


Orders
-

Anonymizing orders
27 Feb 2026
Clearing and anonymizing old customer data is not only good housekeeping - it's also a way to protect both your customers and your business.Why should you anonymize old orders? Clearing and anonymizing old customer data is not only good housekeeping - it's also a way to protect both your customers and your business. Here are three reasons why you should review your settings: Comply with the GDPR: Under the General Data Protection Regulation, you must not keep personal data for longer than necessary. Once a purchase has been completed and the warranty has expired, there is rarely a reason to keep the customer's name and address in the system. Increased security: If your store were to suffer a data breach, the damage is significantly less if you don't have years of old customer data stored. Better performance: a cleaner database will make your system work more efficiently. How long does the data need to be kept? This is where it becomes a bit of a balancing act. While the GDPR wants you to delete data, the Swedish Bookkeeping Act requires you to save records of your sales. According to the Swedish Tax Agency's rules, accounting information (which includes order confirmations and invoices) must be saved for 7 years after the calendar year in which the financial year ended. Here's how the setting works in Abicart: In your store, you can choose to automatically anonymize order information after a certain number of years. Our advice: Set anonymization to 7 years. Then you keep the financial statistics and records required by the Swedish Tax Agency, but you remove the customer's personal data (name, address, email) so that you comply with the GDPR at the same time. Default choice "Never": If you keep this setting, all personal data will be stored forever, which may violate GDPR privacy rules. What happens when anonymizing? When an order is anonymized, the link to the specific person disappears. You can still see what was sold and at what price (which is needed for your accounting and statistics), but you can no longer see who bought the item. Activate anonymization Go to Orders -> Settings. By default, "Never" is selected. Choose between 1-10 years, we recommend 7 years according to the Swedish Tax Agency's rules and save. The system automatically anonymizes old orders every night based on your settings.
-
Personalized gift card
27 Nov 2025
You now have the possibility to create your own gift card! Go to Assortment -> Settings Scroll down the page until you see, Gift Card Settings Click on: Custom PDF Select your pre-designed gift card template from the file archiveIf you haven't uploaded the file yet, you do that now:Create a folder >> name it (e.g. Custom gift certificate) >> Upload the pdf-file >> double click it to select Choose light or dark text Save! Your gift card template must have the following settings: File information File width 1134px Height 506px DPI 144 File format pdf The positions of the text fields are locked to the same positions as on our Dark and Light gift cards. See example here Do you want personalized help? If you prefer not to do this yourself, our customer service team can design a personalized gift card for you. Please contact us for a price quote and we will make it happen.
-

Edit orders
27 Nov 2025
This feature allows you to edit customer information and/or products on an order.Order editing is included in the Abicart Plus and Pro subscriptions.What is order editing?This is a function used to change an order placed if, for example, you receive a return or if a customer wants to remove or add a product.What can I edit?You can add and remove products, edit customer information, adjust VAT settings, change the shipping fee and change the delivery method. Partners and commission settings cannot be changed.If you use Klarna Checkout Global (also called Klarna Checkout v3), you can only change customer information in Klarna Online. The customer information field is therefore locked on all these orders.Things to keep in mindIf an order is paid with your own payment methods such as "own invoice", prepayment, cash on delivery or similar, you can add and remove products on the order without any problems. If an order is paid via a third party, such as Klarna, Svea, Payson, Nets or similar, you can only edit the order so that the order value is reduced compared to the original purchase amount. The reason for this is that in most cases a credit check is made on the buyer and then only applies to the original purchase amount.In some cases, you can add products to the order so that the order value increases, but only in the payment company's administration. We are not allowed to make these changes from our platform. Email address and shipping address cannot be changed if the customer used Klarna Checkout. This is because Klarna retrieves the delivery address from the population register.How do I edit an order?Go to Orders -> Click on the order number.In each box, "Information about ordered products", "Order", "Customer details", "Store notes" and "Delivery" there is an icon, a pencil in the right corner. Click on it to edit the content of each box.How do I cancel an order?Click on the "Cancel" button in the top right corner. If the payment method allows it, a signal will be sent to the payment method to cancel the order. In some cases, the signal is not allowed and then you need to log in to the payment method's admin >> search for the order >> cancel manually. A prompt for this will come up in admin if the signal does not go over, feel free to check the order in both systems regardless of the first few times so that you feel comfortable with the flow.Below are some editing examplesChange the shipping feeFirst, click on the edit icon in the top right corner of the "Information about ordered products" box.Then two new icons will appear to the right of the shipping fee. Click on the pencil to edit the fee and on the trash can to remove the fee completely.Change the stock countIf you change the "Quantity" or "Price/item" the amount is automatically recalculated. The original amount will always be displayed below:You can also add products, shipping fee and payment fee via the sub-products buttons on the order.Send a new order confirmationAfter editing the order, you can resend the order confirmation to the customer. Click on the "Resend order confirmation by email" link at the bottom of the order:Order editing and KlarnaOrder editing is included in the Abicart Plus and Pro subscriptionsIf you edit the order before you have activated the order (marked it as paid), you can send the changes to Klarna via the "Send changes to Klarna" button. If you edit the order after the order has been activated, or if the "Send changes to Klarna" button is not available, you cannot send the changes to Klarna. You will need to log in to the Kustom portal and edit the order there manually. If the order was activated with the original amount, you need to make a manual refund of the difference. You do this in Kustom's merchant portal.NOTE! In some cases, we (Abicart) are not allowed to change the order in Klarna via our integration. If the button "Send the changes to Klarna" is not available, it means that we are not allowed to change the order via the integration. This means that you have to change the order in Klarna Online, as if the order was activated.Reduce order total:If the order is not yet 14 days old, you can edit the order and reduce the order total in Abicart before marking the order as paid. When you mark the order, the new order total is sent to Klarna.If the order is older than 14 days, you need to edit the order manually in both Klarna and Abicart. After that, you can contact customer service to get help marking the order as paid in Abicart.Increase order total:The order must be edited both in Abicart and in Klarna manually, regardless of whether 14 days have passed or not. Increased order total will not be sent via the integration according to Klarna's rules.When both systems have the correct order total, you can mark the order as paid in Abicart.Order editing and SpecterStock balance is automatically changed in Abicart when you edit an order. If you use an ERP system such as Specter, the stock balance will not be synced over there. You need to change this manually in Specter.ReturnsIf the entire order is to be returned, cancel the order. The stock balance will be settled automatically. Check with your payment method if the order amount is refunded automatically or if you need to refund manually.Partial returnEdit the order according to the previous instructions. When you remove a product from the order, its stock balance is automatically adjusted. Resend the order confirmation and review the partial refund with your payment method.How do I delete an order?An order delivered to the end customer should never be deleted. If you try to delete an order, it will be canceled, restoring the stock balance and sending an email to the customer.Instead, go to Orders >> Settings and set "Anonymize orders" >> Save
-

Product monitoring
27 Nov 2025
Did your customers miss the chance to buy a popular product because it was temporarily out of stock? This feature will keep your customers updated and make sure they don't miss out when their favorite products are available again. Read on to easily activate Product Watch and make your customers happy!Product monitoring is included at no extra cost in Abicart Pro.Product monitoring is a feature that allows your customers to monitor products that are temporarily out of stock. When the product is available again, the customer receives a reminder by email. How to activate product monitoring in your webshop:Go to Assortment >> Settings >> Product monitoring >> Check the box >> Save (See image below).Go in Appearance >> Themes >> Edit the theme >> Product page >> "Product monitoring" >> Click Activate >> SaveEdit the product >> Go to Inventory Management >> Check the box "Allow your visitors to monitor out-of-stock products" >> Click Save in the top right corner.*Can also be activated via product import.Now that the feature is enabled, the buy button will be replaced with a "Watch" button when a product is out of stock. The customer can easily monitor the product by entering their email address. When the product is back in stock, an automatic email will be sent to everyone who has watched the product.Please note that products with the settings "Allow orders even if out of stock" or "Hide product if out of stock" cannot be monitored. Also, only the main product can be monitored, not individual customer choices such as sizes or colors.To keep track of all watches, you can go to Orders >> Product watches in Abicart admin.Product Watch is included in Abicart Plus and Pro plans, so if you're not already using this customer-friendly feature, it's time to give it a try! With Product Monitoring, you can ensure that your customers are always informed about their favorite products and that they return to shop in your webshop.
-

Creating a partial delivery
27 Nov 2025
Information on how to send orders What is partial delivery? If an order contains several products and not all of them are in stock, you can choose to split an order. In this case, you send a few products at a time in different shipments, instead of sending the whole order in one shipment.If an order contains several products and not all of them are in stock, you can split an order and send a few products at a time in different shipments.If you use the integration to nShift (Unifaun) or Postnord (Pacsoft), you have to change a setting on the delivery methods so that the shipments are exported correctly. Read more about this under "Event settings" on the respective integration's manual page.How do I make a partial shipment?Go to "Orders" and click on an order that contains several different products. On the right is the "Delivery" box and there you will also see "Create partial delivery". Click on the button and a popup box will open listing all the products on the order. In this example, the third product is not in stock at the moment so we can only deliver the top two products. We click on "Add all" or we enter a one in the quantity field.Then click on "Create". A shipment has now been created for the first two products and clicking on the arrow to the right of "Created" will drop down more information. We can then add a tracking code, mark the order as shipped or edit the shipment. The shipment can be edited until it is marked as shipped. After that it cannot be changed. Mark the shipment as shipped when it is processed. Since there is still a product that is not handled, the text "Order has unhandled products." below. When the product is back in stock, it is handled by creating the second shipment. Since there is only one product left, we click on "Create shipment".When it is created, we can also mark the shipment as shipped and it will look like this:If you want to create a pick list and/or packing slip, you can do this per shipment by clicking on the arrow to the right of the shipment so that more information falls out. Then click on the "Print..." button. and make your choice. Tip: Create an order status for orders with pending partial deliveries to make it clear which orders are still pending. You can read more about order status here.
-

Orders
27 Nov 2025
In Orders you will find all the orders placed in the shop. You can sort, manage, shred and export the orders.Customize the order listChoose that columns to display by clicking on "Columns":Search for ordersTo search for orders between certain dates, placed with a certain payment method, or for a specific order number, use the "Add search parameter" function. The filtering is then saved so that it is available the next time you visit the order page.Search by "Country"A search by "Country" will return hits both on the orderer's selected delivery country (where delivery is to be made) and on the payer's own country (the payer's country). A search on "Norway" will therefore show both orders delivered to Norway and orders from Norway that choose to deliver to another country, such as Sweden.Exporting ordersIf you want to export all orders, there is a function that creates a CSV or SKV file that you can edit on your computer and then import back or to another system.The type of file created is determined by the store's export settings, which can be adjusted under Settings -> General -> Export settings.If you want only a selection of all orders, you can enter values in the search function on the page and then click on "Export orders", e.g. if you only want to export orders between two specific dates.The name of countries exported is always in English, e.g. "Brazil". Any states or provinces are in the main language of the country, e.g. "Espírito Santo" (here: Portuguese).If you are exporting a CSV file, the decimal separator is a dot (e.g. 13.20 kr) and if you are exporting an SKV file, the decimal separator is a comma (e.g. 13.20 kr).Use function on selected ordersIf you want to create address labels or delivery notes, you can do it here. Select the current orders by ticking the box to the left of each order and then select the function.Detailed order informationTo see all the information about an order, you can click on the order number. This will take you to the order page itself, where you can see which products have been purchased, customer information and the delivery and payment methods used, and possibly information on the export status to external systems (transport and financial systems).On some of the blocks you can view more information by clicking on the arrow in the upper right corner. For example, if you want to mark an order as paid but not shipped, click on the arrow on the "Execute Action" block. Then make sure that only the action(s) you want to perform are selected before clicking the button.Activate/debit reserved ordersWhen a purchase is completed, the order is reserved in most cases. You then need to activate/debit the order when it is shipped in order for the money to be paid out. To activate/debit an order, go to Orders -> click on the order number -> in the "Perform actions" box, make sure the "Debit ([payment method name])" checkbox is selected and then click on the "Perform selected actions" button. The transaction will then be activated by the payment service and the money will be deducted from the buyer's card and/or an invoice will be sent out depending on the payment method chosen.You can also activate the order in the order list, by clicking on the icon with a lightning bolt at the far right.
-

Order confirmations via Facebook Messenger
27 Nov 2025
With this feature, you can send order confirmations directly to the customer via Facebook Messenger. What are order confirmations via Facebook Messenger? This feature allows the buyer to have their order confirmation sent directly to Facebook Messenger. The normal order confirmation is sent out as usual via email. One of the advantages is that if the buyer has questions about the order, they can answer directly in the order confirmation on Messenger and then a message will be sent directly to your Facebook page. As a store owner, you can see the entire order directly with items, order number, name, etc. and then the buyer's message appears directly under the order information. This makes it easier to communicate directly with customers about specific orders.This feature is included in the Abicart Plus and Pro subscriptions at no extra cost.What is required to use Facebook Messenger?You must have a page for your store on Facebook (a regular personal account is not sufficient).The store must use one of our responsive themes. The store must have an active SSL certificate.What does the checkout look like for the buyer?In the checkout, a new block appears that looks like this:What does the order confirmation look like in Messenger for the buyer?Once the order has been placed, a message is sent with a summary of the order that looks like this:The customer can also click on the order confirmation to view a more detailed order confirmation which looks like this:Activate order confirmations for Facebook MessengerGo to Settings -> External Connections -> Facebook Messenger.Check "Active" and then click "Continue with Facebook" and log in with your usual personal account. Keep in mind that this personal account must be the administrator of your Facebook page. Once you have logged in, the list at "Page" will be updated with a list of all Facebook pages for which you are an administrator. Select your store's Facebook page and save. Now you need to "whitelist" the store's domain in Facebook so log in and go to your Facebook page. Click on "Settings" at the top of the page.Click on "Messenger Platform" on the left. Add your store's domain to the "Whitelisted Domains" boxHere's a more detailed guide in Facebook for developers.
-

Abandoned carts
27 Nov 2025
Manage customers who have not completed purchases at checkout. What is an abandoned basket? An abandoned basket is an order that has been initiated by the customer adding products to the basket and then proceeding to checkout, but not completing the order. In order for an order to count as an abandoned cart, the customer must have entered their email address at checkout and the order must have been untouched for at least 15 minutes. How does it work? Under Orders -> Abandoned carts, a list of abandoned carts is displayed. Currently, you can filter in four different ways: day current week current month last month Currently, you can only see this information, and you cannot contact the buyer directly through this interface. If you want to contact the customer, you will have to copy the email address and then use your usual email client to do so. What information can you see? You can see the customer's email, the products they had in the shopping cart and the date the products were added to the shopping cart. Please note that these orders may no longer be available for purchase as shown in the list, there is no guarantee that the cart contents are still available.
-

How do I activate an order?
27 Nov 2025
Debit your orders so you get your money from third parties. Under "Orders" all orders placed in the shop are listed. For most payment methods, the payment is reserved on the order first and when it is delivered to the buyer, it must be activated. For example, if an order is placed with Klarna, there is a reservation with Klarna that must be activated before the buyer's card is charged or the invoice is sent out. Only when this is done will the order be activated at Klarna and your money will be paid out. This can be done in two ways. Activate an order in the order listUnder "Orders" in the left menu in admin, all orders are listed and you can activate a reserved order in the list on the far right by clicking on the icon that is a "lightning bolt". When you click on the lightning bolt, a popup box opens with the title "Perform Action". There are normally two options, "Mark as paid (name of payment method)" and "Create new shipment and mark as sent" and a button "Perform action". Both options are ticked by default and the most common way is to just click on the "Perform wade action" button. This activates the order with the third party (in this example Klarna) and also marks it as sent. If for some reason you only want to mark the order as paid or shipped, you only tick the option you want to do and then click the "Perform wade actions" button. Activate an order inside the order pageYou can also click on the order from the order list by clicking on the order number. This will take you to the order page where you can see all the items on the order, customer information, payment and delivery information.To the right below the items is a block called "Perform Action". Here there are normally two choices, "Mark as paid (name of payment method)" and "Create new shipment and mark it as shipped" and a button "Execute all actions". Both options are ticked by default and the most common way is to just click on the "Perform wade action" button. This activates the order with the third party (in this example Klarna) and also marks it as sent. If for some reason you only want to mark the order as paid or shipped, you only tick the option you want to do and then click the "Execute wade action" button.
-
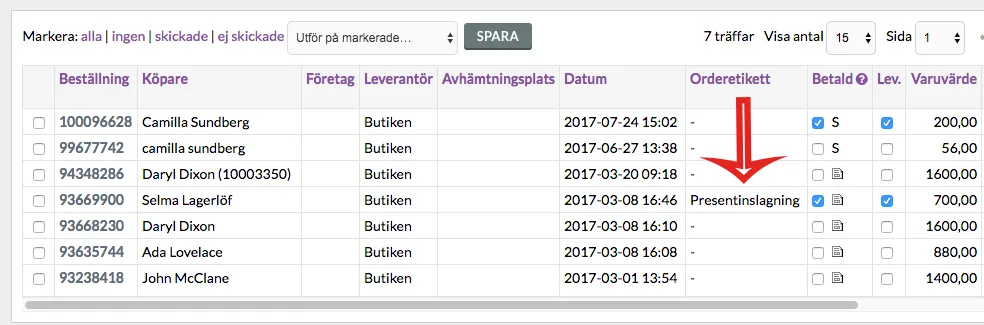
Order labels
27 Nov 2025
You can tag your orders with different labels, which can be used to filter searches.What is an order label?Order labels make it easier to sort your orders.You might want to see which orders include gift wrapping. Then you can create an order label called "gift wrapping". Then you can select certain orders to have that label.You could say that you tag your orders using order labels to get a better overview in the admin:Order labels are included in the Abicart Plus and Pro subscriptions.Create an order labelGo to Orders -> Order labelsAt the top you will see "Create new order label" and a field for "Name". Enter the name of the order label you want to create and click the save button. All the order labels you have created are displayed in a list.Tagging orders with labelsOnce you have created a label, it will appear in a new column in the order list.Click on an order. At the bottom right, you will see a block called "Order label". Here you select the order label that you want to tag this particular order with:Save at the top right.Filter orders by labelGo to Orders. In the "Add search parameter" list, select "Order label". A filter will now appear with a list containing all the order labels that have been created.Select a label and then click on the search button.This will display all orders that have the selected label.
-

How do gift cards work?
27 Nov 2025
Create a gift card product, generate a gift card code, activate gift cards. Gift cards are included in the PLUS and PRO subscriptions. How do gift cards work? You can sell gift vouchers in your shop or generate a gift voucher code that you issue yourself. When the customer uses a gift card, the amount is deducted directly from the total amount at the checkout. This means that the gift card can be used to pay for all or part of your purchase, as long as the gift card lasts. If the gift voucher does not cover the entire order total, the remainder will be paid using any available retail method at checkout. What is the difference between a discount code and a gift card?Both codes are entered in the same field. The gift card is deducted from the total amount at checkout, while a discount is deducted from the products in the shopping cart. The appearance of the gift voucher PDF sent out by email is edited in admin. If you want to give the customer a gift card with your own design, you can make a gift card in, for example, Photoshop >> paste the code >> save as PDF >> email to the buyer manually (or print and deliver physically). There are different ways to create gift cards: 1. Gift card product Create gift card products via admin and let your customers buy gift cards in your webshop. When the order with the gift card is marked as paid in admin, an automatic email is sent to the buyer or recipient. Then they receive the gift card as a PDF. *Only this option sends a gift card PDF to customers automatically. The other options below generate a code you issue yourself. 2. Create gift card yourself via admin (Gift card code) When you create a gift card via admin, you will receive a code to hand out. There is no gift card PDF sent via email, but you can of course paste the code into a self-designed gift card and give to the customer.Orders >> Gift cards >> Create gift card 3. Generate gift cards in bulk - two ways If you need to create many gift cards, you can generate gift cards. This is convenient if you, for example, sell a large number of gift cards to companies via your own invoice. You have two options, see a) and b) below.Note! No gift card PDF is sent for generated gift cards. a) Generate gift cards Contact Abicart support and ask for help to generate gift cards. Please provide the following information:- Currency- Total amount- Number of gift cards- Validity - e.g. 2026-12-31 (if no selection is made, the gift cards will be valid for 1 year) b) Generate gift cards according to file Create a file and send it to support with your request. See example file under "Attached file" at the bottom of the page. Mandatory fields in the file:- Currency- Total (amount)- Validity period (expiredate)- Sender's email (from_email) (can be store's or buyer's) *Note that the file contains information such as email address, sender, recipient, etc. This is to give you a good overview when the gift card is listed in admin. No gift card PDFs are sent to buyers/recipients. Once the codes are generated, you can clean up the file and send it to the customer. E.g. so that the file only contains currency, amount, validity time and the code itself. The customer can specify a column for recipients and fill in who gets which code if desired. Only you and your webshop administrators can see the "Original value" and "Current value" of the gift cards. See Orders >> Gift cards. *If you enter a code in column H, each code must be unique (see example file at the bottom of the page). Contact Abicart support for help generating gift cards in bulk. Activate gift cards in the store In order to use gift cards in the store, you must first add a payment method and then activate in the theme. Step 1) Add the payment method for gift cards Go to Settings -> Payment methods -> Add new payment method. In the list, select "Gift Cards" -> click on "Add" -> then click on the save button. Step 2) Activate the gift card field in the theme Go to Appearance -> Themes -> select theme, edit -> Content -> Checkout. In the "Discount Codes & Gift Cards" block, select "Enabled" and save. Now the input field will appear at checkout: Step 3) Allow gift card for active payment method in the store For most payment methods, you need to enable them to be combined with gift cards at checkout. The setting for this can be found under Settings -> Payment methods -> Click on the active payment method the store has. Check the setting for "Allow gift cards" -> Save. The payment methods that require you to make this setting are: Klarna Checkout Svea Checkout Payson Checkout Swedbank Pay Step 4) Choose the appearance of the gift card Go to Assortment -> Settings -> Gift Card Settings -> Select Gift Card Template -> Save. There are three colors to choose from: What is a gift card product? A gift card product is a product to sell gift cards. The store can create different gift card items with different amounts, e.g. $100, $500, $1000, etc. and then customers can buy the gift cards to e.g. give away to a friend or similar. A common question is whether it is possible to create a gift card product without an amount, where the idea is that the buyer sets their own amount. Unfortunately, this is not possible; gift card items can only be created with fixed amounts. Step 5) Create a gift card product Go to Assortment -> Products -> New Product -> New Gift Card You can basically do all the same settings as for a regular product, such as entering a description, linking to product groups, etc. We will only go through the most important properties here such as validity period, name and price. Validity period Enter a validity period for how long the gift card should be active. In Sweden, the most common validity period is set to 10 years, but the store owner can choose this themselves. Name of the gift card Enter a name for the gift card product, for example "Gift card 500 SEK". Pricing Enter a price for the product, for example 500 SEK. What is a gift card code? If you as a store owner want to give away a gift card, for example to a winner of a competition or perhaps as compensation, you can generate a code directly in admin that you then give to the customer. Note: No code is automatically sent to the customer when you create a gift card code in admin. You must ensure that the customer receives the code yourself, for example via email or SMS. Create a gift card code Go to Orders -> Gift card -> New gift card Gift card code The easiest way to create a code is to click on the "Generate code" button. This will create a random 13-digit number. You can also enter your own code if you wish. Note: Gift card codes must be unique. You cannot create multiple gift cards with the same code. If someone has used a gift card with the code "gift-100", for example, that code is used up. You cannot create a new gift card with the same code again. Name of the recipient Optional field where you can enter the name of the recipient of the gift card. Recipient's email address Optional field where you can enter the e-mail address of the gift card recipient. Sender's name Optional field where you can enter the name of the sender of the gift voucher. Sender's e-mail address Optional field to enter the e-mail address of the sender of the gift voucher. Original value Enter the value of the gift card, for example 500 SEK. Current value A gift voucher can be used several times until the full amount is used. This field shows how much money is left on used gift cards. In our example, we create a new gift card and then we enter the same value as we entered in "Original value", ie 500 SEK. Currency If the store has several currencies activated, a list of these currencies is displayed here. You then choose which currency the gift card should be created with. In our example, we choose SEK. Valid until ... Here you choose how long the gift card should be valid. For example, one month, one year or 10 years. In our example, we choose one year. Important info when it comes to buying gift card items If a customer has purchased a gift card product, the code will be sent out only after you have activated/debited the order. Go to Orders and click on the order. In the "Perform action" box, make sure to check the "Mark as paid" box and then click on the green "Perform selected actions" button. The order will then be marked as paid and the gift card will be activated; email with PDF will be sent to the customer. The gift card code is displayed on the gift card product at the top of the order. Example gift card PDF: https://cdn.abicart.com/shop/ws3/156403/art53/223086653-c55388-191451983-ef9438-bulk_gc_exempel.csv