


Delivery
-
Integrating ShipNordic with your Abicart Store
14 Jan 2026
ShipNordic provides automated solutions for shipping and order management, specifically designed to simplify logistics for small to medium-sized e-commerce businesses. By integrating ShipNordic with Abicart, you can automate your shipping workflows, offer flexible delivery options, and manage returns efficiently.Key Features of the Integration Automated Shipping: Streamline your order fulfillment process. Customer Choice: Let your customers choose their preferred delivery points. Easy Returns: Simplify the return process with QR codes and clear overviews in your admin panel. EU-Based: All data is hosted on servers within the EU for maximum data protection (GDPR compliance). Video Tutorial: How to Set Up ShipNordic in Abicart The easiest way to get started is to follow our video guide. This video walks you through the step-by-step process of connecting your Abicart store to the ShipNordic platform. https://www.youtube.com/watch?v=p_oLuD9DHRw Step-by-Step Instructions If you prefer written instructions or need to troubleshoot specific settings during the connection process, please refer to ShipNordic’s official documentation: How to connect your Abicart store to ShipNordic Summary of the Setup Process Log in to your Abicart admin panel. Follow the steps shown in the video above to generate the necessary API credentials/connection. Configure your shipping methods within ShipNordic to match your Abicart settings. Test the integration by processing a sample order to ensure labels and tracking are generated correctly. For further assistance regarding your ShipNordic account or specific shipping rates, please contact ShipNordic support directly.
-
Print settings Abicart ZPL Print App - Postnord integration
27 Nov 2025
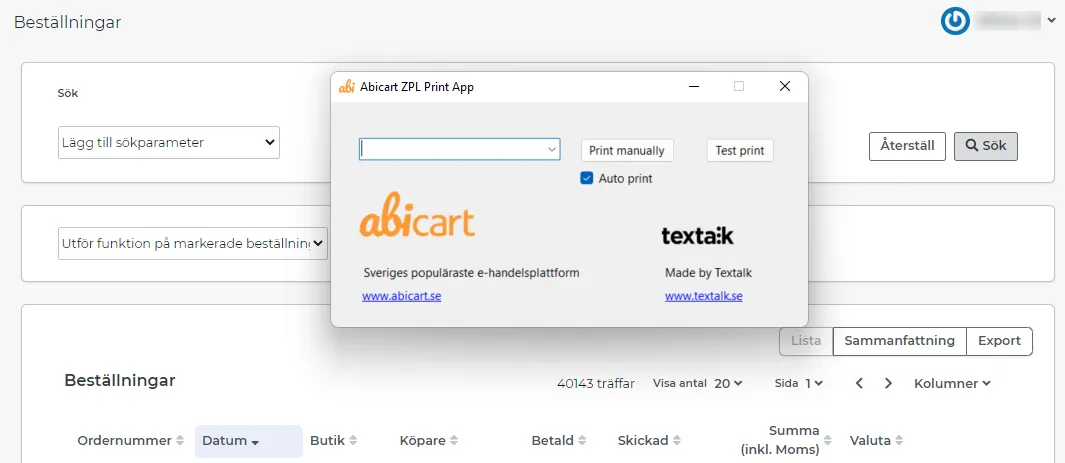
How to set up print settings for the Abicart ZPL Print App - Postnord integration. Once you have installed Abicart ZPL PrintApp for Windows, you will need to make some settings on your computer for the print window to open automatically when you select "perform function on selected orders" in Abicart admin. Tip: In some cases, printing may not start correctly if you already have a pop-up window open in your browser. Please close any pop-ups before sending your EDI shipment. We are aware of the problem and will fix it in the next version of the software.Here's what you do:0) Install Abicart ZPL PrintApp for Windows and export an order to Postnord1) Orders >> Orders >> Produce an order exported to Postnord2) Select the order >> Execute function on selected >> EDI labels. The file will be downloaded.3) Open the file explorer4) Select the file (1)5) Select Open with (2)6) Select choose another app (3)7) Select Abicart ZPL Print App + tick the box + OK8) Repeat: Select order >> Perform function on selected >> EDI labelsNow the window below will open (see picture).Click on (7) and select (8)9) Repeat for the third time: select the order >> Perform function on selected >> EDI labels 10) Then select the printer for printing and save.Link to manual: Postnord Send Direct - Postnord TA
-

Postnord Skicka Direkt - Postnord TA
27 Nov 2025
Postnord Send Direct is available as an integration under Settings >> External connections >> Postnord TA.Integration to Postnord TA is included in Abicart Pro at no extra cost.Checklist before starting the integration:You need to enter the weight of all products in Abicart. We cannot export products without weight.Store information:Enter the address and company information under Settings >> Store information.Reason: We cannot download Postnord's templates, instead we have to create our own templates using the information on this page. The reason is that it is not possible to download Postnord's templates via their API as they belong to the Send Direct portal and cannot be accessed externally.Information required to set up the integration:Account number:Create an account at https://www.postnord.se/ and copy your account number (customer number).API keys:With the customer number, create an account at https://developer.postnord.com/. Once you are logged into the Postnord developer account, go to My Profile >> Apps and copy the API keys.API keyEORI numberThis is mandatory if you plan to use customs declaration declarations.Add this information to the Postnord Integration settings page.Combination to use for different conditions:Once you have entered all the information, you can control the shipping settings under Settings >> Shipping >> select delivery method >> Edit >> Export complete order: (Placed / Paid / Manual)Export shipments individually: (manual, this does not include marking the order as "shipped")Export shipments/orders after the order is marked as "shipped".Mark the exported order as shipped:Manual activation during the order page: (Note: this only works before the shipment is marked as "shipped")Print Zebra labels from your browserProgram to print (zebra) .zpl labels from your browser on a Windows computer. Can be used with Abicart integration to Postnord TA included in Abicart PRO at no extra cost.Abicart ZPL PrintApp for WindowsBenefits:Postnord supports export of multiple shipments. You can set up the integration to export multiple shipments from the same order to Postnord automatically or manually.If the "Customs declaration" section of our Postnord settings is set to CN22 or CN23, we will export customs data to Postnord. We will export the information Postnord needs to process the customs declaration. Regardless of location.In multi-store systems, the specific information from each sub-store is used as labels on the orders in Postnord.Things to remember:You cannot use the integration against nShift or Postnord at the same time. If you want to use both, you can enable manual activation under Settings >> Shipping >> Edit shipping methods >> Postnord settings.We do not interact with shipping fees at all. Postnord's estimate is not something we can influence.If you have marked the order as "shipped", the only way to export the order is to use combination 3.Once an order has been exported, it cannot be removed from Postnord, nor can it be edited.Do not use both "Export shipment" and "Export order" unless you use "Manual activation". .
-

Bulky products
27 Nov 2025
Tag products as bulky to direct them towards a specific delivery method. What is a bulky product? In Abicart, we have two ways of determining the shipping fee and it is either a flat fee on the whole order or a weight-based fee. However, if you are sending orders that may not weigh much but have a large volume, it can be difficult to set the correct charge via weight ranges. You can then tag a product as bulky to lock it to a specific delivery method. How does it work?Many shops that sell online and have a physical store usually create a delivery method called "Pick up in store" and set it to handle bulky products. Then customers will only be able to choose to pick up the order on site.Enable bulky on the productsGo to Products -> select a product and edit.Scroll down to the "Shipping" box in the right-hand column on the desktop. Check the box "Bulky" and don't forget to save.Enable bulky products on delivery methodsGo to Settings -> Shipping -> select delivery method, edit.In the "Settings" box on the right, there is a drop-down list at "Bulky".There are three settings:All - Both bulky and non bulky productsDisable for bulky productsEnable if cart has bulky productThe default setting is "All" and should be used if you have only one delivery method for all products.For example, if you have two delivery methods, "Standard delivery" and "Pickup at store" and want bulky products to be handled only by "Pickup at store", you should set the following:Standarddelivery: "Disable for bulky products."Pickup at store: "All - Both bulky and non-bulky products"In practice, it will work so that if you have a bulky product in the shopping cart, only "Pickup at store" will be visible in checkout. If you do not have a bulky product in the cart, both delivery methods will be visible.
-

Postcode controlled tariffs
27 Nov 2025
Restrict your delivery to certain postcodesWhat are postcode-controlled tariffs?If you don't want to deliver within an entire country, you can restrict the delivery method so that it only works for one or more different postcodes. For example, if you have a bakery and only want to deliver within Mölndal. Then you can specify to deliver only to postcodes starting with 431.How to do this?Go to Settings -> Shipping and choose a delivery method. Click on the delivery method and then on the tab "Link tariff to the delivery country". In this example, we want to add specific postcodes within Sweden, so we click on the block "Countries within the EU". In front of Sweden, a link, "Add", appears.A new window will open.In the box, you can enter text strings to control which postal codes the delivery method can deliver to.1234? - will match all that start with 1234 and have exactly one optional character after it.123* - will match all that start with 123 and have one or more optional characters after it1234[456] - will match all that start with 1234 and end with 4, 5 or 6In our example, we only want to deliver to Mölndal and enter 431*Then click "Done".The add link has then changed to "Edit".Then click the save button in the top right corner. Done.