


Payments
-

Qliro Checkout
23 Jan 2026
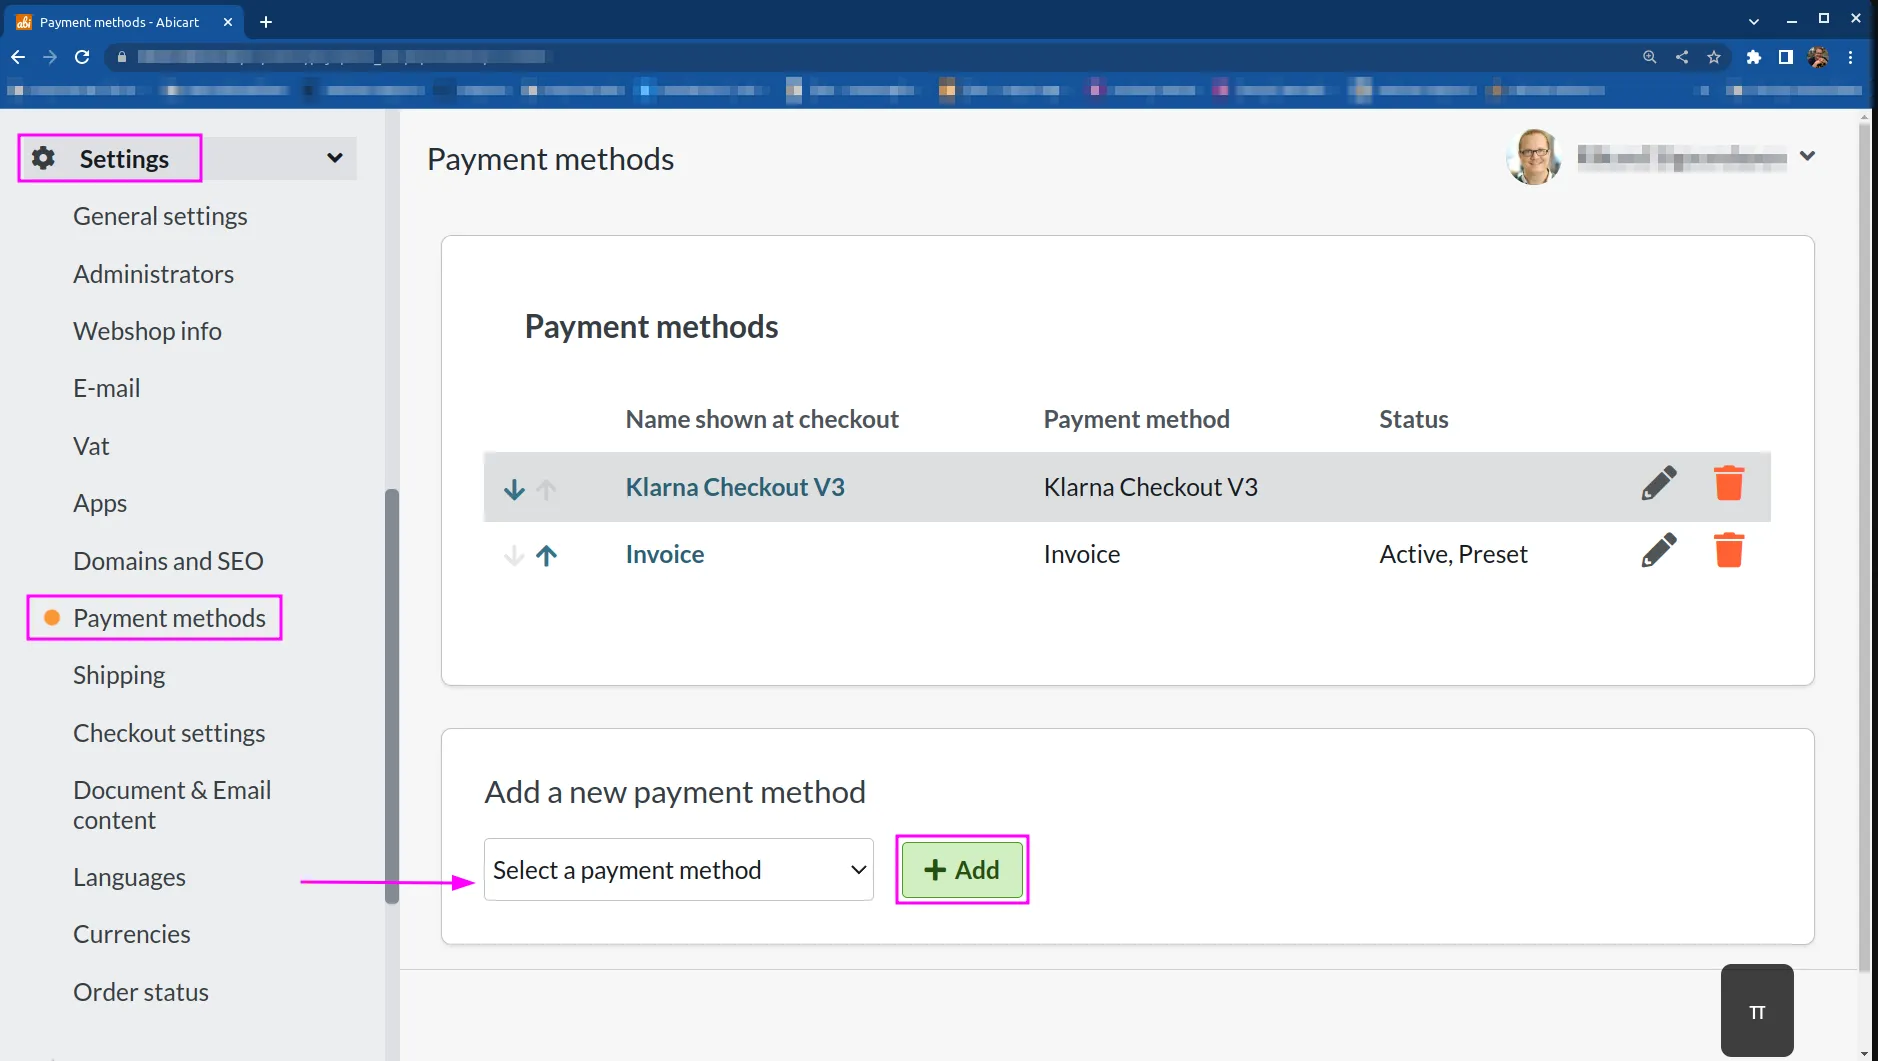
What is Qliro?In today's e-commerce, payment is a crucial part of the customer experience - and a key driver of growth. Qliro is one of the leading companies for modern commerce and helps e-retailers increase sales, loyalty and profitability through a checkout built for results. With modular technology, data-driven insights and a focus on conversion, Qliro creates a smooth and secure payment experience for the end customer.How do I get started with Qliro Checkout? Contact Qliro on their website and get a demo. Add Qliro Checkout to your store Go to Settings -> Payment methods -> Add new payment method. Select "Qliro Checkout" in the list and then click "Add". You will then be taken to the settings page. Status ActiveCheck to activate and make the payment method visible in the store.DefaultA setting to make the payment method default at checkout.Make available only to those customers or customer groups where I specify it.If you do not want all customers to be able to use this payment method, you can deactivate it for non-logged-in customers through this setting. You then go to the respective customer group to activate the payment method there. Available for customer typeYou can set the payment method to be available only for one customer type or all. Require buyer to enter personal/organization numberCheck to make the personal/organization number mandatory at checkout.Send confirmation of payment status to the store ownerA setting to enable a separate payment status email for this payment method to be sent to the store owner.Turn off the purchase of gift card products with this payment methodEnable a setting to disable the gift card product type from being purchased with this payment method. Qliro settings The next block contains fields for Qliro data provided by Qliro Merchant API Key - Data you receive from Qliro Merchant API Secret - Data you receive from Qliro. Activate test mode - Activate for test mode Privacy Policy Page - Select the page that contains your privacy policy. This is a requirement from Qliro. Name and Description Name of payment methodEach payment method has a name that will be displayed in the checkout, but if you want to modify this, you can enter a new name in this field. An optional field that can be left blank. Detailed descriptionA field to enter a text that informs the buyer about how the payment method works. Can be left blank. Currencies If you have several active currencies in the store, you can limit these for each payment method. The default setting is "All the store's activated currencies", but if you check "Specific currencies", all active currencies are displayed and you can choose to disable those that should not apply to this payment method. Countries The default setting of the payment method is that it applies to all countries to which the store offers delivery (Settings -> Shipping). If you want to restrict a payment method to only certain countries, you can check "Specific countries" and then specify the countries that can use this payment method. Order status If you want orders placed via this payment method to have a specific order status, you can set it here. Select the status from the list. Limitation with regard to order total A setting to limit the amount that a payment method can process. If you choose to limit the amount between two intervals, it is always the total order value including shipping and other fees. Fee to be added at checkout when ordering A function to add an extra fee to the purchase, such as a handling fee.
-
Payment methods
27 Nov 2025
Abicart supports most of the established payment solutions on the market.How to add a payment method:Here are articles on how to add and set up the payment solutions available in Abicart.Read more
-
Pre-payment
27 Nov 2025
Add a pre-payment method to the checkoutWhat is prepayment?It's a payment method you can add to your checkout. Customers place an order and then send the payment via bank transfer or bank account. Once you have received the money, you send the order to the buyer. You handle this payment method entirely on your own. You must check that the payment has been received before sending the order to the buyer.Add prepayment in the shopUnder Settings -> Payment methods -> Add new payment method -> select "Prepayment" and click on "Add". Tick "Akiv" on the payment method. In the "Detailed description" field, specify how customers will pay. For example, enter bankgiro, bank account or similar. Then click on "Add".
-

Swish Commerce
27 Nov 2025
Pay via Swish in the shop. What is Swish? Swish is a mobile money transfer application, launched by Getswish AB, owned by Sweden's six largest banks: Danske Bank in Sweden, Handelsbanken, Länsförsäkringar Bank, Nordea, SEB and Swedbank and Sparbankernas Riksförbund. The application enables fast payments between individuals' bank accounts by entering the recipient's mobile phone number instead of the account number.What is required to activate Swish?This integration supports "Swish Commerce"If you want to pay with Swish, you need to get "Swish Handel" via your bank. Get an agreement hereOnce the agreement is complete, you will receive a login to"Swish Certificate Management" where you create and manage your certificates.Note that Swish only works in Sweden with the currency SEK.Every 5 years you need to renew your TLS certificate. You do this by generating a new certificate and adding it to Abicart. See guide below.Activate Swish in the storeStep 1: Add Swish as a payment methodGo to Settings -> Payment methods -> Add new payment method -> Select "Swish" in the list and then click "+Add". Then click directly on "+ Add" again so that the payment method is saved.Step 2: Generate the CSRClick on the "How to" link after you have clicked on Swish under Settings>Payment methods.Step 3: Generate the CSRThen click on "Generate CSR"Now a code (a piece of text and numbers) is generated in a box below the button, it should look like the image below.Step 4: Copy the CSRCopy the CSR certificate that you just created. Click in the box with the certificate, all text will then be highlighted. Right-click and select "copy" (or CTRL + C).Step 5: Log in to the Swish portalOnce you have copied the CSR certificate, go to the Swish Certificate Manager:Click on the link marked in the image below or via this link: Swish Certificate Manager.Log in using BankID (Fill in your organization number, social security number and your Swish number to Swish Handel)Step 6: Create certificate in Swish certificate management6 a) Revoke old active certificates before new certificates can be created:6 b) Click "New certificate" 6 c) Click "Skip" in the view below:Note! Do not follow the steps "Create a CSR file". Just click "Skip" and continue to step 6 d)Now you are under the "Generate" step6 d) Paste the CSR certificate you created + copied in Abicart admin in the box below:6 e) Then click "Generate certificate"(If you are going to choose which format of the certificate you want to use, choose the .PEM format. Then click "Generate", you have then generated a TLS certificate that will appear directly on the screen).(Paste the CSR certificate you copied from Abicart. Do not upload a CSR file).6 f) Then click on"Done"Step 7: Download the TLS certificate you just created7 a ) Now you have a valid certificate (see the list of Certificates). Click on the eye (View) to bring up the TLS certificate:7 b) Now a box with text appears. This text is your TLS certificate. Carefully select all the text in the box and copy (CTRL + C). (It is important that everything is included. The certificate is your key for Swish to work)(You can also download the certificate and copy it from the file)Step 8: Add the certificate and Swish number to the payment method.8 a) Go back to Abicart's admin - Settings >> Payment methods >> Swish >> TLS certificate8 b) Paste what you copied in the TLS certificate field (see image below)8 c) Enter Swish number >> SaveStep 9: Testthe payment method in your checkout9 a) Mark the payment method as "Active" and go to checkout9 b) Click View Store and go to your store to make a test purchase:9 c) Test purchase: add a product to the cart >> go to checkout >> select Swish as payment method >> fill in your details >> accept the store's terms of purchase >> fill in your mobile number linked to Swish9 d) When Swish loads as shown below, you have ensured that you have entered everything correctly. You now have a working Swish! (If you want to test the entire order flow, you can of course complete the test order and cancel it when the test is complete)Settings and settingsActive - Check the box to activate the payment method at checkout.When you add the payment method for the first time, check NOT in "Active" directly, but save the payment method first. Then make all the other settings below. When everything is ready, check "Active" and save again.Default payment method for customer - Check if the payment method should be default for all customers in the checkout. Only one payment method can be preselected.Make available only for the customers or customer groups where I specify it- [Webshop Plus only] If you want to limit the payment method for one or more customer groups, check the box. You then select which payment methods can be used for each customer group.Require the buyer to enter the personal/organization number - Check the box if the personal/organization number should be mandatory at checkout.Available for customer type - If you want to limit the payment method to a specific customer type (private individual or company), you can select it here. If "All" is selected, both customer types can use the payment method.Do not allow other delivery address for this payment method - Turn off the possibility for the buyer to choose another delivery address. You can then only have the order sent to the registered address.Send payment status confirmation to the store owner - A setting that allows the store owner to receive an email when orders via this payment method are marked as paid.Turnoff the purchase of gift card items with this payment method - If you do not want to be able to purchase gift card items with this payment method, you can turn off the possibility via this setting.Your accountIn the Account box, enter the details you create in"Swish Certificate Management". You will receive the login from your bank.If the text "You must save the payment method before you can do anything here." appears, you must go back to the previous page and click on the green "+ Add" button at the top right first.Swish number - Enter the mobile phone number to which you have connected "Swish Handel".TLS certificate - Enter the TLS certificate you have generated.TLS certificate password - If your certificate is protected with a password, enter it here, otherwise leave the field blank.Name and descriptionName - There is already a default name for the payment method displayed at checkout, but if you want to enter a different name, you can do so here.Detailed description - Optional to enter a text that provides more information about the payment method.CurrenciesSet the currencies that will apply to the payment method. For Swish only SEK works as currency.Limitation with regard to order total[Abicart Plus only]This feature allows you to choose to display different payment methods at checkout depending on the total value in the cart.There are four different settings to control how the payment methods are displayed:No restriction. This shows the payment method regardless of how much the customer is shopping for.Hide if the order total is zero. Here the payment method disappears if the total amount in the cart is 0.Hide if the order total is greater than zero. The payment method is visible here if the total in the shopping cart is greater than 0.Hide if the order total is outside the specified range:With the last option, you can choose to hide the payment method if, for example, the order total is lower than 500 kr:ShreddingWhen you cancel an order paid with Swish, the full amount will be refunded to the buyer. Unfortunately, it is not possible to partially credit, only the full amount can be credited.
-

Your own invoice
27 Nov 2025
A payment method for own invoicesWhat is the invoice payment method?The invoice payment method is intended for use by shops that create their own invoices in a financial or business system and then send them out to the buyer. Create your invoices manually or in your financial systemPlease note that it is not possible to create invoices in the shop, they must be created manually or in a financial/business system.Enter the payment method in the shopGo to Settings -> Payment methods -> Add a new payment method -> Invoice -> click on "Add". The most important settings to consider are the following:ActiveTo activate the payment method in the checkout, you need to tick this box. NameEnter a name for the payment method, for example, "Invoice 30 days". Detailed descriptionHere you need to explain to the buyer how they will pay. Enter the bankgiro, post office or bank number and inform what rules apply. You send the invoiceRemember that this is a manual invoice that you handle entirely yourself. You create the invoice and send it to the buyer yourself. There will be no invoice created or sent out automatically by Abicart with this payment method.Use an invoicing service instead.One tip is to use one of the various invoicing services we support, such as Klarna Checkout. If you use their services, you as a shop owner will receive your money for the order within a few days and you will avoid problems with any invoices that are not paid. Apply for Klarna or DIBS today. You do this on the right-hand side of the home page in the shop's administration.
-

PayEx card payment
27 Nov 2025
Card payment service via PayEx.How do I get PayEx card payment?Contact PayEx and get an agreement with them on their site, http://www.payex.seActivate PayEx card payment in storeOnce you have an agreement with PayEx, you can add the payment method and activate it in the store. Go to Settings -> Payment methods -> in the "Add new payment method" list, select "PayEx card payment" -> click on the "Add" button. StatusHere you can see the basic settings of the payment method. Active - Check the box to activate the payment method at checkout.Default payment method for customer - Check if the payment method should be defaulted for all customers in the checkout. Only one payment method can be preset.Make available only for those customers or customer groups where I specify it - If you want to restrict the payment method for one or more customer groups, tick the box. You then select the payment methods that can be used for each customer group.Available for customer type - If you want to restrict the payment method to a specific type of customer (private or business), you can select it here. If "All" is selected, both customer types can use the payment method.Require buyer to enter personal/organisation number - A setting that forces the buyer to enter a personal number when making a purchase. This setting should only be activated on payment methods such as own invoice (not third party invoice services) and prepayment. We do not recommend forcing purchasers to enter a personal identity number for card payments.Do not allow alternative delivery address for this payment method - Turn off the possibility for the buyer to choose an alternative delivery address. The order can then only be sent to the address where the customer is registered.AccountMerchant account number - Enter your PayEx account number. This information is provided by PayEx.Encryption key - Enter your encryption key. This information is provided by PayEx.Debit method - This is a setting when the money will be deducted from the buyer's card. If you choose "Direct debit", the money will be deducted immediately when the buyer clicks on "Complete purchase". If you choose "Debit when order has been shipped", the money will first be reserved on the buyer's card. Then, when the order is marked as "shipped", the money will be deducted from the card. PayEx transaction callback - In order for the service to work correctly, you must log into PayEx admin and go to "Transaction callback". There you enter the following address: https://shop.textalk.se/backend/payex_ipn.phpNote that you will also need to enter the store's IP address in PayEx admin.The IP address is: 192.121.104.141
-

Lock payment method to currency and country of delivery
27 Nov 2025
In this manual, we'll walk you through how to lock a payment method to currency and country of delivery. This allows you to control which payment method is available to customers from other countries.In the following example, we will add that customers from abroad cannot shop in SEK when they choose Klarna V3 at checkout.Here's what you do:1) Click on Settings2) Click on Payment methods3) Klicka Välj betalningsmetod välj betalningsmetoden i listan - här väljer vi Klarna Checkout V3.4) Click Save5) Go through the payment method settings and fill in the API keys you received from the payment method. Link to manual: 9 easy steps to get your store up and running! >> Add payment methods6) Save7) Select the currency for which the payment method should be available, in this case SEK8) Select the country for which the payment method should be available, in this case Sweden9) Save again10) Repeat steps 3) to 9) and create a delivery method for each currency/country restriction you want in the store.You use the same API keys for each payment method you recreate. The example shows 5 pcs of Klarna Checkout V3 with exactly the same keys. Only the currency/country separates them. If you have different payment methods against different countries, add currency + country to each payment method. For example, you might want Klarna for Sweden & Europe, Nets Easy for Denmark and Paypal for the US.Payment methods that can be set up multiple times with the same API keys are e.g. Klarna Checkout V3, Nets Easy & Svea Checkout. If you want to use e.g. Swedbank Checkout or you need to sign an agreement for each country.Example:Here you can see that we have locked different Klarna Checkout V3 to the target groups Sweden, Denmark, Norway, USA & Europe:When a customer selects the USA as the delivery country, only Klarna checkout - USA will appear at checkout. The customer can therefore only shop in USD.
-

Kustom Checkout
27 Nov 2025
Get paid with Kustom Checkout in your webshop. Here you will find information on how to apply and get started with the payment method.What is Kustom Checkout? Kustom Checkout is a so-called Checkout solution that includes several payment methods: invoice, partial payment, card payment and direct payment. Your customer can easily choose between different payment methods at checkout. You don't have to send out invoices and keep track of payments. In addition, Klarna takes the entire credit and fraud risk. That means you always get paid - no matter what. How to apply for Kustom Checkout? Own domain firstIn order to apply for Kustom Checkout, it is a requirement from our side that the store has its own domain, so you should not apply with the auto-generated domain you get when creating a demo store with us. Apply via the dashboard in Abicart Admin Step 1: Apply Step 2: Apply After you have completed step 1, a KYC form (Know Your Customer) will appear in the same box in admin where you started the application, where you need to provide additional information to complete the agreement. If there is any information missing from the initial form, these will also need to be filled in. You will also need to provide bank details needed for payments, this is also done in our admin under Dashboard in connection with the AML form. Step 3 When Kustom has reviewed the application and this is approved (should take about 24 hours), the payment method will be automatically added to the store, you will find settings for Kustom Checkout under Settings>Payment method. What you need to do to proceed is to place an order with Kustom Checkout as the payment method and set this order as paid in the order list in the webshop. After placing the test order, you should deactivate Kustom Checkout and reactivate the payment method after step 4 is completed. The payment method needs to be activated in order for it to be visible in the store. This is done under Settings -> Payment methods -> Kustom Checkout. #### Step 4 About 24 hours after the test order has been set as paid, Kustom will have accepted the application, this will also appear a note about this in admin. Your store can now take payment with Kustom Checkout as payment method! What does it cost to use Kustom Checkout? There are no fixed monthly costs or start-up fees with Kustom Checkout, but there is only a transaction fee per order completed with the payment method. This transaction fee is determined by the subscription you have with us. Managing orders with Kustom Checkout Every time you receive an order via Kustom Checkout, you need to activate the order when you send it to the customer. Go into the order, in the "Perform actions" box, make sure the "Charge (Kustom Checkout)" checkbox is selected and then click the "Perform selected actions" button. When this is done, the order is activated at Kustom and the customer is charged, or the invoice is sent to the customer. You can also activate the order in the order list. Then click on the icon with a lightning bolt at the far right. Cancel a Kustom Checkout order If a customer has changed their mind and you want to cancel the entire purchase, you can cancel the order. Go to "Orders", click on the order in question and then click on the cancel button in the top right corner. Then the order will be shredded in the store and a signal will also be sent to Kustom, which will shred the order there as well. It is not possible to partially cancel an order from the webshop, but this must be done in Kustom's portal. If you have a Plus or Pro subscription, it is possible to edit the order total in the webshop's order list. Kustom Checkout and multi-store system If you want to use Kustom Checkout in one or more stores in a multi-store system, the application needs to be made at the sub-store, not at the top level of the store system. To be able to do this, the setting "Own payment methods are set for each store" needs to be activated. The setting can be found under Store system -> Settings. When you apply for Kustom Checkout, it works for customer type "Private person". Contact Kustom's support to activate it also for customer type "Company". You can apply for Kustom Checkout with a individual company or limited company.