


-
Setting up DKIM & DMARC
27 Nov 2025
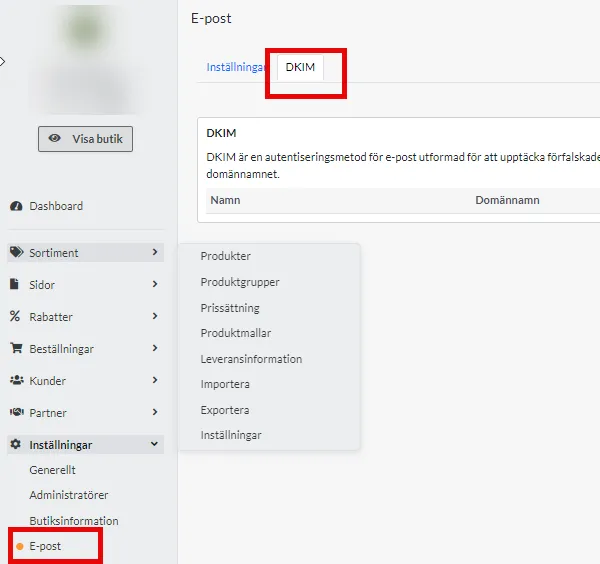
DKIM (DomainKeys Identified Mail) is an email authentication method that protects against email forgery by allowing the sender to add a digital signature to the header of emails. This signature is verified with a public key published in the sender's DNS. Using DKIM improves email deliverability and protects brand reputation by reducing the risk of spam and phishing, making it an essential part of a secure email configuration.To add DKIM, you need to add a setting at your domain name provider. If you do not know how to do this yourself, contact their support.This guide applies if you use Abicart's mail server. If you are using your own email server such as Google, they may already have DKIM and DMARC enabled, check with your provider's support to find out what applies.Add DKIM for the domain you use for emailingStart by creating your DKIM key in Abicart under Settings > Email > DKIM tabClick on Add and select the domain name you use for emailing, and a key is automatically generated in a unique format for your store, e.g. abicart20240131XXXXX._domainkey.Close the pop-up windowClick on the key to open a window with the settings you need to proceed. Copy the name and value.Log in to your domain name provider and add this information to your DNS as a TXT record.More information on how to do this is usually available on your provider's help pages. It is often also possible to contact your DNS provider and let them know the contents of the name and value fields and they will help you with the implementation.5. When DKIM is correctly set up at your DNS provider, it will say Registred = Yes in Abciart in the same place where you retrieved the data.Keep in mind that these types of settings can take up to 24 hours to take full effect.6. When registred has the value YES , click on your domain key and activate the setting so that the value in Active also changes from No to Yes.7. done!Setting up DMARCDMARC stands for "Domain-based Message Authentication, Reporting, and Conformance". It is an email validation method that helps protect your email domain from unauthorized use, such as phishing and spam. It helps reduce the risk of your emails being mislabeled as spam or someone else using your domain to send malicious emails.A DMARC policy determines what happens to an email after it has been checked against SPF and DKIM records.The DMARC policy determines whether a DKIM or SPF error results in the email being marked as spam, blocked, or delivered to the intended recipient.Mail servers can still mark emails as spam if there is no DMARC record, but DMARC provides clearer instructions on when to do so.You create a DMARC policy by adding a TXT record to your DNS with the name _dmarc.Example: _dmarc TXT "v=DMARC1;p=reject" or _dmarc TXT "v=DMARC1;p=quarantine"p = reject means that mail is not received at all, p=quarantine means that mail is received but will probably end up in the spam folder.If you want to receive reports from mail providers about mail that does not meet the DMARC policy, you can add this to your DMARC policy as follows:v=DMARC1; p=none; rua=mailto:email@example.com;There are several DMARC generators you can use if you wish, such as these: https://dmarcian.com/dmarc-record-wizard/ Try our Quick Record Wizard.See also Add SPF record
-

Connect your own SMTP server for your store's email
27 Nov 2025
Send your store's emails through your own email provider with the correct authentication, encryption, and allowed sender. This guide is for administrators in Go, Plus, and Pro who have access to Settings → Email and an SMTP account or a provider-approved IP relay. The store's theme does not affect the connection. Abicart's built-in email server is the default; using your own SMTP is an option. 1. Check that the provider supports the connection Abicart's connection can use a username/password (SMTP LOGIN) or the explicit choice None – the server accepts our IP. Encryption is a separate choice. This connection does not offer a built-in OAuth/XOAUTH2 login flow. Username/password: both need to be correct and allowed for SMTP by the provider. A preset is no guarantee of the account's policy.Gmail: use an app password if the account supports it, not the regular account password. Two-step verification must be enabled and the account's policy must allow app passwords.Microsoft 365/Outlook: check that SMTP AUTH and password-based SMTP are actually allowed for the tenant and mailbox. An old preset or a general deprecation date does not prove access. If the provider requires OAuth, you cannot replace this with a regular password in Abicart.None/IP relay: only use when the provider has explicitly approved Abicart's sending servers for relaying. Do not open a public relay or turn off encryption to solve an authentication error. 2. Fill in the server settings Open Settings → Email.Under Email server settings → Email provider, select a suitable preset or Custom SMTP settings.Check all values against the provider's current instructions, including pre-filled values. FieldWhat to enterHostThe provider's SMTP host, not the store's web domain unless it is also the correct mail server.Port and encryptionThe combination specified by the provider, for example 465 with SSL/TLS or 587 with STARTTLS. The port and encryption must match.AuthenticationUsername/password or an explicitly approved None/IP relay. None hides the account fields but does not control encryption.UsernameThe provider's account name, often the full email address.PasswordSMTP/app password according to the account's policy. Do not share it in support messages or screenshots.SenderAn address that the account or relay is allowed to send as. Also check order confirmations and other specific sender fields. Example: Google's SMTP host is smtp.gmail.com. Select the port/encryption according to Google's current SMTP instructions and use an app password when required. Do not use a regular Gmail password as a general solution. Create a Google app password if the account allows it Open your Google Account's security settings and check two-step verification.Open Google's current instructions for app passwords. If the option is missing, the account's organization or security settings may be preventing the feature; do not lower security to make it appear.Create an app password with a name that identifies Abicart. Google will show a 16-character password; it is not a numeric one-time code.Enter it in Abicart's password field and save the settings. Keep it secret and revoke it in Google when the connection is no longer needed. The existing screenshots show examples of Google's security flow. Names and placement may change; follow the current Google instructions and your account's policy. 3. Save and check the email Save the changes.Under Test server settings, enter a recipient you are allowed to send to and select Send. This sends an actual test email.Check the reception, sender, and any rejection information. A successful SMTP test is not proof for every order email or all recipients' spam filters.If SMTP is no longer to be used, select Abicart's email server and check the sender domain's SPF/DKIM/DMARC for the new sending path. Troubleshoot connection and delivery Authentication failed: check the account name, correct SMTP/app password, SMTP AUTH policy, and that the account is allowed to send as the selected address. Both username and password are required for LOGIN.534-5.7.9 or app password required: follow the Google section and check that the account actually allows the feature.Connection error/timeout: check the host, port, TLS/STARTTLS, and the provider's availability. Do not switch to unencrypted as a default action.Test arrives but order emails are missing: check the correct order and recipient, the specific sender fields, spam folder, and the provider's rejections. A successful test does not resend old order emails.SPF/DKIM/DMARC error: follow the actual SMTP provider's instructions for the domain. Adding Abicart's SPF does not automatically resolve another provider's authentication. The store's SMTP settings are also used for newsletters. Check that the provider permits both the actual sender addresses and the intended sending volume. A successful test message does not prove that a larger campaign or all order messages will be delivered. If the provider requires OAuth, this connection does not support that login flow; choose a compatible sending route without weakening account security. Quick startConfirm that the provider allows Abicart's authentication method and sender.Select the SMTP provider and check the host, port, encryption, and account details.Save and send a successful test email to your own recipient.Check actual reception and correct any connection or domain errors. Subscription and accessThe email server settings apply to Go, Plus, and Pro. The email provider's account, agreement, and security policy determine which login methods and senders you can use. No specific theme is required.
-

Allow Abicart's email servers in the domain's SPF record
27 Nov 2025
Reduce the risk of your store's emails being rejected by authorizing the correct sending servers to send for your domain. This guide is for domain managers and store administrators who use their own sender domain and Abicart's email servers. It applies regardless of Go, Plus, or Pro subscription and regardless of theme. If a custom SMTP provider sends the emails, follow that provider's domain instructions; do not add Abicart as a sender unnecessarily. 1. Determine the sender, sending service, and DNS manager Open Settings → Email and check which address is used for the relevant emails.Determine if the emails are sent via Abicart's email server or custom SMTP.Open the DNS management for the actual sender domain. For name@example.com, it's example.com. A separate sender subdomain needs to be evaluated for that specific domain. You cannot change the SPF for gmail.com or another provider's domain that you do not own. An SPF record on your store's own domain does not grant permission to send as name@gmail.com. Instead, use your own sender domain or an SMTP configuration supported by the email provider. 2. Create or update a single SPF policy SPF is normally stored as a TXT record that starts with v=spf1. Read existing TXT records before making changes. Keep a single applicable SPF policy for the domain; do not add another record that starts with v=spf1. When no SPF record exists Create a TXT record with your DNS provider.Enter the correct hostname according to your provider's format, often @ for the domain root. Avoid having the provider add the domain name twice.If Abicart is the only intended sending service, the policy can be: v=spf1 include:spf.abicart.com -all Do not use this alone if, for example, your company's regular email also needs to send from the domain. When an SPF record already exists Add include:spf.abicart.com to the existing policy before its final mechanism: all. Keep other intended providers and do not change their settings or the final policy without evaluating the entire sending flow. Example for a custom domain that actually uses Google Workspace and Abicart: v=spf1 include:_spf.google.com include:spf.abicart.com -all This is not a setting for a private gmail.com address. Other previous examples are include:_custspf.one.com for one.com and include:spf.loopia.se for Loopia. Always check the current policy with the provider your domain actually uses: Google Workspace SPF, one.com or Loopia. Do not copy multiple providers just because they are in the example. 3. Save and check the correct domain Save the DNS change. How quickly it becomes visible depends on DNS cache and TTL; it can take up to a day, but this is not a fixed delivery time for emails.Look up the domain's TXT records and verify that a single, correct SPF policy is displayed.Check the syntax and count no more than ten DNS-triggering SPF terms across the entire evaluation, including nested include chains. This is not a count of raw DNS requests, TXT records or characters.Check the sender address's SPF marker under Settings → Email. A green marker shows Abicart's SPF check for that address; it does not prove that all emails are delivered or that DKIM/DMARC is correct. Troubleshoot rejected emails No policy / none: check that the TXT record is on the correct sender domain.fail or softfail: check the actual sending service and if its authorization exists before the all mechanism. Do not add a fixed server IP from an old error message instead of the current include.permerror: check for duplicate SPF records, syntax, and the lookup limit.SPF passed but email is missing: check the recipient, spam folder, the provider's rejection notice, and DKIM and DMARC. SPF is only one part of email authentication. Extend the domain's existing SPF policy; do not replace it with the Abicart example if other services also send email. Keep a single applicable v=spf1 policy. Count no more than ten DNS-triggering SPF terms across the entire evaluation, including nested include chains. For a rejection, check the MAIL FROM domain in the rejection or message authentication results. The visible From field and an SPF pass alone do not prove correct DMARC alignment or delivery.Do not change the website's A/CNAME or the email's MX records to fix an SPF error. Quick startCheck the sender address and which server is sending.Find the domain's existing SPF policy with the DNS provider.Add include:spf.abicart.com when Abicart is sending and keep other intended senders.Verify a single valid policy, the lookup limit, and the sender's status. Subscription and accessThis guide applies to Go, Plus, and Pro when Abicart's servers send from your own domain. You need access to the domain's DNS or help from its manager. The theme does not affect SPF.
-

Email settings
27 Nov 2025
The store's miscellaneous email settings. What are e-mail settings? Here you can find settings to specify the different shop email addresses to be used for communication to and from your customers. Enter your email addresses in all fields.You cannot create email addresses for your domain here in the shop, but you can do this with your domain provider/web host where you bought your domain. Contact their support for help setting up email accounts and managing your email addresses. E-mail ordersThe address where your copy of the order confirmation will be sent. Max one email address in each field. Click the "Add another email address" button if you want to add more. Customers will receive the email address you enter in this field as the return address on their order confirmations. Note that the store owner will receive a different return address, shop-orders@abicart.se instead. The reason is to minimize the risk of the order confirmation getting stuck in spam.E-mail order senderSending address for order confirmations. You can only have one email address as sender. NOTE!!! If you enter multiple email addresses in this field, no order confirmations can be sent out, neither to customers nor to the store.E-mail contactEnter an e-mail address to be used when customers contact the store via the contact form (Own pages -> Contact form).E-mail newsletterSending address for newsletters. You can only have one e-mail address as sender. E-mail address for alertsE-mail address used as sender address when sending out article alerts.Custom SMTP settingsIf you want to have full control of all the mailings that are sent out and also monitor statistics, you can use your own SMTP server. Enable the feature and choose a predefined provider or set your own details for your mail server. This is an advanced feature and if you choose to use it, we at Abicart cannot provide support in case it does not work. Instead, you should contact your web host or the company responsible for the SMTP server for troubleshooting.If you have not entered your own SMTP details, all sends are made from Abicart's mail servers and masked so that to the recipient it looks like it has been sent from your email address. A disadvantage of not using your own SMTP server is that the emails sent out can sometimes be interpreted as attempts to netfishing where the real sender is hiding behind another email address.
-

Customize order emails, receipts, and order documents
27 Nov 2025
Choose what the customer receives via email and what information appears on your store's printouts. This guide applies to administrators in Go, Plus, and Pro. Open Settings → Document and email content. Email content controls messages and their texts; Document content controls things like the picking list, packing slip, and language for printing. A text change and activating an automatic dispatch are different settings. 1. Change the order confirmation On the tab labelled Email content, open the section labelled Order confirmation. Choose what information to display, such as product images, customer numbers, delivery messages, and how personal identity numbers are displayed. If you want confirmations to be sent, Do not send order confirmations must not be enabled. Enter your additional text in Text on order confirmation for each relevant language. Save and use the preview where available. These text fields supplement the message; they are not a general editor for replacing the entire email template structure with your own template. 2. Set up receipts and automatic receipt emails Under Receipt , you choose whether to include the descriptions of the shipping and payment methods and enter Text on receipt for each language. Select Automatically send receipt by email when the order is marked as paid if you want the automatic dispatch. If you want to attach a PDF receipt, select the separate setting for the PDF attachment when it appears. Click Save. The automation depends on the order's payment status actually becoming paid. A receipt is not the same message as the order confirmation, and the receipt text alone does not trigger the sending. Never mark an unpaid order as paid just to send a receipt. For manual payments, first reconcile the actual incoming payment. 3. Set up the shipping confirmation Enable Send shipping confirmation by email when order is marked as shipped if it should happen automatically. Select any copy to the store and product images, and write Text in confirmation in the correct language. Save. An order being paid does not mean it has been shipped. Mark it as shipped when it corresponds to the actual handling. If an integration changes the order status, its workflow also needs to align with when you want to send the shipping email. 4. Select fields for picking list and delivery note On the tab Document content you select fields for the Picking list, for example, product number, name, product group, stock location, GTIN, MPN/SKU, images, prices, and how product bundles should be displayed. Also check sorting and any warnings for out-of-stock products. For machine-readable codes, select the code type based on the value to be printed and the scanner you use. The code types allow for different characters and lengths. Follow the limitations shown in the admin; for example, a long product number cannot be made into an EAN-8 just by selecting that code type. For the Delivery note you select, for example, prices, images, shipping and payment method with any descriptions, organization number, and VAT number. The delivery note and the picking list have different purposes and do not need to have the same fields. 5. Select document language and print size Under Order documents you select the language separately for the delivery note, picking list, and receipt: Same as administrator: the language used by the administrator.Customer's language: the language associated with the order. Also select the text size for printing and save. Make sure that any custom texts are available in the languages the documents will use; a language selection does not automatically translate the text you have written yourself. 6. Check the result Check the preview and a relevant document in the correct language. If an email is missing, first check the specific sending setting and the correct order status, then the recipient's address and delivery/spam issues. Do not change the payment or shipping status just as an email test on a real order. Use a separate test flow when an actual sending needs to be tested. If your question is about a fully custom template or a layout different from what the available fields allow, please describe your needs to our support team before pasting an entire email template into a supplementary text field. Quick start Open Document and email content and select the correct tab.Change fields and texts per language.Activate the desired mailings separately and check their triggering order status.Save and check the preview and documents. Subscription Basic document and email settings are available in Go, Plus, and Pro. Some options depend on activated features, for example, product bundles or an integration. This guide applies to the store's order communication, not invoices for the Abicart subscription.