


-
Setting up DKIM & DMARC
27 Nov 2025
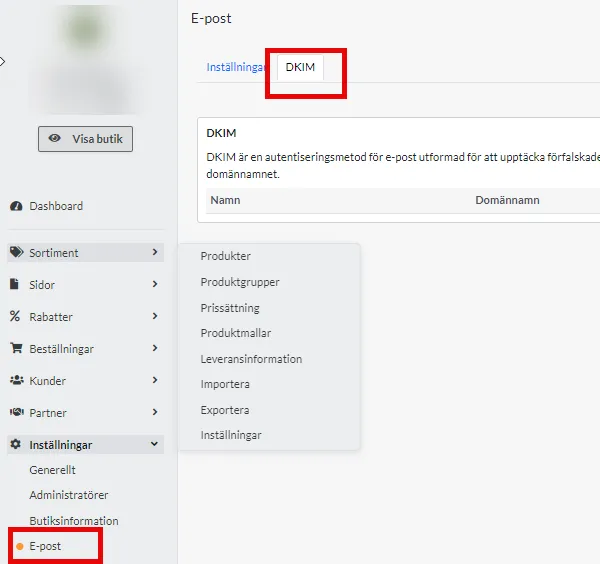
DKIM (DomainKeys Identified Mail) is an email authentication method that protects against email forgery by allowing the sender to add a digital signature to the header of emails. This signature is verified with a public key published in the sender's DNS. Using DKIM improves email deliverability and protects brand reputation by reducing the risk of spam and phishing, making it an essential part of a secure email configuration.To add DKIM, you need to add a setting at your domain name provider. If you do not know how to do this yourself, contact their support.This guide applies if you use Abicart's mail server. If you are using your own email server such as Google, they may already have DKIM and DMARC enabled, check with your provider's support to find out what applies.Add DKIM for the domain you use for emailingStart by creating your DKIM key in Abicart under Settings > Email > DKIM tabClick on Add and select the domain name you use for emailing, and a key is automatically generated in a unique format for your store, e.g. abicart20240131XXXXX._domainkey.Close the pop-up windowClick on the key to open a window with the settings you need to proceed. Copy the name and value.Log in to your domain name provider and add this information to your DNS as a TXT record.More information on how to do this is usually available on your provider's help pages. It is often also possible to contact your DNS provider and let them know the contents of the name and value fields and they will help you with the implementation.5. When DKIM is correctly set up at your DNS provider, it will say Registred = Yes in Abciart in the same place where you retrieved the data.Keep in mind that these types of settings can take up to 24 hours to take full effect.6. When registred has the value YES , click on your domain key and activate the setting so that the value in Active also changes from No to Yes.7. done!Setting up DMARCDMARC stands for "Domain-based Message Authentication, Reporting, and Conformance". It is an email validation method that helps protect your email domain from unauthorized use, such as phishing and spam. It helps reduce the risk of your emails being mislabeled as spam or someone else using your domain to send malicious emails.A DMARC policy determines what happens to an email after it has been checked against SPF and DKIM records.The DMARC policy determines whether a DKIM or SPF error results in the email being marked as spam, blocked, or delivered to the intended recipient.Mail servers can still mark emails as spam if there is no DMARC record, but DMARC provides clearer instructions on when to do so.You create a DMARC policy by adding a TXT record to your DNS with the name _dmarc.Example: _dmarc TXT "v=DMARC1;p=reject" or _dmarc TXT "v=DMARC1;p=quarantine"p = reject means that mail is not received at all, p=quarantine means that mail is received but will probably end up in the spam folder.If you want to receive reports from mail providers about mail that does not meet the DMARC policy, you can add this to your DMARC policy as follows:v=DMARC1; p=none; rua=mailto:email@example.com;There are several DMARC generators you can use if you wish, such as these: https://dmarcian.com/dmarc-record-wizard/ Try our Quick Record Wizard.See also Add SPF record
-

Custom SMTP
27 Nov 2025
By default, Abicart uses its own mail servers to send emails from your store. However, if you want to have more control and visibility over your email delivery and performance, you can use your own SMTP server instead. SMTP stands for Simple Mail Transfer Protocol, which is a standard for sending and receiving email messages over the internet. SMTP servers are applications that handle the delivery of emails from one server to another.You can either use an existing SMTP server with your current email provider or create a new one with a third-party service provider. Some examples of the SMTP service providers are Gmail, Mailgun, Outlook, etc.Once you have an SMTP server that you can use, you need to enable the custom SMTP settings feature in Abicart and enter the details of your SMTP server. Here are the steps to do that:Log in to your Abicart account and go to Settings > Email.On the right column you can find the Custom SMTP settings section. Choose a predefined provider from the drop-down menu or select Other if you want to enter your own details.Enter the host name, port number, username, password, and encryption type of your SMTP server in the corresponding fields. For example, if you are using Gmail as your SMTP server, you can enter smtp.gmail.com as the host name, 465 as the port number, your Gmail username and password in the username and password fields, and SSL/TLS as the encryption type.Most of the provider information is pre-filled by Abicart, so it is just the username and password that should be filled in by you.Click Save changes at the top of the page.Now you have set up your own SMTP server for Abicart. To test your server, you can send a test email from Abicart by clicking on Send test email at the bottom of the custom SMTP settings. Sometimes, you might encounter some errors when using your own SMTP server for Abicart. These errors might prevent you from sending or receiving emails from your store or cause other problems with your email delivery. Here are some common errors that you might encounter and how to fix them:Error: Authentication failedThis error occurs when your email client or our application cannot connect to your SMTP server using the username and password that you provided. This can happen for various reasons, such as:You entered the wrong username or password for your SMTP server.You are using a service that requires an application-specific password or you are using a service that has two-factor authentication enabled, such as Gmail, and you did not create or use one. (More information)Your SMTP server has some security or configuration issues that prevent it from accepting your credentials.To fix this error, you need to check and correct your SMTP settings. Here are some general steps to do that:Make sure that you entered the correct host name, port number, username, password, and encryption type for your SMTP server. If you are using a service that requires an application-specific password or that has two-factor authentication enabled, such as Gmail, such as Gmail, you need to create one and use it instead of your normal password. [This can be resolved by following the steps in the below error information].If you are still getting the error, you may need to contact your email service provider or your SMTP server administrator for further assistance.Error: 534-5.7.9 Application-specific password requiredThis error means that you cannot use your normal username and password to log in to your SMTP server because it requires an application-specific password instead. This is usually the case when you are using Gmail or another service that has two-factor authentication (2FA) enabled for your account. 2FA is a security feature that adds an extra layer of protection to your account by requiring a verification code or a device confirmation in addition to your password when you log in.To fix this error, you need to create an application-specific password for Abicart in your Gmail account or other service provider account. An application-specific password is a 16-digit code that allows an app or device to access your account without using 2FA. Here are the steps to create an application-specific password for Abicart in Gmail:Go to your Google account and sign in with your Gmail username and password.Click on Security in the left sidebar.Under Signing into Google, click on App passwords.If prompted, enter your Gmail password again and click Next.Under Select app, choose Other (custom name) from the drop-down menu.Enter Abicart as the name of the app and click Generate.You will see a 16-digit code that is your application-specific password for Abicart. Copy this code and keep it somewhere safe. You will not be able to see it again after you close the window.Go back to your Abicart account and go to Settings > Email settings.Scroll down to the Custom SMTP settings section and enter the 16-digit code that you copied as the password for your SMTP server.Click Save changes at the bottom of the page.Now you have created an application-specific password for Abicart and fixed the error. You can use this password to log in to your SMTP server and send emails from your store. You can also create more application-specific passwords for other apps or devices that you want to use with your Gmail account.
-
Create an SPF record on your domain in Abicart
27 Nov 2025
These instruction applies if you use your own domain and Abicart SMTP server to send emails from Abicart. If you use Custom SMTP settings, you do not need to add Abicart SPF.Add an SPF record to your DNSFollow the instructions below to add an SPF record to your domain. Please note that it can take up to 24 hours for the changes to be activated.To add an SPF record for a domain, you first need to access the DNS configuration for the domain. If you use a web-based DNS service to manage your domain, you can usually add an SPF record by logging in to your account and navigating to the relevant section for adding DNS records.If you have your own DNS server, you can add an SPF record by editing the DNS configuration files for the domain.Do this:Once you have accessed the DNS settings, create a new TXT record.In the "Name" field, enter the hostname to which you want to apply the SPF record. This is the one after the @ sign in your email address. So if your email address is namn@exempel.com, you should add an SPF record for example.com.Enter the following text in the "Value" field:v=spf1 include:spf.abicart.com -allSave the record and wait for the changes to take effect. This can take up to 24 hours, depending on your DNS provider.Keep in mind that SPF records can be quite tricky, and it's important to make sure you have the right syntax and formatting. If you are unsure whether your SPF record is correct, you can use an online SPF record checker to verify it.NOTE! You also need to include your own email provider in this SPF record, depending on the provider you use. Some examples:one.com(read more here)v=spf1 include:_custspf.one.com include:spf.abicart.com -allgmail(read more here)v=spf1 include:_spf.google.com include:spf.abicart.com -allLoopia(read more here)v=spf1 include:spf.loopia.se include:spf.abicart.com -allWhat does this change mean?By adding this SPF record, you are telling email servers that you authorize Abicart to send emails on your behalf. For example, order confirmations sent to end customers.If something goes wrong along the way and the order confirmation does not reach the end customer, the shop owner will receive an email informing them of this and an error message about the reason.The error message displayed in the email can look different but here are two different examples: ==================================================================The MAIL FROM domain [your_domain] has an SPF record with a hardfail policy (-all) but it fails to pass SPF checks with the ip:[192.121.104.215] (Abicart's IP address). To best protect our users from spam and phishing, the message has been blocked. ===========================================================SMTP error from remote mail server after end of data:This mail is unauthenticated, which poses a security risk to thesender and Gmail users, and has been blocked. The sender mustauthenticate with at least one of SPF or DKIM. For this message,DKIM checks did not pass and SPF check for [your_domain] did notpass with ip: [192.121.104.215] (Abicarts IP address).===========================================================If everything is set up correctly, your email addresses will get a green mark under Settings > Email, which means you are ready.Read also about how to set up DKIM and DMARC here.
-

Email settings
27 Nov 2025
The store's miscellaneous email settings. What are e-mail settings? Here you can find settings to specify the different shop email addresses to be used for communication to and from your customers. Enter your email addresses in all fields.You cannot create email addresses for your domain here in the shop, but you can do this with your domain provider/web host where you bought your domain. Contact their support for help setting up email accounts and managing your email addresses. E-mail ordersThe address where your copy of the order confirmation will be sent. Max one email address in each field. Click the "Add another email address" button if you want to add more. Customers will receive the email address you enter in this field as the return address on their order confirmations. Note that the store owner will receive a different return address, shop-orders@abicart.se instead. The reason is to minimize the risk of the order confirmation getting stuck in spam.E-mail order senderSending address for order confirmations. You can only have one email address as sender. NOTE!!! If you enter multiple email addresses in this field, no order confirmations can be sent out, neither to customers nor to the store.E-mail contactEnter an e-mail address to be used when customers contact the store via the contact form (Own pages -> Contact form).E-mail newsletterSending address for newsletters. You can only have one e-mail address as sender. E-mail address for alertsE-mail address used as sender address when sending out article alerts.Custom SMTP settingsIf you want to have full control of all the mailings that are sent out and also monitor statistics, you can use your own SMTP server. Enable the feature and choose a predefined provider or set your own details for your mail server. This is an advanced feature and if you choose to use it, we at Abicart cannot provide support in case it does not work. Instead, you should contact your web host or the company responsible for the SMTP server for troubleshooting.If you have not entered your own SMTP details, all sends are made from Abicart's mail servers and masked so that to the recipient it looks like it has been sent from your email address. A disadvantage of not using your own SMTP server is that the emails sent out can sometimes be interpreted as attempts to netfishing where the real sender is hiding behind another email address.
-

Document and email content
27 Nov 2025
Below we go step by step through how to make various settings related to documents and email.Under Settings -> Document and Email Content there are two tabs, Email Content and Document Content.Email contentHere are settings to customize the content of order confirmations, receipts and delivery confirmations.Order confirmationsChoose which properties to display on the customer's order confirmation. It is also possible to add a custom text to be displayed on the order confirmation.ReceiptsSelect the properties to be displayed on the customer's receipt. It is also possible to add your own text to be displayed on the receipt.Delivery confirmationsActivate delivery confirmation when the order is marked as sent. Document contentHere are settings to customize the content of pick lists, delivery notes and print settings for the order documents.Pick listSelect the properties to be displayed in the printout of the picking list. Delivery noteSelect the properties to be displayed in the printout of the delivery note. Order documentHere are the language settings for the printouts, "Same as administrator" (the language selected in admin under "My profile") or "Customer's language". That is, the language chosen by the customer when the order was placed.