


Product groups
-
Create campaign-based product group
2 Feb 2026
You can quickly highlight the right products, direct traffic to where you want and increase both conversion and average purchase - without changing your regular structure. Why create a campaign-based product group? By gathering products for a current campaign in a separate product group, the shopping experience becomes both easier and more inspiring for the customer. Instead of searching through the entire range, the customer is presented with a clear selection that suits that particular occasion. This creates confidence, saves time and makes it easier to make purchasing decisions. Create a product group based on your current campaign, for example, Favorites for Valentine's Day or Under 500 SEK for Mom. Create a product group based on your current campaign, such as Valentine's Day Favorites or Under $500 for Mom. Product groups and products
-
Create Custom pages with product groups and subgroups
27 Nov 2025
A creative way to use Abicart as a CMS tool is to build content pages as product groups. As an e-commerce platform, Abicart is of course optimized for building product structures with assortments, but with a little imagination you can actually use Abicart to build any web. A good example is this website - abicart.se is built entirely with Abicart - and only with standard components. If you want to set up your own pages as a menu item with multiple subpages, you use product groups.Custom pages and product groups work almost exactly the same way. The differences are that product groups can be set up as a main group with subgroups, and custom pages can only be standalone.So it can be useful to put your custom pages as product groups if you want to have custom pages under one menu item:Here's what you do:1) Go to Assortment >> Product groups2) Click on New product group & give the group the name you want as a menu item >> Save by clicking on Add.This will be your "main group" - Now you just have to create the subgroups! 3) Click on the main group >> Then click on New subgroup in the box on the right.4) Name the subgroup >> Save.5) Type the information into your "custom page" or copy the existing custom page and paste its content into the new subgroup.You can enter the text in the field for "Image and text in product group table" or under Optional text/image "Custom look" for a more customized page. Learn more about, custom look here: Link to the manual - Product groups6) Now you just have to add the menu item - Link to the manual: Add a menu item
-

How do I choose the order in which my products appear on product group pages?
27 Nov 2025
Set up automatic or manual sorting on your product group pagesAutomatic sorting on all product group pagesBy default, all product group pages are linked to the sorting selected in the theme (Appearance -> Themes -> select theme, edit -> Content -> Product group page -> scroll down to the section for "Articles" and then Sorting). You can choose from seven different sorting options: name, price, latest, most popular, stock, product number and weight. All items on all product group pages will then be sorted according to the selected sorting above.Change sorting on a specific product group pageIf you want to change sorting on a specific product group page, you can do so. You then have to go to the product group through Assortment -> Productgroups -> select product group, edit -> the tab "Appearance" and click in "Custom appearance". You then get to add a product table and in the product table settings on the right, you choose it to be "Linked" and then a block with "Sorting" appears a little further down. This sorting is a bit different from the theme's sorting but you can choose from the following sorting orders: last modified, last added, cheapest first, product number ascending, product number descending, product name and most sold. The articles on this product group page will then be sorted according to the selected sorting and will ignore the sorting from the theme.Manual sortingIf none of the automatic sorting fits, you can choose to place the items one-by-one in a specific order.Assortment -> Product groups -> select product group, edit -> the "Appearance" tab and click in "Custom Appearance". You then get to add a product table and in the product table settings on the right, you choose it to be "Manual" (instead of "Linked").Now you can select items in each box in any order you like. Move your mouse cursor over one of the boxes in the product table and then press the button with the tick (Select product). Select a product by searching on the name, or by browsing product groups. Click on add and save.One thing to keep in mind when making a product table manually is that new items added to the product group will not be displayed automatically, but you need to go to the product group page and add each new product to the product table manually each time.Note also that a product can only be displayed once on each page. So you cannot add the same product several times in a product table and any duplicates will disappear when you save.
-
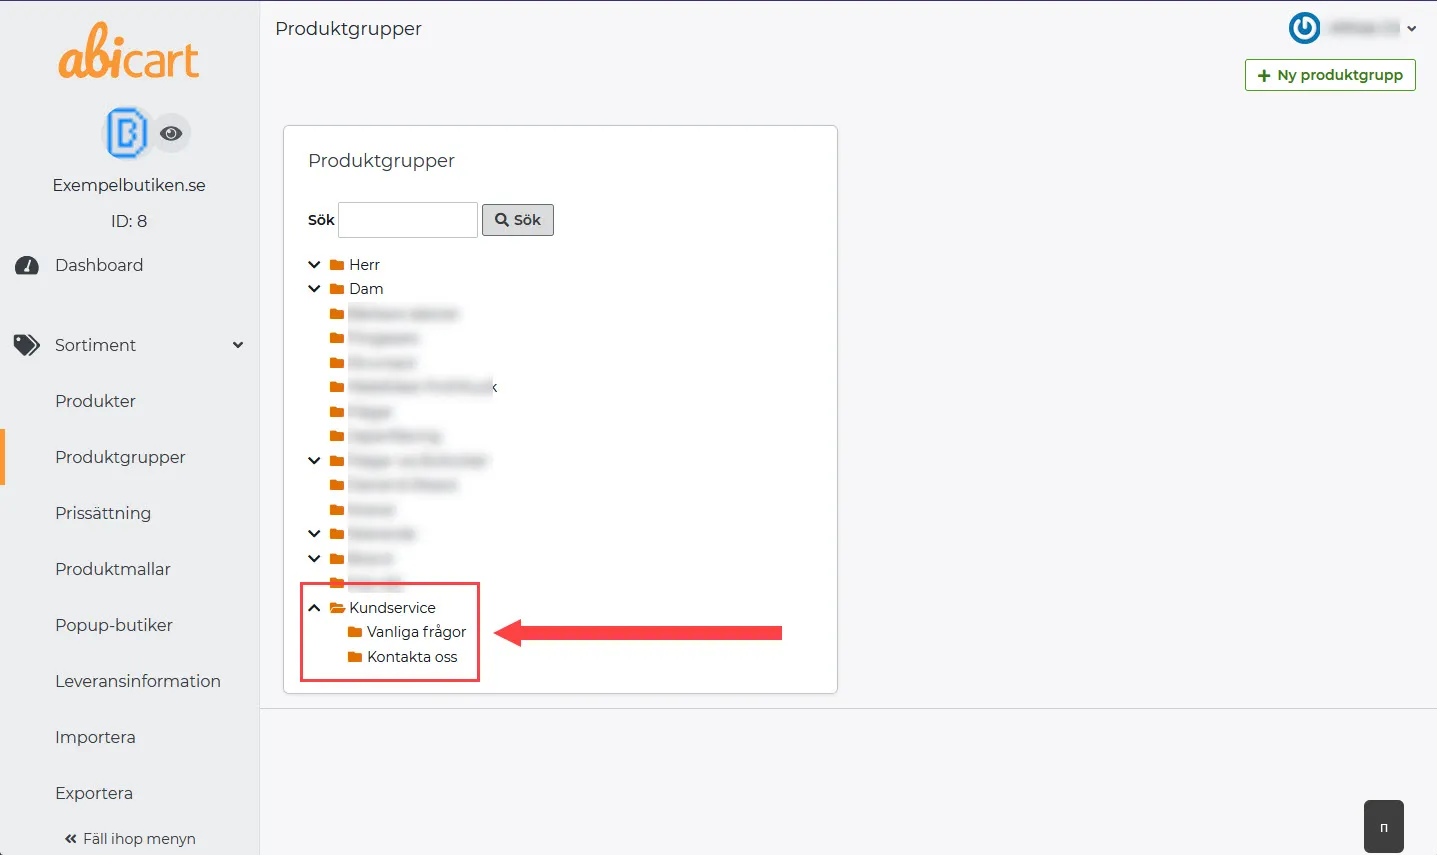
Product groups
27 Nov 2025
Product groups Product groups are used to organize your products in a convenient way for your customers. They form the basis of your product range. Defined product groups help you to create order in your shop. In admin, you can use folders to create a structure to categorize your products.The structure of the product group created here will be used as the layout for the menu on the website.So plan it very carefully.Tip. A well-designed structure makes navigation easier for your buyers. Easy navigation equals a good user experience and satisfied customers.For example, this is what it might look like when you group all brands under one product group: How do I add product groups?Go to Assortment (A) -> Product groups (B) -> Click on +New product group (C) Enter the "Name of the group" (D) (e.g. Fashion). Click the +Add button (E) to add and save the group . How do I create subgroups? Method 1:Start by creating a new product group. If you are not sure how to do this, see the previous section "How do I add product groups?".Select the main group to which the new product group will belong at "Location" (A). Enter a name for your product group (B).Click on +Add (C) to save your product group.If you click on Assortment -> Product groups (D), you will now see that your main group has a subgroup. Method 2:On the "Product Groups" page, click on the name of the product group (A). A list will appear on the right.Select +New subgroup (B) to add a new subgroup. How do I move groups?Sometimes you may need to move groups, you can do this in two different ways.Method 1:Select the group (A).In the list on the right, select Cut out (B). Click on a group where you want to move the clipboard (C). The list now contains the options Paste in, Paste before and Paste after (D). Paste means that the clipboard will be placed inside the selected group.Paste before means that the clipboard will be placed before the selected group in the tree.Paste after means that the clipboard will be placed after the selected group in the tree.Method 2:Press and drag the folder you want to move to (A). Drop it either on the group in which it will be placed (B).Or between groups to move it within the structure (C). How do I add products to my product groups?Go to Assortment -> Products (A). Create a new product (B), or edit an existing one (C). Under Categorisation (D) you can select a "Product group" for your product (or several if you have a PLUS or PRO subscription).Preview your store and you should see a menu item for each of your product groups.Things to remember: Each product must belong to a product group to appear on the website. (Don't see certain products on the website? Check if they belong to a product group.) You can add a product to multiple product groups, but only one can be treated as the primary group for that specific product. Only products from the primary product group will be included in the sub-shop (if you are using a multi-shop system). When you create a new discount, it will only be applied to products in the primary group and not to products using multiple groups. For example, the discount will only apply to this product via the "Men" category and not via "Watch". If you want to add a discount to this product, the discount must apply to "Men" and the product must have this group set as the primary product group.Other settings and what they do:HideIn the product group settings, there are two ways to hide both groups and/or products. Hide product group and its productsIf you decide to stop selling a certain type or category of product, hiding them one by one is no easy task. With this setting, you hide both the group and its products from the menu and the shop.Things to remember: If you apply the setting to a category at the top level, the subgroups are also hidden from the menu. Products, whose primary product group is "hidden", will not be listed on the website. The products from the subgroups will still be available and can lead you to the page for that group. If you want to hide all groups below the one at the top level, it must be done on each subgroup. Tip! If you have not hidden the group but it is still not visible in the menu, the next place to investigate this is at Appearance (A) -> Themes (B) -> Edit (pen icon) (C) -> Product group page (D) -> Empty groups (E). (The product group may be empty). This also applies to the option "Do not show the product group in the product menu". Do not show the product group in the product menuDo you want to hide the product group from appearing in the menu? Then this is your option.This setting hides the group from the menu, but it will still be searchable and can be accessed via the product group at the top level.Things to consider: This option is not active but still the product group is not available on the website menu? This is not included in the menu under Appearance -> Themes -> Edit -> Content -> Header / Menu (Based on the theme). Your product group is not indexed yet. Wait for 24 hours and if it is still not available please contact us and we will fix it for you. Add an image and description to the product group In this setting, you can add a picture and description for the group. It will appear at the top of the page for the product group.Tip! Choose an image that connects well with your group, this will help your customers navigate more easily.Shop designEach theme has its own design and predefined layout, but at the same time is extremely customizable according to your preferences. You can start humbly and follow the theme layout, or get creative and go for a custom look. The shop design for the shop window is controlled by the shop template: this follows the layout of the active theme selected under Appearance -> Themes.This is the default setting for the product category.Customized store design (Customised look)This is the creative part. Here you can design your own layout for your product group page. The different blocks can be added and rearranged according to your choice. Benefits of using custom look: Flexible design. Control the information displayed. SEO-enhanced custom content. Easy selection & placement of products. Remember: Any settings made here will override the settings made in the active theme under Appearance -> Themes -> Edit -> Product category page. You may encounter some issues with heading tags (H1, H2, etc) that we are currently investigating. Product group tableDisplay the product groups you select. Benefits: Helps customers easily navigate through products in different grippers. Add related grips. Flexible placement on the side (A). Flexible grid (B). Easy selection (C). Easy sorting (D). Product list & tableTo display the products in a grid, list view or both in separate blocks. Linked - Automatic selection & placement of products under selected product group. Manual - Flexible and custom selection of products and their placement in the block. To search or browse for a product to place in block (A). Add a new block to the location (B). To influence the position of the product. Click on the icon and then on the desired location (C). To remove the product from block (D). Fullwidth product It will be in list format like the "product list" block, but with more control and flexibility to choose what information to display about the product on the product group page. Here's an example of what it might look like in full view: Here is an example of what the "Product List" might look like: Optional text/imageThis option provides more extensive control for adding content compared to other blocks. Benefits:Insert links to images and text.Use HTML under source code (<>).Add videos and tables. Remember:Custom scripts may not work and may damage the page.Possible problems with header tags.