


-

Store - Attributes
31 Jul 2026
Store The Store attributes let you tie a product to a specific physical store location. This is useful for retailers with multiple locations who want to indicate where an item is available. All fields are optional and can be shown to customers on the product page. Available attributes: Store Address: the physical address of the store location Store Code: a unique code identifying the store location About Store Code Use Store Code to tag a product with a short identifier for the physical store it belongs to. Keep the code consistent across your products, since this is what ties a product to a specific location. Using Google local inventory ads or vehicle ads? Google Merchant Center has its own store code requirement, and your code here needs to match the one registered in your Google Business Profile. Read Google's Store code guidelines for the full format requirements. Setting up Store attributes 1. Enable the attributes Go to Assortment → Products → Product Settings. In the panel on the right, locate the Product Attributes section. Scroll down until you find the Store heading. For each attribute you wish to use, click the edit icon and select your preferred visibility option, then click Save. 2. Add store details to a product Go to Assortment → Products and open the product you wish to edit. Scroll to the bottom-right of the product page. You will find the Store fields, where you can enter the store address and store code. If you have any questions, please contact customer support.
-
Books - Attribute
21 May 2026
Books The Books attributes allow you to add additional information to book products. All fields are optional and can be shown to customers on the product page. Available attributes: Author: the name of the book's author(s) Copyright: the copyright year or statement e-Book: indicates whether the product is available as an e-book Edition: the edition of the book (e.g. 2nd Edition) eISBN: the ISBN for the digital/e-book version Format: the format of the book (e.g. Hardcover, Paperback) Imprint: the imprint or sub-label of the publisher ISBN: the International Standard Book Number Language: the language the book is written in No of pages: the total number of pages Publication date: the date the book was published Publisher: the name of the publishing house Source: the source or origin reference of the book Setting up Book attributes 1. Enable the attributes Go to Assortment → Products → Product Settings. In the panel on the right, locate the Product Attributes section. Scroll down until you find the Books heading. For each attribute you wish to use, click the edit icon and select your preferred visibility option, then click Save. 2. Add book details to a product Go to Assortment → Products and open the book product you wish to edit. Scroll to the bottom-right of the product page. You will find the Books fields, where you can fill in the relevant details for each attribute. If you have any questions, please contact customer support.
-
Changing the VAT rate in the shop
25 Mar 2026
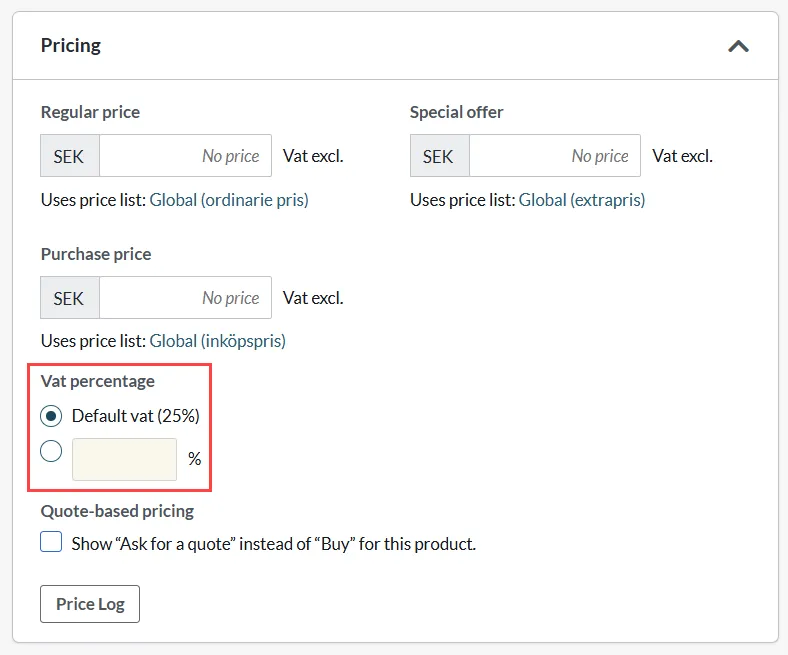
This manual describes how to change the VAT rate for your shop's products and is a general guide to VAT changes. The review of VAT rates is particularly relevant in the run-up to April 1, 2026, when VAT on food products will be reduced from 12% to 6%.Also read: How does VAT work in the shop?Under Settings -> VAT you will find the setting for thedefault VAT value for the store's products. The VAT rate specified there is used for all items with the VAT setting "Default VAT". All products have default VAT selected automatically when they are created. The setting can be found on the product page in admin under Pricing -> VAT percentage. If the product has a different VAT rate, enter the correct VAT rate per product: There are three ways to edit the VAT rate for your products: - Change the standard VAT rate- Change the VAT rate per product manually- Change VAT rate per product via import 1) Standard VAT Settings -> VAT rates -> Set the Default VAT value for the items in your store -> Save *Note that the product must have "default VAT" enabled to get the VAT rate you set as default VAT. If you previously had 12% as standard VAT and also 12% as your own VAT rate per product, you also need to change the own VAT rate when you change the standard VAT. You can do this according to point 2 or 3. 2) ChangeVAT rate per product manually To change the VAT rate per product, go to the product page in admin: Assortment -> Products -> Click on the product you want to edit -> Pricing -> VAT percentage -> Enter VAT rate -> Save *Repeat for all products concerned 3) Change VAT rate per product via import To change the VAT rate for multiple products with their own VAT rate, export the assortment -> Change to the correct VAT rate in the file -> Import - Done! Note! Note that all products need to have a unique article number to be imported. If products do not have an item number, you need to enter it first. Please contact customer service if you need help generating random item numbers. Step 1) Export the following:- Item No.- VAT percentage Read more about exporting here - Product export Step 2) Change to the desired VAT rate in the file Sort the file according to the VAT rate column and change e.g. all 12% to 6%. If you changed the default VAT rate from 12% to 6%, change the products that still have 12% in the file, to 6%. Then you have changed the products that have their own VAT rate. Step 3) Import the file Read more about importing here - Product import Note: If your prices are entered including VAT, the final price is not affected by a change in VAT rate. If, on the other hand, your prices are quoted excluding VAT, the final price will change, as VAT will be added at checkout.
-
Importing related products (product relationship lists)
5 Mar 2026
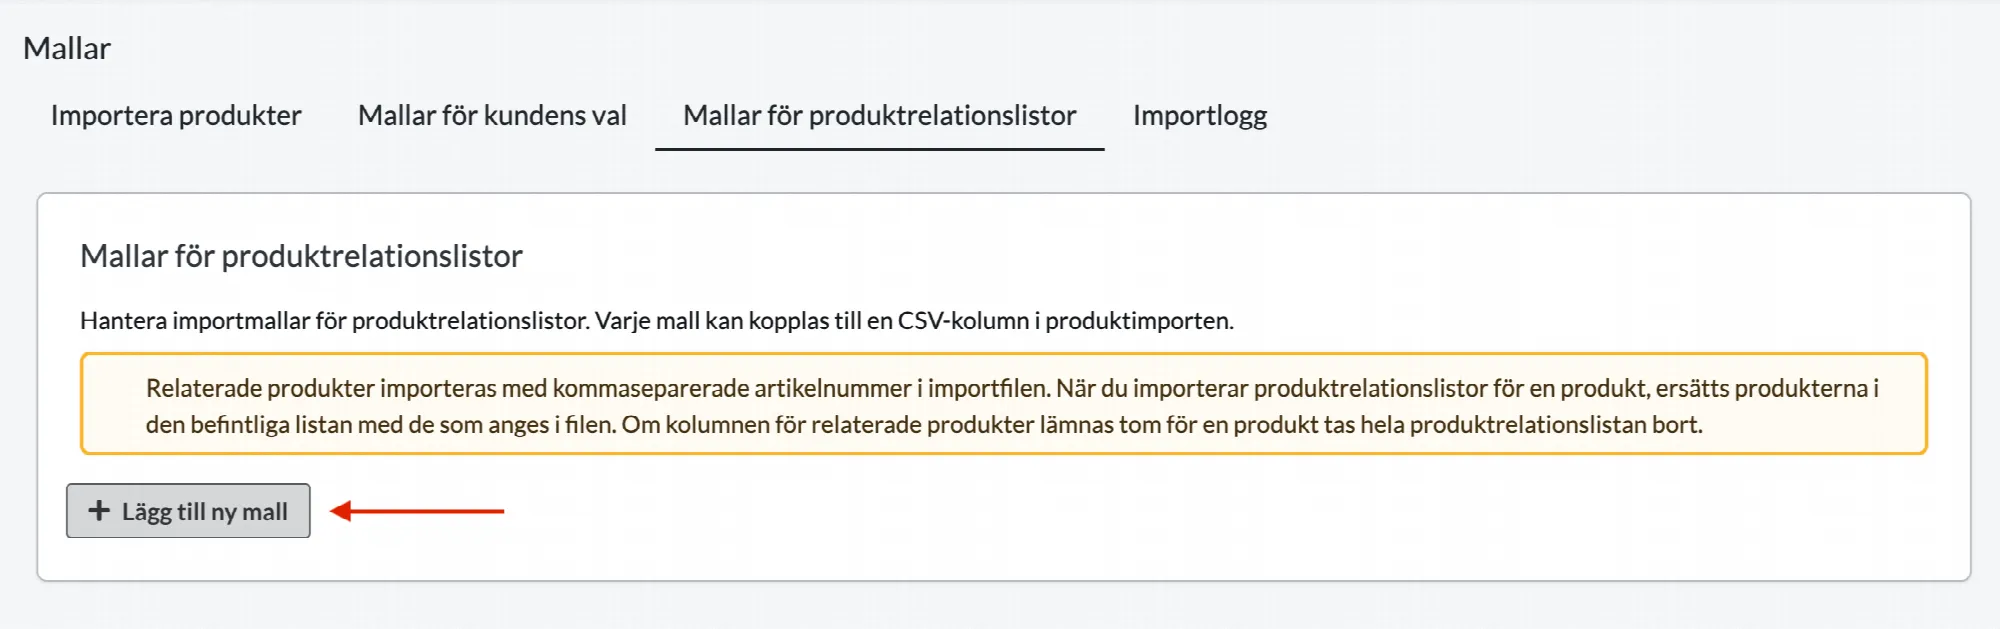
Product import allows you to add related products to your store via an import file. The feature uses so-called product relationship lists, where you specify related products on a specific product.In this guide, we'll walk you through how to create an import template for relationship lists and how to import related products to your products.Step 1 – Create a template for product relation lists Before you can import related products, you need to create a product relation list template. Go to Catalogue → Import Open the tab Templates for related products Click Add new template Enter: Name of the relation list (for example "Similar products") Visibility settings Click Create list The template is used to tell the system which relation list the import should update. Step 2 – Prepare your import file Related products are specified in the import file using product numbers separated by commas.Important to keep in mind: The product number for the main product must be on the same row The related products are specified using product numbers separated by commas Example: In this example, the products with product numbers T-SHIRT-002, T-SHIRT-003 and T-SHIRT-004 will be added as related products to T-SHIRT-001. Step 3 – Upload your import file You can now import related products. Go to Catalogue → Import Upload your import file Make sure that "Automatic" is selected for both "Fields separated by" and "Character encoding", and that "Update information" is selected under "If the product already exists in the catalog". Step 4 – Map the columns in the import For the system to know what information is contained in each column, you need to map the columns to the correct properties.Since the import file has clear column headers, this is easy to do.For example, you need to specify: the column containing the product number for the main product the column containing related products – here you select the name of the template you created earlier, for example "Similar products" In this example, the first row of each column in the import file contains headers. We do not want to import these, so we check "First row contains column headers".Here we have selected the column content for each column in our import file: Product number, Product name (sv) and Related products → Similar products. Step 5 – Start the import Once the columns are mapped, click Start import.The system will now create or update the product relation list depending on whether this list already exists on the product or not. Result after the import When the import is complete, you can check the result by: Opening a product Going to Related products Here you will see that the relation list has been created and is linked to the template used for the import.In this example, we import only one list of related products, but it is possible to import multiple product relation lists for the same product. In that case, simply add another column for related products (for example "Matching accessories") and make sure to create a corresponding import template before uploading the import file.It is only possible to import related products to relation lists that are linked to an import template. Lists that were created manually cannot be updated via import.Here we can see that the product relation list "Similar products" has been created after the import.The list can be edited manually afterwards by clicking the name or the "edit" icon on the previous page. Important to know about importing related products When importing product relation lists, the following applies: The products in the existing list will be replaced by those specified in the import file. If the column for related products is left empty for a product in the import file, the entire product relation list will be removed from the product (if there is already a relation list linked to this import template).
-
Bulk Price Adjustments
2 Mar 2026
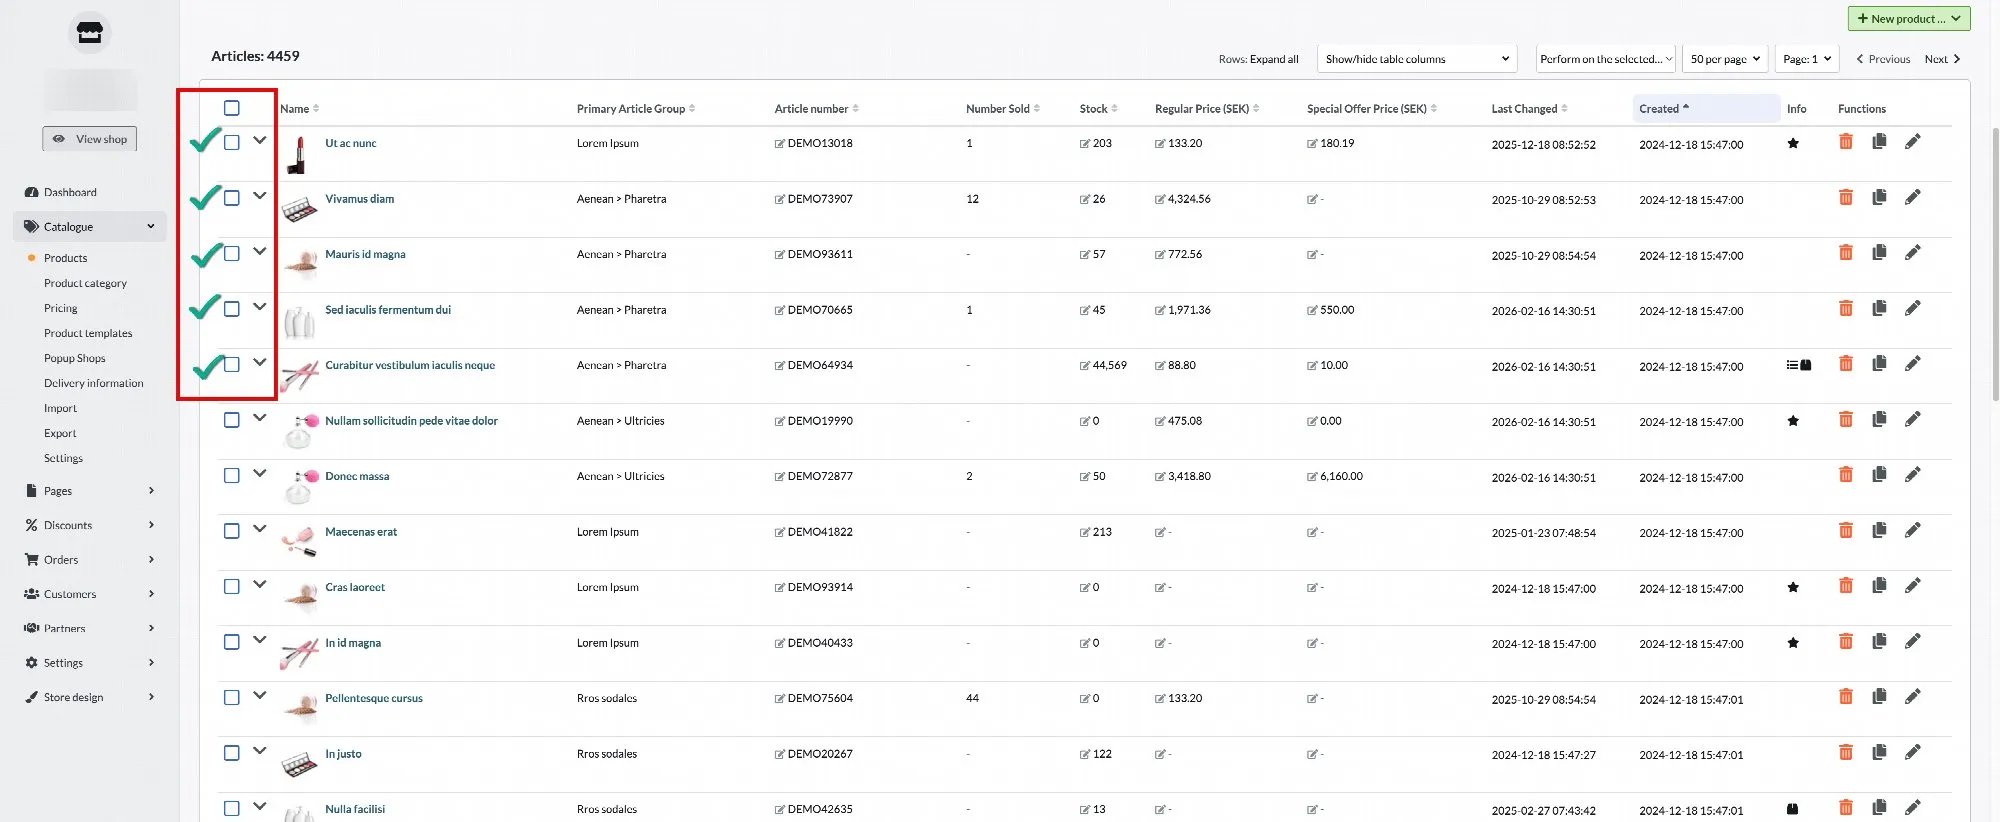
There are two ways to change product prices in bulk.Bulk Price Editing Two ways to update prices across many products at once, plus how to stay safe while doing it. Option 1: Bulk Discount via Assortment → Products Use this option when you want to apply a discount to specific products. Steps Go to Assortment → Products. Select the products you want to discount. Click Perform action on the selected. Select Additional Operations. Enter the percentage you want to reduce the price by (for example, 20). Click OK. The selected products will now be discounted by the specified percentage. Pros You can select specific products individually. Works across different product groups. Simple and quick when adjusting only a few products. Ideal for campaigns or targeted promotions. Cons Can only reduce prices (not increase). Not practical when updating large product groups. Requires manual product selection. Possible Error While performing this action, you may encounter the following error message: What does this mean? This error occurs when no special price list is connected to your store under Assortment → Pricing → Usage. How to Resolve It Go to Assortment → Pricing → Usage. Check whether a special price list is assigned to your store. If no price list is connected, select the appropriate price list. Save your changes. Once a price list is connected, you should be able to complete the bulk price update without issues. Option 2: Bulk Price Change via Assortment → Pricing Use this option when you want to increase or decrease prices for an entire product group or all products. Steps Go to Assortment → Pricing. Select either a specific product group or All products. Click Tools (top-right corner). Select Apply Percentage Changes. Enter the percentage: Use a negative value (e.g., -20) to reduce prices. Use a positive value (e.g., 10) to increase prices. If you selected a specific product group, ensure the option is checked so changes apply only to that group. Confirm the changes. The selected products will now be updated. Pros Can both increase and decrease prices. Efficient for updating entire product groups or all products. Ensures consistent pricing adjustments across categories. Saves time when making large-scale changes. Cons You cannot select individual products. Limited to product groups or all products. Higher risk of affecting unintended products if not reviewed carefully. Recommendation: Work on a Copy of the Price List Before making bulk price changes, we strongly recommend creating a copy of your price list. Why? Bulk changes affect many products at once. Working on a copy ensures: You have a backup. You can review changes safely. You can revert if something goes wrong. How to Create a Copy of a Price List Go to Assortment → Pricing. Open the price list you want to modify. Click Copy (or the corresponding duplicate option). Enter a new name for the copied price list (for example: Price List, Updated). Save the copy. Make your price changes in the copied version. Review all changes carefully. When everything is correct, activate the new price list. This way, your original price list remains unchanged and can be used as a backup if needed.
-
Create campaign-based product group
2 Feb 2026
You can quickly highlight the right products, direct traffic to where you want and increase both conversion and average purchase - without changing your regular structure. Why create a campaign-based product group? By gathering products for a current campaign in a separate product group, the shopping experience becomes both easier and more inspiring for the customer. Instead of searching through the entire range, the customer is presented with a clear selection that suits that particular occasion. This creates confidence, saves time and makes it easier to make purchasing decisions. Create a product group based on your current campaign, for example, Favorites for Valentine's Day or Under 500 SEK for Mom. Create a product group based on your current campaign, such as Valentine's Day Favorites or Under $500 for Mom. Product groups and products
-
Exclude from Index
27 Nov 2025
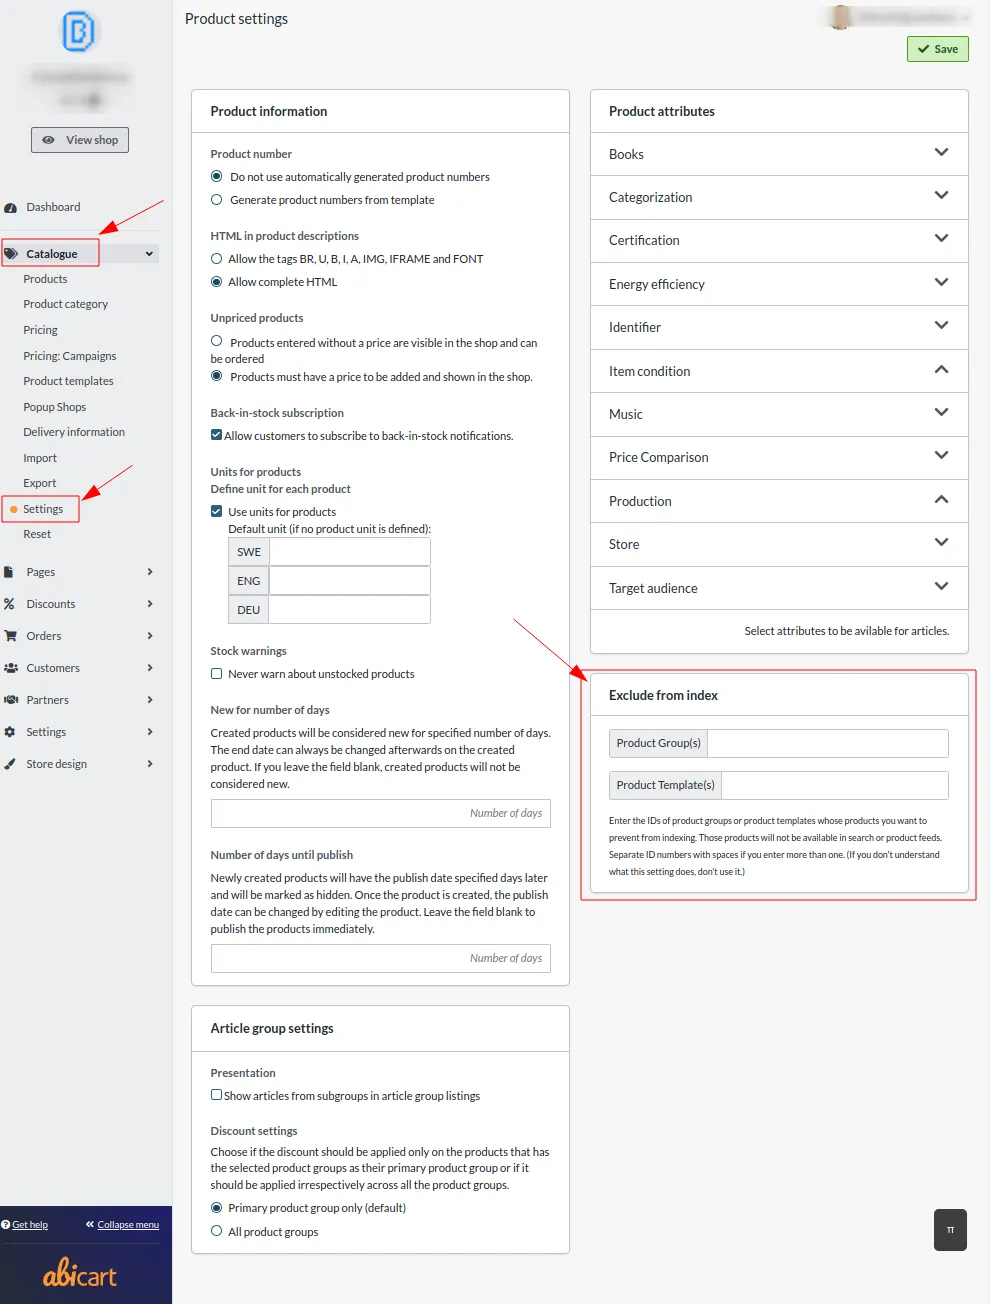
The "Exclude from index" feature allows you to specify certain product groups or product templates that you do not want to appear in indexing. This means that products associated with these groups or templates will not be included in search results or product feeds.Instructions:Product Group(s):Enter the ID numbers of the product groups you wish to exclude from indexing.Separate multiple IDs with spaces.Product Template(s):Enter the ID numbers of the product templates you want to prevent from being indexed.Separate multiple IDs with spaces.Note:Use this setting only if you understand its purpose. Incorrect usage may lead to products not appearing in search results or product feeds, potentially impacting their visibility in your store.This setting is useful if you have specific products that you don't want customers to find through searches or external product feeds, such as products under development or seasonal items that are not currently available.
-
Add product
27 Nov 2025
Go to "Products" in the Abicart administration.Click on "+ New product..." in the top right corner.Select "New product" and fill in the product information as follows:a. Product name: Enter a search engine friendly name, include manufacturer or brand name.b. Introductory text: Write a short summary of the product.c. Description: Write a detailed description of the product.d. Pricing: Indicate the regular price, additional price (if applicable) and VAT rate.e. Inventory management: Enable inventory management, enter the inventory balance and inventory messages for the customer.f. Properties: Enter the weight of the product and select a product template (if applicable).g. Quantity: Enter the minimum and maximum quantity that can be purchased and the minimum increment for quantity.h. Item settings: Mark the product as new, upload customer specific file (if applicable) and enter other settings.i. Information: Indicate if the product should be hidden and what type of item it is (product, package, service or gift card).j. Categorization: Select the product group(s) and any Google Taxonomy.Once you have filled in all the information, click "Save" to add the product to your Abicart store.Read more about Products
-

Create product descriptions automatically with Abicarts AI
27 Nov 2025
Discover Abicart's AI tools and create product descriptions automatically! With Abicart's AI tool, you can create quality product descriptions quickly and easily. It's easy to use and helps you save time and energy.
-
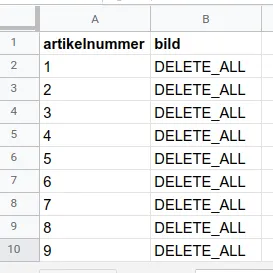
Delete/remove images via import (bulk action)
27 Nov 2025
Note: Only use this function if you are sure of what you are doing.To delete many images at the same time, you can create an import file like the one below and import it.
-

Automate the translation of your product texts with Abicart's AI
27 Nov 2025
Construct product texts that reach customers all over the world with Abicart! Automate the translation of your product texts into any language. Abicart is a powerful tool that gives you the best translation of your product texts, and is an effective way to reach customers all over the world!Abicart now has the ability to automatically translate product texts. We use both Deepl and Google Translate to create translations automatically.With this service, it is easier than ever to reach new markets. It allows companies to increase their online presence and reach a wider audience without having to spend time and money on manual translations.What's even better is that this service is included at no extra cost in all versions of Abicart. This means that all our users can benefit from the automatic translation at no extra cost.So if you want to increase your company's online presence and reach a wider audience, Abicart automatic translation could be the perfect solution for you.With the current service, which is included in all versions of Abicart, you need to click on the translation button in the admin, on each product separately.
-

Automatic product export via FTP/SFTP
27 Nov 2025
-

Video guide: importing images - How to import images into your Abicart Webshop
27 Nov 2025
-

Video guide: product import, how to import products in Abicart
27 Nov 2025
In this guide we will go through how to import a file with products.To import new products, certain mandatory properties must be included in the file, such as the product number, the product name in the base language and the price in the base currency.To update existing products, only the product number and the property you want to update, such as stock balance or price, need to be included in the file.Many shops usually receive products from their suppliers in a text file. The supported formats are CSV, txt, Tab or skv. If the file is in any other format, for example, excel, xls, xlsx or Mac and numbers, the file must be resaved before it can be imported. We will go through this a little later in the Guide. Start by opening the file in a spreadsheet program. In this example, we're using the free LibreOffice Calc, but Excel and other spreadsheet programs will also work.The most important thing when you open the file, and see what the contents look like, is that the properties are in separate columns, and that special characters like å ä ö look correct. If something is not correct, you have to close the file and try to open it again. If you use LibreOffice Calc, you can easily make sure that you open the file correctly. Once you have double-clicked on the file, a preview window will open. In this window you can choose how to open the file.In this example the large field looks a bit messy, so we need to make some adjustments before we can open the fileIf we look in the preview window, we can see on the top line, that the headings are there and there is also a semicolon between each heading. We can then assume that the semicolon is the field separator in this file. We check the semicolon and see how it turns out. Much better!But there still seems to be something wrong. And we can see it in some characters like Å Ä and Ö. This means that the character encoding is not set correctly. The most common character encoding used is Windows 1252, also called Windows Latin 1, or utf-8. In this example, the default is windows 1252 and win latin 1, and then we test changing to utf-8. Now it looks good! Å, Ä and Ö are correct. Then we open the file. If we look at the products, we can see that all products, except one, have a stock balance, and four products have a discount. No problem, this file can be imported.Keep in mind that if the file is in any other format than csv, txt, tab or skv, the file must be resaved. In that case, go to Archive, Save as. At file format, select text csv, tick edit filter settings and then click the save buttonIn the popup box that appears, we select utf-8 as the character encoding, semicolon as the field delimiter, and then we make sure that the quotation marks are selected in the string delimiter. Then click the OK button.Now the file is ready to be imported.Go to Assortment / Import. Select the file to be imported and then select: automatically, at, Fields separated by, and, Character encoding. The system will then detect which separators and character encoding are in the file.Then click on Continue.Since our import file contains column headings in the first line, we check: First line contains column headings. Then you need to explain to the system which column contains which property. Since we have column headings in the first row, it is easy to select and match each column.In this example, we know that the column named EAN is completely empty. Then there is no need to select it, but leave it set to ignore column. This will then be skipped in the import. If you know that you are going to redo this import several times, maybe once a week, or once a month, you can save a template with the column order, so you don't have to match the columns one by one each time. In this case, check: save column order for future imports. Then click on Start import.If you have checked: save column order for future imports, you will need to enter a name for this template. Enter a name, such as today's date and new products. Then click on save and start the import.Depending on how many products are to be imported, this can take anywhere from a few seconds to several hours. We can see how many lines were found in the file, as well as how many products were imported. Since we only have seven products, this is very fast. We can click on Products in the menu to see the result. Here are our products. We can also make sure that the product groups were correct. Click on Product Groups in the menu, and the groups and their sub-levels are shown here. Everything looks correct and this file is now imported. Hope this guide has clarified how to import products in Abicart. Please feel free to comment and leave feedback in the comments section. If you have any questions, please feel free to contact our customer service by logging into admin and clicking on My Customer Service.
-

Work with custom HTML and CSS in Abicart (HTML on product pages)
27 Nov 2025
In Abicart, you have great opportunities to influence the appearance and content.To work with custom HTML on product pages, go to Assortment -> Settings and select Allow full HTML in product descriptions. To work with custom HTML in Abicart's text editing tool, go to Settings -> General and select HTML in "Text editing tool"Work with custom CSS in a theme:Go to Appearance, Themes and select edit on current theme. Then select the Style tab and then Custom CSS.
-
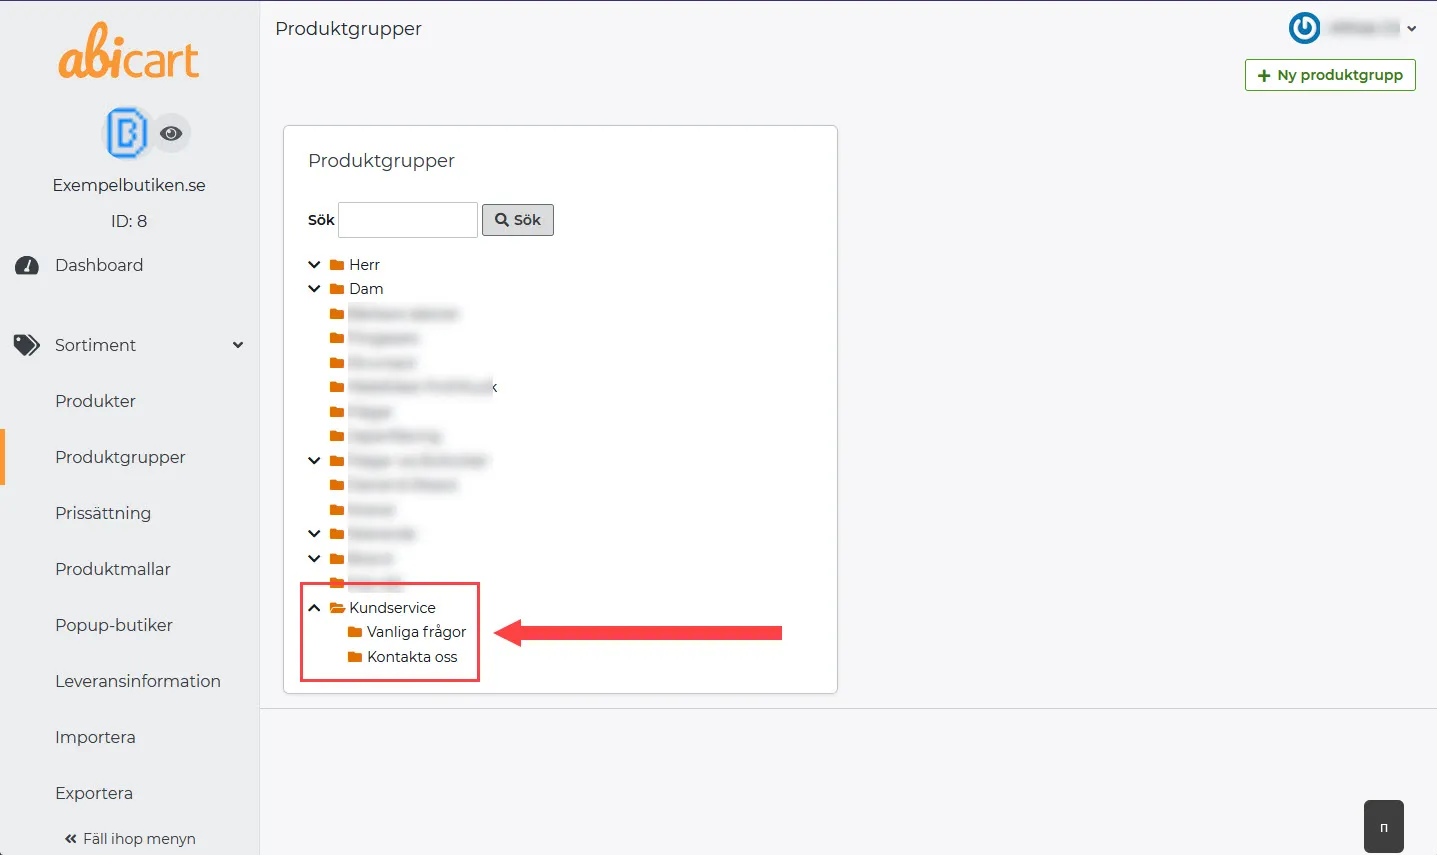
Create Custom pages with product groups and subgroups
27 Nov 2025
A creative way to use Abicart as a CMS tool is to build content pages as product groups. As an e-commerce platform, Abicart is of course optimized for building product structures with assortments, but with a little imagination you can actually use Abicart to build any web. A good example is this website - abicart.se is built entirely with Abicart - and only with standard components. If you want to set up your own pages as a menu item with multiple subpages, you use product groups.Custom pages and product groups work almost exactly the same way. The differences are that product groups can be set up as a main group with subgroups, and custom pages can only be standalone.So it can be useful to put your custom pages as product groups if you want to have custom pages under one menu item:Here's what you do:1) Go to Assortment >> Product groups2) Click on New product group & give the group the name you want as a menu item >> Save by clicking on Add.This will be your "main group" - Now you just have to create the subgroups! 3) Click on the main group >> Then click on New subgroup in the box on the right.4) Name the subgroup >> Save.5) Type the information into your "custom page" or copy the existing custom page and paste its content into the new subgroup.You can enter the text in the field for "Image and text in product group table" or under Optional text/image "Custom look" for a more customized page. Learn more about, custom look here: Link to the manual - Product groups6) Now you just have to add the menu item - Link to the manual: Add a menu item
-

Translations - Export/import texts in multiple languages
27 Nov 2025
As your store expands and gets bigger, you may want to expand your shop to include more countries, currencies, and languages. In the past, you had to translate all your administration texts manually (apart from the product range). Now you can export all the texts in the shop instead.You must first go to Settings -> Languages to activate the languages you want in your store.If you want to activate a language but do not want to display it in the shop directly, click on the language in "Hidden". Then only the language fields will be displayed in the shop administration.Do not make changes during this processNote: When exporting texts, do not make changes in the shop before importing the new language. Exported language strings are imported with the same keys, so if you make changes in the store before importing, there is a risk that text strings will be imported incorrectly.Video guideExport file for translationGo to Settings -> Language -> Export.Export translationsHere you will see several choices that need to be made.Which language do you want to translate from? - Here you will see a list of the languages entered in the store under Settings -> Languages.For example, if you want to translate from Swedish to English, select Swedish. Your exported file will then contain three columns: Id, source language (in this example in English) and an empty column where you write your translations.Which file format do you prefer? - You can choose between three different formats in which the file will be exported, CSV (semicolon-separated text file), ODS (Libre Office) or XLSX (Excel).If you are not sure which to choose, we recommend XLSX, which can be easily opened in Excel.What data do you want to include? - If you want to translate all the texts already entered in the shop, tick all the boxes for Articles, Article groups, Delivery methods, Payment methods, Delivery information, Article template, Own pages and Theme.Theme - Here a list will be displayed with all the store's themes. Select the store's active team. In the exported file, there is a ready column for the translations (translation) in the export file, where you enter your translations for the language of the respective text field.Then click on export.Where do I put the translations in the file?Once you have exported a file, open it in a spreadsheet program, such as Excel, Libre Office Calc or similar. The file should then contain three columns, key, content and translation, and look something like this.Column A: key - This column contains the property to which the text applies. For example, in the picture above, line 2 is an "article" with article ID 12565483 and the content "aftertext" which is the field for text that appears after the order. In column B of line 2 we can see the English text that applies which is "Text after order".Column B: content - In the second column, the English text is shown in this case (as we chose to export the translation from English above).Column C: translation - In the third column we translate the text in column B into the language we want to add to the shop, for example English.How do I import a file once the texts have been translated?Once you have translated a file and want to import translations, go to Settings -> Language -> Import.Import translationsSelect the language to import - A list of the store's active languages will be displayed. If you have translated a file from English and entered English texts in column C, select "English" from this list.Select the file you want to import - Select the translated file from your computer.Then click on the import button. Done!Important informationPlease note:When exporting texts, do not make changes to the store before importing the new language.The language must be added to the store.You can only import one language at a time.If you have exported the file as CSV, the file must be saved with the character encoding "UTF-8" and the delimiter set as "comma" in order to be imported.
-
Product export
27 Nov 2025
You can export all your products, and their properties, in your store to a text file. This is useful if, for example, you want to update several products at the same time, or if you just want to have a backup of all products.Product export is a function to save all products in a text file. You can choose to export all properties, or just selected ones.How do I use product export?Go to Products -> Export. Here you can choose which properties you want to export. Once you have made your selections, press the "Export" button located in the top right corner.Now you have a text file with the properties you selected, which you can use for whatever you want. The file can be opened in spreadsheet programs such as Excel, Numbers, LibreOffice Calc, etc.NOTE! Remember to always export the art.nr property. It is the primary key used to identify each item. The item number must be present in order to import the file again.A more detailed instruction on this can be found further down in the article.You can generate art.nr automatically using the setting under Catalogue >> Settings >> Product numberThings to keep in mindBefore exporting, you should review the store's export settings. These can be found under Settings -> General -> Export settings.Here you can choose how the file will be saved, you can choose for example "Delimiters" and "Character encoding". DelimiterThere are three different "Delimiters" to choose from: commasemicolontabIf you choose "comma", the file will be saved with the extension .CSV.If you choose "semicolon", the file will be saved with the extension .SKV. If you choose "tabulator" the file will be saved with the extension .TAB. All these three formats can be opened in any spreadsheet program. The most common way is to save the file with "comma" and get a text file with a .CSV extension.Character encodingA character encoding is a way of representing, encoding, a selected set of characters, of binary digital encoding used in communication and data storage in computers. There are two character encodings to choose from:ISO-8859-1 (Latin 1, Western European)UTF-8 (universal)Most commonly, Windows uses "ISO-8859-1 (Latin 1, Western European)" and Mac and other operating systems use UTF-8. Exporting a fileGo to Assortment -> Export.This displays all properties that can currently be exported. Select the properties to be exported, and also tick the box "Include column headings in first row" at the bottom left. Then click on the export button in the top right corner. Then you just have to wait a bit. Normally it takes 5-10 seconds for the file to generate if you have 500-1000 products. If you have more products, it may take much longer. Open the file in the spreadsheet programOnce the file is exported, we open it in our spreadsheet program. Remember to open the file after the export settings we made above. If we saved the file with file extension CSV and character encoding UTF-8, the file must be opened this way in the spreadsheet program for it to be correct. Once the file has been opened, check it quickly and make sure the contents are in their columns. Also check that special characters such as å, ä, ö are correct.If something is not right, do not save the file now. It will not be possible to use it again. In that case, close the file without saving. Tips and troubleshootingBelow are examples of common errors that can occur if you have opened the file with the wrong delimiter and/or the wrong character encoding.The examples shown below are made in the free program "LibreOffice Calc" which can be downloaded here.File opens incorrectlyIf everything is "all over the place" and not column by column when you open the export file, you have chosen the wrong delimiter. If å,ä,ö and other letters have been replaced by "strange" characters and symbols, the wrong character encoding has also been chosen. In the example below, both the delimiter and the character encoding are wrong.There are two ways to solve this:- Review the export settings (settings > general) and change the delimiter and character encoding. Then re-export the file. Now it should open correctly.- Choose how the spreadsheet should open the file. In Calc you will always be asked how to open the file.Choose the character encoding.Select delimiter.Preview what the file will look like when opened.In this case, you can already see in the third box that the information is not in columns and that the text "Purchase price" in the first line contains incorrect characters.To open the file correctly in this example, we need to change:character encoding to "UTF-8"the delimiter to comma.Now we see in the preview that it looks correct.Then when we open the file, it looks good:Price with decimal point instead of commaFor the Swedish language, commas are used as decimal separators in prices. In English, for example, it is a period instead.If you open the export file and the decimal separator of the prices is a dot instead of a comma, you need to change the separator in the export settings. If you use a semicolon as the delimiter, the comma will be used as the decimal separator. If you use a comma as a delimiter, the decimal separator will be a dot.In the example below, "comma" is selected as the delimiter.In the example below, "semicolon" is chosen as delimiter.First zero disappears in some columnsSometimes item numbers and/or other fields start with a zero followed by other numbers. Some spreadsheet programs automatically interpret fields containing only numbers as numbers and the leading zero disappears when the file is opened. To prevent this from happening, we need to tell the program to interpret the columns as text and then the zero will remain. We do this before opening the file in Calc.1. Click on the column heading containing leading zeros to select the column.2. Then select "Text" from the drop-down list.When the file is opened, the leading zeros will remain.
-

Product import
27 Nov 2025
If you have a lot of products to add to the store or to update, there is an import function. This means you don't have to do it manually for each product. It is important to remember that all products must have a unique item number for the import to work. Calculator You first prepare the import in a spreadsheet program, such as Google Sheets (free), LibreOffice (free), OpenOffice (free) or Excel (Windows), Numbers (Mac) . You enter a property in each column where the item number is the "key" the product is identified with. For example, if you want to update the price and stock balance of several products, it is sufficient to have three columns in the file. Column A for the article number, column B for the price and column C for the stock balance.Video guide: What file formats are supported? In order for the file to be imported, it must be a text file of type .CSV, .TXT or .SKV.A text file can also contain different character encoding and our import supports two different ones, "Windows UTF-8 (universal)" and "Windows ISO-8859-1 (Latin 1, Western European)". If you receive a file with items from a supplier, you should be able to get them in one of these formats.If you create the products in a spreadsheet program, such as Excel, you can choose the file format by selecting "Save as" and then selecting "File type" from the list. What is needed to create a completely new product via import? To create a brand new product, at least the following fields are required: Item number Product name (in the basic language of the shop) Product description (in the basic language of the shop) Price (in the store's base currency) An example of what this looks like in an import file: What is needed to update an existing product via import? It is quite common to need to update a property of the products, such as stock balance or perhaps setting a new price in case of a sale. To update a product that already exists in the store, only two columns are needed in the import file: the item number and the property to be updated, such as price. An example of what this looks like in the import file: The system then uses the item number to identify the product and then updates the prices of all item numbers included in the file. Nothing is changed on the product other than the property or properties on file. I have an Excel file, how do I import it? Many suppliers use Excel (xls, xlsx) as a file format and this cannot be imported directly into our system. You must first resave the file to a text file before it can be imported. Below are guides on how to resave an Excel file to a text file in Excel and "Libre Office (Open Office)". Excel (Microsoft Office): Open the file and then go to File - "Save As". (If you are using Excel 2007, click the Microsoft Office button and then click Save As.) The "Save As" dialog box opens. Select the text file format for the spreadsheet in the "File Format" box. Click CSV (comma delimited). Drag to the location where you want to save the new text file, then click Save. A dialog box will appear. It says that only the current spreadsheet will be saved in the new file. If you are sure that the current spreadsheet is the one you want to save as a text file, click OK. You can save other spreadsheets as separate text files by repeating the procedure for each spreadsheet. A second dialog box appears, stating that the spreadsheet may contain features that are not supported by the text file format. Click Yes if you only want to save the spreadsheet data in the new text file. The file is now ready to be used for import. Open Office / LibreOffice: Open the file and then go to File -> Save As Click on the list next to "File Format" to expand it. Select "Text CSV" Also check "Edit filter settings" and then click the save button. For "Character set", select "Unicode (UTF-8)".For "Field delimiter", select "comma".For "Text delimiter", select "quote". Import a file of products into the store We now have a text file in the correct format (see above) that contains products and is ready to be imported.Go to Assortment -> Import.In "Select file" select the file you want to import.Double-check that "Automatic" is selected for both "Separate fields with" and "Character encoding" and that "Update information" is selected for "If item already exists in assortment". See picture. Then click the continue button in the bottom right corner. This will take us to the following page. In this example, there are headers in the first row of each column in the import file. We do not want to import these, but check "First row contains column headings". In order for the system to know which column contains each property, we need to select this. Since we have clear column headings, it is easy to select. Part number in the first column and product name in the second, etc. Select the column for all properties to be imported. If you have many properties, you may need to scroll sideways to see all the columns. If there is a property you don't want to update, select "Ignore Column" and it will be skipped. Before we start the import, there is a checkbox called "Save column order for future imports". If you have a lot of properties that you want to update, and you know that you will be doing this kind of import several times, you can save a template for the column order. If you tick it, next time you can click on the "Load saved column order" link instead of selecting each column one by one. Note that it must be exactly the same column order in the file for it to be correct. If you know that this import will only be done once, leave the checkbox next to "Save column order for future imports" empty, and then click "Start import". Depending on how many lines (articles) there are in the file, this will take different amounts of time. If there are only a few lines, it can be done in a few seconds, but if there are many, thousands of lines, it can take half an hour, an hour or even several hours. Wait until everything is ready. Hopefully it will look something like this picture. In this case, there were seven lines in the file. We checked that the first line contained headers, so it was ignored. The remaining six lines were imported. Importing multiple product categories on one product In Abicart Plus and Pro, a product can belong to several product categories, and this can also be solved via import. You then add a new line to the file and enter the product number again and then type the name of the second product group in the product group column. In this example, the beach ball will end up in three product groups: "Beach", "Toys" (subgroup of "Beach") and in "Offers". You can only put the product in one product group via import. If you want to remove the link between a product and a product group, you need to do it manually in admin. Importing multiple images of a product To import multiple images on a product, add a new line to the file and enter the item number again, then enter the image filename/url of the second image in the image column. In this example, the Badball product will have three images imported. If you have a file where the images are in different columns, you will have to solve the import by importing each image column separately. You do a full import first with all properties and select "Image" for the first image column in the file. Once that import is complete, you do a new import with just the product number and image column 2. If there are more columns with images, you repeat the import with the product number and image column 3, image column 4, etc. Example, what should the import file look like? Updating prices For updating prices of existing products only, the file can look like this: The only thing needed is the item number of the products to be updated and the new prices. Article number in column A and the new prices in column B. Update stock balance To update stock balances on existing products only, the file can look like this: In this example, three columns are needed. Item number, inventory management (1 = yes, 0 = no) and inventory balance. We therefore import a one in column B to enable inventory management on the item and then the inventory balance itself in column C. F.A.Q. Question: I did an import but all the lines were ignored, why? Answer: Most likely there is a setting in step 1 of the import that is wrong. Under Assortment -> Import at "Import settings" -> "If the item is already in the assortment:" then "Ignore" is selected. Change the setting to "Update information" and rerun the import. Question: many of my products are marked as "New". How do I unmark them all as new in the easiest way? Answer: The quickest way is to do an export of all products (Assortment -> Export). Export the properties "item number" as well as "novelty". Open the file in a spreadsheet program and enter a zero on all lines in the column "Novelty". Save the file and then do an import. Then all items will be unmarked as new.
-

Product import with customer choice
27 Nov 2025
You can sell products where the buyer can choose different variants, such as size, colour, model, material or similar. This is called "customer choice" in Abicart. To avoid having to enter this manually on each product, you can do this via an import.What should the file look like to import the customer's choices?In a normal import, only the item number is needed to identify the product, but to import the customer's choice, an additional item number is needed for the choice (variant) itself. So, to create a brand new product with the customer's choice via import, at least the following properties need to be included in the file:article number (for the main product)product name (in the store's base language)item number for customer selectionName of customer's choice, e.g. "Colour"price (in the store's base currency)Example of what the import file might look like when importing a product with three sizes and two colours.In the example above, the sizes small and medium cost the same, 100 SEK, while large costs 125 SEK. You can also import other product properties such as description, weight, etc. in the import, but above are the columns that are mandatory to create a new product in an import.It does not matter in which order the properties are located in the file. When you do the actual import, you select the property for each column. More on this below.Create import templatesIn order to import the customer's choices, you first need to create so-called import templates for the choices. For example, if you want to import sizes and/or colors, you need to create a template for each customer choice. In this example, one for "Size" and one for "Color".Go to Assortment -> Import.In the top block "About Import", there is a heading a bit down called "Importing the customer's selection". Then click on the link "Customer Choice Import Templates"Click on "Add new".Here are a number of options:Name - Please enter a name for the template, for example "Size".This option may have a price impact - If certain options are to cost extra, you need to enable this setting.A possible price impact is applied before the price is multiplied by the numeric text fields that affect the quantity - If you use two text fields where the buyer has to enter different values, for example if you sell a product where the buyer has to enter his own measurements for height and width. Then you can check this setting and these values will be multiplied before the price is added. This will give you, for example, a price per square metre of the product.This selection may affect weight - If some selections weigh more than the original product, you need to activate this setting.Single properties (stock balance, item number, picture) - If you want to be able to specify a stock balance or link a picture to each selection, this setting should be enabled. You should always check this box.Click the save button when the template is finished.The most common settings are "This selection may have price impact" and "Custom properties".If you have products with several different properties, such as color, size, model, material, etc., you need to create a template for each property.Import customer's choice in AbicartGo to Assortment -> Import.In "Select file", select the file you want to import.Double check that "Automatic" is selected in both "Fields are separated by" and "Character coding" and that "Update information" is selected in "If product already exists in the assortment". See picture.Then click the continue button in the bottom right corner.This will take us to the following page.In this example, there are headings in the first row of each column in the import file. We don't want to import these, so we check "First row contains column headings".In order for the system to know which column contains each property, we need to select this. Since we have clear column headings, it is easy to select. Part number in the first column and product name in the second, etc. Select the column for all properties to be imported.If you have many properties, you may need to scroll sideways to see all the columns. If there is a property you don't want to update, select "Ignore Column" and it will be skipped.Before we start the import, there is a checkbox called "Save column order for future imports". If you have a lot of properties that you want to update, and you know that you will be doing this kind of import several times, you can save a template for the column order.If you tick it, next time you can click on the "Load saved column order" link instead of selecting each column one by one. Note that it must be exactly the same column order in the file for it to be correct.If you know that this import will only be done once, leave the checkbox next to "Save column order for future imports" blank, and then click "Start import".Depending on how many lines (articles) there are in the file, this will take different amounts of time. If there are only a few lines, it can be done in a few seconds, but if there are many, thousands of lines, it can take half an hour, an hour or even several hours. Wait until everything is ready. Hopefully it will look something like this picture.In this case, there were seven lines in the file. We checked that the first line contained headers, so it was ignored. The remaining six lines were imported.Things to consider:Products with customer selections must have a master item number and a unique item number on each selection.Variants of the same product must be directly below each other in the file. They are imported in the order they are listed in the file.
-

Image import
27 Nov 2025
If you have a lot of products, and don't want to manually add images to each product, you can use image import. Images can be imported at the same time as other product properties (price, description, product group, etc.).Video guideHow does the image import work?You cannot add an image directly to the import file, instead you must enter a file name or URL for the image. The image must be available on a server at the time of import and it works to import images from an FTP server or a web server. The images will be downloaded and placed on the respective product at import time.After the image import is complete, the images can be deleted from the server.Web serverFor imports where the images are on a web server, enter the full URL of the image in the image column of the import file.FTP serverFor imports where the images are on an FTP server, you need to enter the login details (server, username and password) for the server in step 1 of the import (Products -> Product import).In the import file, enter the file name of the image in the image column.To import the file into Abicart, fill in the fields for FTP settings.Go to Products -> Import. Enter the server, username, password and directory.Importing multiple images on the same productIf you are adding multiple images to a product, you must create a new line in the import file for each new image.The product number (Column A) is repeated for each new image and then you place the new images in the correct row in the image column (Column C).In the example below, the soccer ball will have two images and the lego will have three images.
-

Gift wrapping
27 Nov 2025
You can give the buyer the choice to have their order wrapped as a gift. The function appears at the checkout, where the customer can choose to have his order wrapped.How do I activate gift wrapping?Go to Appearance -> Themes -> choose your theme and edit. Then go to the Content tab -> Checkout -> Gift wrapping. Activate gift wrapping by clicking on the "On" button.Use "Generate a gift wrapping article" to create the gift wrapping article. The gift wrap works as if it is an additional product the customer orders.Once the product has been generated, click on the save button in the top right corner.The gift wrap is now displayed at the top of the product list under Products and has a base price of 10 SEK. You can change the product as usual, price, name or picture and add the customer's choice if desired. Now your customers will be able to choose gift wrapping at checkout.Some questions you as a shopkeeper should ask yourself:Do you wrap all products separately or a single package for the entire order?Should the customer be able to choose to wrap the products separately?Should the customer be able to buy the wrapping of a specific product (if there are many in the basket)?We recommend that you make this as easy as possible for the customer and therefore do not overcomplicate the purchase by letting the customer make a lot of decisions. You can use "customer choice" here. Examples of choices you can add:Number of packages1-34-6 (+20 kr)6-9 (+50 kr)10 or more (+100 kr)Describe which items you want us to wrapCover paperRestrictionsIt is not possible to automatically generate the gift wrap product in sub-stores for multi-store systems. You have to create this product manually. Please contact our customer service for more information or help with this.
-

Product filters - Attribute, customer choice and price filters
27 Nov 2025
Filters is a feature that appears at the top of category pages in the store, allowing visitors to quickly and easily search for products in stock by colour, size, material, price, etc. In this article you will learn how to use filters in your webshop.Filters are included in the Abicart Plus and Pro subscriptions.How the filter function worksThere are three types of filters: price filters, attribute filters and customer choice filters.The price filter allows the customer to filter products between different price levels.The attribute filter uses fixed attributes such as brand, manufacturer and country of origin or custom attributes created on a product template.The customer choice filter uses the options available on the products, such as sizes and colors.Enable filtering in the themeGo to Appearance -> Themes -> select theme, edit.Then go to Content -> Filters. Price filterTo add a price filter, click on the "New price filter" button.The filter will appear as a block under "Active filters".There are no other settings for the price filter, just save it.The result in the store is displayed at the top of all product group pages like this.The visitor can adjust the filter by dragging any of the rings and then all products in the category that have a price within the selected price range will be displayed. Attribute filterThere are two types of attributes, global attributes and custom attributes created on a product template. Global attributes Under Soritment -> Settings -> Product attributes, there are a number of fixed attributes that can be activated. These are primarily used in product flows to, for example, Google Shopping and Facebook Catalog. But you can also choose to display these on the product page of the products and then it is also possible to filter on these.Attributes on the product templateIf you have other attributes that are not included in the global attributes, you can create these on a product template and then it is also possible to add these to the filter so that visitors can filter on these. Here in our manual there is more information on how to create product templates. Add attribute filtersClick on "New attribute filter"All active and available filters from global attributes and attributes from product templates will be displayed in a drop-down menu.Select the attribute you want visitors to sort on, for example "Brand". The filter will then appear on all product group pages where there are products that have a brand specified as an attribute.Customer selection filterIf you have products that have sizes, colors, or other choices that are created via customer choice, you can let customers filter on this. Here in our manual you can find all the information on how to create customer selections.Add "New customer choice filter".Then choose which customer choice the customers should be able to filter on.In this example, we select "Size" and then the following filter will appear on the category pages that contain products with size as a customer choice.
-

Product properties (attributes)
27 Nov 2025
There are two types of attributes, "global attributes" and "custom attributes". Global attributes are predefined properties while custom attributes can be named according to your needs.What are product characteristics (attributes)?Global attributes are properties used in product feeds (Google Shopping etc.), such as brand, manufacturer and country of origin. For some of the global attributes you can enter your own text while others have predefined values.Custom attributes can be for example movie categories, music genres, materials, etc. More information on this further down the page.There is no obligation to use these attributes, but it can be good from a search engine perspective to use a brand name, for example. If you choose to have the brand name public and indicate the brand on all products, this will be displayed on the product page and then also indexed by the search engines.Global attributesUnder Catalogue -> Settings -> Product attributes there are all global attributes.There are a few different settings for each attribute.VisibilityChoose how the attribute is displayed. Public, product flow only, private and inactive. All global attributes are inactive by default.Public - Displayed on the product page and in product feeds.Feed only - Displayed only in product feeds, not on the product page.Private - Only shown on the product page in admin.Inactive - Not shown anywhere.Mandatory fieldsChoose whether the field should be mandatory when creating the product.Default valueIf all products should have the same value, you can enter it here and it will be inherited by all products that do not have a specific value entered on the product page.All global attributesBrand nameWhen activating the setting, a free text field will appear on the product in the admin where you enter the name of the brand.HS numberWhen activating the setting, a free text field will appear on the product in the admin where you can enter the HS number.HS number stands for Harmonized System number, and it is an internationally standardized numerical system used to classify and code goods traded worldwide. This system was developed by the World Customs Organization (WTO) to facilitate international trade and customs clearance of goods.The HS code is made up of a six-digit code used to describe the basic classification of a good. This six-digit code can then be expanded to include additional digits to provide more detailed information about the good. The full HS code can be up to 10 digits long and is used by customs authorities around the world to determine tariffs and rules for goods being imported and exported.Suggested age groupWhen you activate the setting, a list of five predefined choices will be displayed on the product in admin where you can select one of the following age groups:Newborn (up to 3 months) - newbornInfant (between 3-12 months) - infantToddler (1-5 years) - toddlerChildren (between 5-13 years) - kidsAdult (teenager or older) - adultFor imports, use the short name after the hyphen in the list above.Suggested genderWhen activating the setting, a list of three predefined choices will be displayed on the product in admin where you can select one of the following:Female - femaleMale - maleUnisex - unisexFor imports, use the short name after the hyphen in the list above.Adult contentWhen you activate the setting, a checkbox will appear on the product in the admin to check if it is adult content.Production dateWhen you activate the setting, you will be able to select a date in a calendar on the product in the admin.ManufacturerWhen activating the setting, a free text field will appear on the product in the admin where you enter the name of the manufacturer.Country of originWhen activating the setting, you will be able to select a country in a list on the product in the admin.ConditionWhen activating the setting, a list of three predefined choices will appear on the product in the admin where you can choose one of the following:New - newUsed - usedRenovated - refurbishedFor imports, use the short name after the hyphen in the list above.Enter/select attributes on the product page in adminWhen you activate a global attribute, new settings will be shown in the "Properties" block on the product page in admin on all products.All public attributes are displayed in the shop, on the product page between the buy button and the description. Importing global attributesIt is possible to import global attributes and you need to include the item number and the global attribute. If you want to import free text fields such as brand and manufacturer, just write the name in plain text.If you want to import attributes that are predefined, such as age group, gender or condition, you must enter the English name listed behind each selection above. For example, article number in a column and the text used if you want to show that it is a used product.Example of how an import file for global attributes can look like Create your own attributesIf you have products where you want to present different attributes, you can create a template for this that you can easily select for each product. For example, if you sell DVD movies and want to list the directors and actors of the movies, product attributes are an excellent feature to use. The properties are presented in a table under the buy button on the product page. See the highlighting in the image below. This feature is included at no extra cost in Abicart Plus and Abicart Pro.Create propertiesProduct properties are created on a product template and then linked to the products.Catalogue -> Product templates -> New product template.Name of the product templateFirst we need to enter a name, for example Movies. Then click on "Add".Then click on the "properties" tab and there are two choices, "Add option" (creates a list) or "Add optional text" (creates an empty text box).Click on "Add option".Attribute name - Here you enter a name for the attribute and in our example we will sell movies and want to list the director and actor for each movie. We name the first attribute Director.Type of information - The checkbox "An object can have several of these at the same time" is a function that allows you to select several options for an attribute. But a movie usually has only one director so we do not check this box here.Search - If you want the options to be searchable, check this box. In our case, we want to be able to search for directors and actors, so we check this box.PresentationHide from customer - The option is not shown on the product page.Linked values - The option will be linked and connected to the search function. Currently only works in classic themes.Click "Add option" and then enter the names of all the directors you want to include. In this example I have created six in the image below.We now want to create actors and it may be that you want to choose several options so we make sure to check "An object can have several of these at the same time". Then we add the options we want.Then save the template and go to a product.Products -> select a product, edit.In the "Properties" block at the bottom of the left column there is a choice for "Product template". Select the template we created and then click save. This will list the different properties on the template, in this example director and actor.We set it up so that you could only select a director and then these are shown in a list. The actors are a multiple choice so you can hold down the CTRL button on your keyboard and then click and select multiple choices. We make two selections in this field and then save.If we preview the product, the properties are displayed under the buy button.Importing product propertiesIf there are many products to be updated with attributes, you can import this via a text file. You need to include the product number, product template name and the attributes to be imported.Example of what an import file can look like.Then import the file in the regular product import under Products -> Import.In step two, where you select columns, there is a block with all the product templates' properties.Then click on "Start import" and wait for it to finish. If there are many products with many properties, it can take quite a long time, so just sit back and wait.Select multiple attributes via importTo select several attributes via import, you must first create the attributes on the product template and make sure to check "An object can have several of these at the same time" under "Type of information".To then select several of these attributes via import, enter the name of the attributes in the same cell, separated by commas. The result is then the following after import.
-
Products
27 Nov 2025
What are the different types of products? There are currently four different types of products: - product (physical or downloadable) - package (consisting of several different products) - service - gift voucherProductThe most common thing you have in your store are regular products. Here you can enter various properties such as name, description, price, stock balance, item number, weight, shipping information, etc.PackagesA product bundle must contain at least two products and you can set a new price for the bundle itself, regardless of the base price of the products in the bundle. Example: If you create a package with three products that cost 50 SEK each, you can enter your own package price of 120 SEK.ServiceWhat distinguishes a service from a regular product is that the blocks (properties) for e.g. stock balance and shipping are missing.Gift cardIf a customer wants to give away a gift card, you can use gift cards in the store. The store owner then creates gift cards with different values, e.g. 100 kr, 250 kr, 500 kr, etc. The customer can then buy one or more gift cards which they then give away. Either it is sent out by email or the buyer can print and give away a physical gift card that serves as payment in the store.Create a new productGo to Products -> Click on the "+ New Product..." button top right -> select "New Product".On this page (tab "Product Properties") there are several different boxes containing different settings.Tip! When you create a new product via copy and don't want the price from the old product to affect the comparison price: Copy the product >> Save as draft >> Enter the correct price >> Save as draft >> Save as usual.Read more about the comparison price & the new law on sale prices here (Lowest price last 30 days)TextsThis box contains settings for the product name and descriptions. If you have activated multiple languages, fields for each language will be displayed for each property.Name of the productEnter a name for the product. Keep in mind that this name is important for search engines, so instead of just entering "t-shirt", you should think about including the manufacturer or similar in the name as well. For example, "T-shirt from [brand]".Introductory textThis field appears on the product page just below the product name and is meant to be used for a short summary of the product.Description of the productThis field is intended to be used for a long detailed description of the product.PricingThis box contains settings for prices, VAT and the possibility to activate a quote function. If you have activated several currencies and set them to be manual, a field for each manual currency is displayed in each price field. However, the most common is that you have a base currency and then link other currencies to this base currency. Then the system can calculate prices in these other currencies automatically based on the current exchange rate.Regular priceA field to enter a regular price for the product.Extra priceA field to enter an additional price for the product.Note that the new pricing system with price lists can also be managed under Products -> Pricing.VAT rateIf a product should have a different VAT rate than the standard VAT rate, you can enter it here. Under Settings -> VAT -> VAT rates -> Default VAT rate for store items, enter a basic VAT rate for all products.Show "Request a quote" instead of "Buy" for this item.In some cases you may not know what the product will cost, and you need to get a quote. You can activate this setting on the product. Instead of a buy button, the customer will fill in an email address and mobile number, they also have the option to fill in their name and a message. After that, the customer will be able to click on "Send price request." The details and the item in question will be sent by email to the store owner.By default, you must enter a price for the products in order to create them. If you want to create products without a price, you can change this setting under Products -> Product settings -> Items without price.Stock managementThis box contains settings to enable inventory management, enter stock balances, and display various stock messages to the customer.Enable stock managementThis setting must be enabled for stock management to work.Stock balanceField to enter the stock balance.If you are using customer selections and have enabled inventory management, enter the stock balance of each selection in the "Customer selections" tab.View stock balanceIf you want to show the product stock balance to the customer, activate this setting. The stock balance is shown on the product page and if the balance is 0 or less, the stock message from the "Stock message for items not in stock" field is shown instead.Hide the item if out of stockIf you want the product to be hidden when it sells out, you can enable this setting.Allow orders even if out of stock and show stock messageYou can set it up so that products that have sold out can still be purchased. The field "Out of stock message" will be displayed and the product can be purchased as usual.Stock message for out of stock itemsIf you have enabled stock management and "Show stock balance", this field will appear on the item page. Here you can enter a text that informs when the product is expected to be back in stock, for example "Temporarily out of stock. Back in stock in 3-4 days".Send me an email when stock is lowA field to activate a setting for the store owner. If you want to be alerted that a product is about to run out of stock, you can activate this feature. You will then also need to enter a value in the "Stock Alert Limit" field, i.e. when the alert should be sent out. For example, if you enter "2" in the field, the system will send out an email to the store owner (the email is sent to the email address specified under Settings -> Email -> Email orders) when the stock balance becomes two or lower.Hide product if out of stockCheck the box to hide the product when stock runs out.Stock location name (for sorting in pick list)Enter the name of the storage location here.PropertiesThis field contains settings for weight and product template (included in Abicart Plus & Pro).WeightIf you use a transportation service like Unifaun and/or Pacsoft, you must enter the weight of all products. The weight should be entered in grams and it will be summed up on all items in the cart to calculate a shipping fee based on the total weight.Product templateIf you have created product templates, these will be displayed in a list here. Select the template that the product will use. Product templates are created under Products -> Product templates. QuantityIn this field you can control how many quantities of the product must be purchased. By default, you can buy anything from one to as many products as are in stock. However, some products you may want to sell in 6-packs, 10-packs, or similar, and then you can set this here.Minimum steps for quantityThe number that the customer can order must be a multiple of this number. The default is "1".The most common is that you sell products individually and then you enter "1" in this field. But if you sell, for example, a 10-pack, the "Minimum step for quantity" will be 10 pieces.Minimum quantityThe minimum number that may be purchased. Default is "1".For example, if you sell a 10-pack, enter 10 as the minimum number. Then the minimum number that can be purchased will be 10.Maximum quantityIf you want to limit the number of this product that can be purchased, enter the value in this field. Default is "0" for unlimited quantity.Hide quantity input field (item display)If you do not want the customer to be able to choose the quantity of the product, you can activate this setting. The customer can then only buy the value entered by the store owner in the "Minimum quantity", "Minimum quantity increment" and "Maximum quantity" fields above.Never show quantity input fieldsThe setting above (Hide quantity input fields) only applies on the item page and if you do not want the buyer to be able to change the quantity in the cart/checkout, you must also check this box. Item settingsThis field contains settings about whether the product should be displayed as new, for display only, etc.NoveltyIf you activate the article as news, it will appear on its own page "News". You can also add a block of products to the start page of the theme and select the "News" link. Then only the articles that are marked as news will be displayed.Customer-specific fileIf you want the buyer to upload an image/file to the product before it is added to the shopping cart, activate this setting. For example, if you sell products with your own prints. Then the buyer can easily attach an image to be printed on the product.Customer specific file is necessaryIf you have activated the setting above, "Customer-specific file", you can make this setting mandatory, so that the buyer must upload a file to be able to add the item to the shopping cart. Then you tick this setting.If only this setting is enabled, nothing happens. The "Customer specific file" setting must be enabled for "Customer specific file is required" to do anything.Exclude from related itemsAbicart Plus/Pro includes a function to show related items under an item on the item page. For example, accessories or "Others also bought". In some cases, you may not want to show certain products in a relationship list and you can disable them with this setting.For display onlyIf you only want to display a product without it being available for purchase, you can enable this setting. For example, if it is an upcoming product, you can add it earlier and then make it purchasable when it comes into stock.Text in order confirmationA field where you can enter a text for this particular product that appears in the order confirmation.Note that there is a general field for "Text in order confirmation" under Settings -> Document and email content -> Order confirmation -> Text on order confirmation.You should only use this field if there is something specific to this particular product that you want to inform about.InformationIn this field there is a setting to hide the product and to show the product type.HiddenA setting to hide the product. The product will not be displayed in the store but only in admin. In the product list, the product row is also marked as dark gray.Product typeThere are four different product types and here you can see which type it is. Product, package, service or gift card.CategorizationSettings for selecting product groups, and optionally selecting Google Taxonomy (requires the Google Shopping add-on).Product groupSelect which product group(s) the product should belong to.In Abicart Plus and Pro, a product can belong to unlimited product types. In Abicart Go, a product can only belong to one group.Google TaxonomyFor Google to accept the Google Shopping product feed, you need to select Google Taxonomy for each product. The categories are predefined by Google and you cannot change or add your own. You must select one of the ones listed if you want to use Google Shopping.IdentificationThe identification field contains properties to identify the product.Item numberAn item number can contain letters, numbers and some special characters.Some external systems (transportation systems, financial and checkout systems, etc.) may have restrictions and not allow certain special characters in the item number such as spaces, & characters, hash tags, periods, commas, etc. Therefore, these special characters should not be used as part numbers, only letters (a-z), numbers (0-9), hyphens (-) and underscores ( _ ).MPN / SKU (Manufacturer's Product Number)A field for the manufacturer's product number.GTIN (Global Trade Item Number)A field for the GTIN. If you are using Google Shopping, you must enter a GTIN number, or enter a brand name for the product.ImagesA module to upload images of the product. Supported image formats are JPG, PNG, GIF and WebP.You should use the .JPG image format and have an image size of at least 1000 x 1000 pixels. The system will rescale the image to different sizes and then display the "best" size depending on the visitor's screen size. In addition, we transcode uploaded images to AVIF. However, the format is only used if the browser supports that format. It is not possible to upload or import AVIF images.AttachmentsA module to upload an attachment to the product, such as a PDF file with technical specifications or similar.You should not use the attachment feature to sell digital files, such as PDFs or similar. The attachment will be available on the product page for all visitors and will be downloadable without having to buy the product.We have a downloadable file selling feature that you can use to sell digital files. ShippingIn this field there are different shipping settings and display of shipping notifications.Free shippingIf you want a specific product to be free shipping, you can enable it here. If there are some products that are free shipping and others that are not, the regular shipping fee will be applied to the order.If all items in the cart are free of shipping charges, no shipping fee will be added to the final total.BulkyA feature to tag a product as bulky, for example if you sell products that are physically large but may not weigh much and should not use the regular shipping fee.Usually, you create a shipping method (Settings -> Shipping and delivery) that can handle bulky products (e.g. "Pick up in store") and then disable bulky products on all other shipping methods.If the customer has at least one bulky product in the cart, only the delivery method(s) that can handle bulky products will be displayed at checkout.Delivery informationUnder Products -> Shipping information, you can create different shipping templates that display different texts depending on whether a product is in stock or sold out. You can then link the templates to your products. You can tag a shipping template as "default template" and it will be activated by default on all products. You can then manually change the shipping template or turn it off completely via the settings here.Show the store's default shipping information template ("[Template name")Show no shipping informationChoose your own item-specific shipping information templateStore owner's notesA text field for notes. Only shown in admin, not in store.
-
Pricing, price lists and graduated prices
27 Nov 2025
Use several different price lists and switch between them during a sale, for example. Create tiered prices so that the more you buy, the cheaper it getsBe careful when editing active price lists!We ALWAYS recommend copying the price list you want to edit. Once you have applied e.g. percentage price change, you cannot go back one step if it goes wrong. If you edit in one copy, you can always start again in a new copy if the first attempt was wrong.What are price lists?A price list is a list of prices that you can link to the shop's basic price, additional price or to a customer group that should have customized prices.The advantage of price lists is that you can prepare price changes in peace and quiet, a couple of days before the price change is to take effect and then switch the price list manually or via a schedule when the new prices are to take effect.Price lists are managed under Assortment -> PricingIn Abicart Plus and Pro, unlimited price lists are included. In Abicart Go there are only two price lists, Global (regular price) and Global (extra prices).Extra prices are shown on the product page & product group page as -X SEK or -X%. While discounts are deducted first at checkout. Click here to read more about discounts.Things to keep an eye onNormal prices, extra prices and purchase prices are managed in separate price lists, which are then linked to where they should be used.Sub-stores and customer groups can be linked to price lists which are then used instead of the main list. Several sub-stores and/or customer groups can be linked to the same list.If a price field is left empty, the product is not available for purchase. If the store allows free items, you can enter 0 as the price, but an empty field will also make the product non-purchasable with that setting.If you change prices on the product page or product list, the price in the active price list will change.Prices are listed including or excluding VAT depending on the store's basic VAT settings (Settings -> VAT -> Price management). You cannot have some price lists including VAT and others excluding VAT.ConversionWhen the functionality is activated, existing prices will be converted to the new structure. However, the store should go through the prices and confirm that it looks right, as various settings affect how the conversion takes place.Normally, three different price lists will be created, one for regular price, one for extra prices and one for purchase prices. If no product has an extra price or purchase price, only one price list is created, Global (regular price).Linking price listsUnder Assortment -> Pricing -> "Usage" tab, you link the store's price lists.In the example above, we have three price lists linked in the store. Regular price, extra price and purchase price.If you use customer groups, you can easily set which price list each customer group should use. These are shown under the block with "Global pricing".Create a new price listYou can create a new price list in a few different ways. The most common is to go to Assortment -> Pricing and click the "+New price list" button in the top right corner. This creates an empty price list without any prices.Name - Enter a name for the price list, for example "Black Friday", "Promotion" or similar. This is not displayed anywhere towards the customer but only in admin.Search - If you have many items and only want to enter prices for some, you can easily add a search parameter for product number or product name and then search for which items to price.If you do not want to create an empty price list but want to copy and edit an existing price list, this is also possible. In that case, go to an existing price list, then click on "Tools" in the upper right and then select "Create copy of this price list". You can then rename it and update the prices manually.Updating prices in a price listYou can update prices in four different ways:Change manually on the product page in the administrationEnter the product as usual (Assortment -> Products -> Edit product -> Price) and enter the new price. For example, if you change the "regular price" and "extra price" on the article, the price lists for each price will also be updated, in this case "Global (regular price)" and Global (extra price).Change manually in the product listingGo to Assortment -> Products and click on the price in the product list. Then enter the new price in the box below. Change manually in the price listGo in and manually edit the price list (Assortment -> Pricing -> click on the edit icon "pencil" to the right of the price list). All items are then listed in a long list and you can make manual changes behind each product. Change prices via text file importIf you want to update all the prices in a price list or perhaps create a completely new one, you can do this by importing a text file.What should the file look like?The file should contain at least three columns with the following headings:ArticleQtyCurrency code, for example SEKIf you have several currencies, you enter these in each column after each other. See example.To update an existing price list, go to Assortment -> Pricing and click on a price list via the edit icon (pencil) on the right. Then click on the gear in the upper right, "Tools" and then "Import prices from file". This opens a pop-up window where you select your import file. There is a setting where you can choose between product number and product ID. This is if you do not have your own product numbers on your articles, you can use the database's product ID instead.Select the file and click "ok". The file will then be analyzed and if everything is okay, a green box will appear below.Then click on the import button and wait. The import may then take a while depending on how many items are included in the price list.Once the page has reloaded, everything is ready and the new prices have been loaded into the price list.If something is wrong, for example if there are two items with the same product number or if the product number does not exist, this will be shown in the box.Remove tiered prices via importTo remove tiered prices via import, export the price list. Then edit the file and delete the price; the value in the "Qty" column should remain. See example:Column A = Item no.Column B = The quantityColumn C = PriceThis is what the file looks like after export:Edit the file so that it looks like the image below. Then import the file into the price list in admin again.Scheduling(Webshop Plus and Pro only)The store can schedule a price list to be activated at a specific time. The function replaces the previous "scheduled extra prices", also known as "Black Friday", and is done under Discounts -> Scheduling.The function switches which list to use for extra prices at the specified time. It is also possible to set if/when the system should revert to the previously active price list.Create a new scheduleDiscounts -> Scheduling -> +Create scheduled event Name - Enter a name for the schedule, for example "Black Friday". This is not shown anywhere to the customer, but only in admin.Scheduling - Enter a date when the price list should be activated.If you want this price list to be temporary, you can check "Deactivate and return to regular price list" and enter a new date when this price list should be removed.Event settings - Specify which price list to activate. The list shows all the store's price lists.In this example we choose "Black Friday".Then click on "Add" to activate the scheduling.Tiered pricesIf you want to give customers a cheaper price the more of the same product is purchased, you can create tiered prices. Go to Assortment -> Pricing and then choose which price list you want to use and click on it.Between the name and the price there is an icon with some dots and dashes. Click on it.This will add a row, a box for quantity and then a box for price.In this example, we want to give customers a discount if they buy three items, so we enter a three in the box for quantity and the price what the unit price for three pieces should be, 120 SEK. Then just save the price list. Done.In the example above, the unit price will be SEK 220 if you buy one or two items. If you buy three or more, the unit price will be 120 SEK.If you exceed a limit, the price applies to all quantities (not just the quantity that exceeds).Show tiered prices on the product pageTo show the price steps on the product page, you need to activate this in the theme.Go to Appearance -> Themes -> select theme, edit -> Content -> Product page.Scroll down to "Price table" and click the "Enabled" button and save.Note! Displaying tiered prices on the product page only works on regular price. It is not possible to display the table on the product page for any graduated extra prices.Show extra price in percent or value?To show the extra price in SEK instead of -x%, edit the store theme:Go to Product group page >> Scroll down to Extra price in percent >> Change to "value" >> SaveDone!
-

Product bundles
27 Nov 2025
Product bundles allow you to put several products together and sell them as a single package.This feature allows you to create a ready-made package with existing products and set a separate price for the package. When the package is purchased, the inventory balance is automatically counted down on all products included in the bundle.Product bundles are included in the Abicart Plus and Pro subscriptions.RestrictionsThis feature is still under construction and therefore there is currently a limitation in that some products cannot be included in a package.Products that cannot be included in a package at the moment: Products with different VAT rates.gift card products. products where the customer can upload a customer-specific file.Product packages cannot be copiedCreating a product bundleIn this example, we have five products, four tools and a toolbox that we want to sell together in a package. To create a product package, click on "New product" -> "New bundle".Enter a name for the bundle.Enter a description.Then you choose which products to include in the bundle. In the right column there is a field called "Products included". Click on "+ Add content" and then find the first product to be included in the bundle. You can search by product name and/or product number. In this case, we search by product number and the product name appears in the list below. Click on the product name to select it.Repeat the step and add all the products to be included in the package. When all products are selected, it will look like this:Then you have to give a price for what this bundle should cost. In this example, all products cost 1275 SEK in total and we think you should get a little discount so we set 999 SEK as the price for the bundle.In the shop, it looks like a normal product.
-

Embed a video or youtube clip
27 Nov 2025
Post a video clip on a product page, product group page or custom page.I have a video clip, can I upload it to the file archive? Yes, you can upload the video clip to the file archive, but you should always use a streaming service such as YouTube, Vimeo or similar for your videos. If you have filmed something, for example, with your mobile phone and upload the video file directly to the site, visitors must download the entire video file before they can watch the clip. This can make the whole store very sluggish and slow to load. Therefore, you should always upload the video to YouTube, for example, and then "embed" the clip from there on your site. Important to keep in mind Abicart's themes are responsive, which means that the design adapts to visitors' screen sizes. Usually when you copy an embed code from a streaming service, there is a fixed width and height in the code which means that the video clip is not responsive. We'll go through how to make the clip responsive further down this page. Embedding a link from YouTube Once you have uploaded a video to YouTube, click "Share" below the video Then click on "Embed" and copy the code You paste the link in the article description of the article where the video should appear. Go to Products -> select product, edit paste the code in "Description". Save. Making a video responsive and full-width A video embedded in the theme will not automatically adjust to the visitor's screen size. Solution: Go to https://embedresponsively.com/ and paste the link from YouTube or Vimeo and click "Embed". NOTE! Keep in mind that it should be the URL that you copy from the address bar and not the sharing link. The code that appears consists of a CSS part and an HTML part that you need to paste in two different places. The code that is between the "style tags" you put into your stylesheet in the theme and the HTML code that comes after the style tags (highlighted in the image) you paste into the source code in a separate HTML module. You can also put the video on a product page:Products -> select product, edit -> paste the code "Description". Example: Embed a link from YouTube shorts When the video you want to embed is a "shorts" video, you need to edit the URL you get from YouTube. The link you get looks like this: https://youtube.com/shorts/exempelvideoIt needs to be edited to look like this: https://youtube.com/embed/exempelvideo Copy + paste the code below into your editor and then replace these fields:- Video URL- The optimal size for a Shorts video is 315px x 560px, but you can change the image size as needed. Make sure that the aspect ratio is maintained.- Frame border in pixels (px) <iframe width="315" height="560" src="https://www.youtube.com/embed/exempelURL" title="YouTube video player" frameborder="0" allow="accelerometer; autoplay; clipboard-write; encrypted-media; gyroscope; picture-in-picture; web-share" allowfullscreen></iframe> Follow these steps: 1. open the video on Youtube2. copy the video link found in the address bar of your browser.(or) Click on Share > Copy. 4. Paste the copied video link into the iFrame code mentioned above.5. Replace /shorts/ with /embed/ in the video URL:Before: https://youtube.com/shorts/exempelvideoAfter: https://youtube.com/embed/exempelvideo 6) Change the width/height if it needs to be customized. For example, the code should now look like this: <iframe width="315" height="560" src="https://youtube.com/embed/uE9S4UiINEc?si=0Sbx8nxSh7hAOcVc" title="YouTube video player" frameborder="0" allow="accelerometer; autoplay; clipboard-write; encrypted-media; gyroscope; picture-in-picture; web-share" allowfullscreen></iframe> 5) Insert the code in the source code (<>) of any HTML block. For example, it can be a product description, a separate page, product group or the star page. When you put the code in the store, the video will appear like this:
-

Related products
27 Nov 2025
Related products allow you to show complementary or similar products on the product page, such as Accessories, Similar products or Others also purchased. By displaying relevant products, you can increase upselling, increase order value and help customers find more products they are interested in.Different ways to create lists of related products You can create lists of related products in several ways depending on how you want to work in your store: 1. Manually on the product (product-specific list)You can create a related list directly on a product and manually select which products to display, or choose to display an automatic list based on purchases. 2. Via product templates (only for Abicart Plus and Abicart Pro subscriptions)If you use product templates, you can create relationship lists in the template. The lists will then automatically appear on all products that use that template. You can choose to hide related products from the product template on a specific product by checking the "Hide lists inherited by product template" box on the product's related products settings.Read more about product templates here 3. Via import If you have many products, you can create or update related lists via import. This allows you to manage related products on a larger scale.Read more about how to import related products here Info for you with Plus & Pro: You can choose to show related products both from item template and from product specific list (list created via import/manually per product). Add related items to a product Go to Assortment -> Products -> Select product, edit -> Go to the "Related Products" tab. Click on "Add relation list". Name of the list Enter a name for the list. The name will appear above the products in the list on the product page. Settings Set where the relationship list will be displayed in the store: Show on product page Show when product is added to cart Always show in cart Appearance A setting for how the relationship page should be presented, as a list or table. Select "Manual selection" and then click on "Add product". Locate the product by first selecting the product group and then the product. Repeat the step to add more products to the list. Enable the display of related products in the theme Go to Appearance -> Themes -> Select theme, edit -> Content -> Article pages. Scroll to the bottom of the page to "Block". Click on "Add block" and select "Related, visited or other products". Click on add. Enter a name for the block (only shown in admin) and at "List" select "Related products". Under "Automatic or manual" select "Manual" for a manually created list. If you choose "Automatic", the system will show products that other buyers have traded at the same time as the product you are looking at.
-

Delivery information
27 Nov 2025
Display different texts with delivery information depending on the stock status of the productsDelivery informationShipping information is a text message that appears on the product page, at checkout and on the order confirmation depending on the shipping template and the stock balance of the products. You can set a text for when the item is in stock, and another text for when the product is sold out.The most common is to have a template that has a text message for when the product is in stock and another text when it is sold out. For example, "In stock. Immediate delivery" and "Out of stock. Delivery in 8-10 days".You can create several different templates with different texts, but each product can only have one template active at a time.Stock messageStock message is a product setting under Inventory Management (Assortment >> Products >> Edit a product >> Inventory Management). The stock message & its related settings are also available via export/import.Send me an email when stock is lowCheck this box to receive an email notification when stock is low. The email will be sent to the same email specified under "Recipient Order Confirmation Copies" (Settings >> Email)What is the difference between delivery information and "Show stock balance/Stock notification for goods not in stock"?In order to show delivery information and stock balance/stock message, it is required that "Enable stock management" is activated.The delivery template is intended as a general text that can be used for products: general delivery information.The stock message, on the other hand, can be written more specifically and vary from product to product.The delivery template can only be edited in admin, but the choice of delivery template per product can be done both manually via admin and via import. See more info under the heading "Import delivery templates".Stock message can be edited manually via admin and via export / import. See image example below.If you use both delivery information and "Show stock balance/Stock message for goods not in stock", two messages are displayed at the same time. Sometimes this can be good, other times it might cause confusion. Use only one of these functions at the same time delivery information and stock message do not fit well together. Example stock message & delivery information on product page:Example properties for export when you want to edit stock message via import:The properties highlighted in yellow are needed to activate and enter the stock message. The orange highlighted property is only needed if you want the product to be ordered despite being out of stock.What is required for shipping information to workFor the feature to work, it must:"Enable stock management" must be active on the product.The product's stock balance must not be empty.There must be at least one delivery template.Create a delivery templateTo enter a delivery message, you first need to create a delivery template.Go to Products -> Delivery information.Under "New template" there are three fields that you can fill in.Name of the templateEnter a name, for example "standard template", "template 1", "5 days delivery" or similar.The name is only displayed in admin.Text displayed when the item is in stockEnter a text, for example "In stock, immediate delivery".Text when the item is out of stockEnter a text, for example "Out of stock. Back in stock in 8-10 days".Do not forget to save.You can create several different templates but each product can only have one active template.Choose the default templateWhen you create a shipping template, it automatically becomes default template. If you have created several delivery templates, you must select one of the templates as the default template. You do this by ticking the ring to the right of the template name. (If you change the label "default" to a new template, all products that have "Show store default template for shipping information" will get the new template).Delete a shipping templateIf you want to delete a template, select the template via the checkbox in front of the template name and then click the "Delete selected" button.Select the delivery template on the productsGo to Assortment -> Products -> select product, edit -> scroll down to the box "Shipping" -> Shipping information.Here you have three different choices:Show store default template for shipping informationBy default, the default template is selected on all products.Show no shipping informationNo template will be used.Choose your own product-specific template for shipping informationIf you select this, all shipping templates available in the store will be displayed and you can choose a different template than the default template.Importing delivery templatesIf you have many products that will use different templates, you can make an import to avoid having to manually select each product. Under Products -> Delivery information, there is a box at the top with the heading "Import delivery information".To import the delivery template on the products, a text file is needed that is semicolon separated and contains two columns.Column A should contain the item numberColumn B should contain the name of the shipping template. It must be the exact name in lower case, upper case, etc.Note that you can only change the template via import. It is not possible to change to"Show no delivery information".
-
Product templates / article templates
27 Nov 2025
Create a product template with sizes and colours and then link the template to multiple productsWhat is a product template?If you have many products that have the same options (for example, trousers that have the same sizes and colors) and you don't want to specify this manually, one by one on each product, you can create an article template. Product templates are only available in Webshop Plus and Webshop Pro subscriptions.What settings are available on a product template?There are three different properties that can be activated on a template and they are:Properties (attributes)Customer choice (sizes/colors)Related productsCreate a product templateGo to Products -> Product Templates -> Click on + New Product TemplateEnter a name and then click on "Add". Once the template has been created, four tabs are now displayed, template properties, properties, customer choice, and related products. Properties (attributes)For example, if you sell DVD movies and want to list the genre, director, and actor of the movies, product properties are an excellent feature to use. All directors and actors are entered into the template and once you have linked the template, you then select the specific director and actor on each product.For instructions on how to create attributes, go to the "Product Properties (Attributes)" manual page.Customer choice (sizes/colors)Create various choices that customers must then select on the products before they can add it to the shopping cart, such as sizes, colors, materials, options, etc. For instructions on how to create customer choices, go to the "Customer choices (sizes and colors)" manual page.Related productsOn each product page in the store, you can choose to display a list of other products at the bottom of the page, called related products. In the theme, you can choose to activate a feature that automatically displays related products based on what other customers have purchased in combination with the current product and/or product pages they have visited before.This feature allows you to manually create a relationship list, for example for "Accessories" or similar. If the relationship list is created on a product template, this list can easily be applied to multiple products. For instructions on how to create relationship lists, go to the "Related Products" manual page.Adding a product template to a productGo to Products -> select product, properties. Scroll down to the block called "Properties".At the product template, a list of all created templates will be displayed. Select the one you want and don't forget to save it. Sure. Each product can have a product template activated.
-

Shopping lists / Purchase lists
27 Nov 2025
Allow logged-in visitors to save products in different shopping lists.What are shopping lists?It is a feature where logged-in visitors can save one or more products in different lists, which can then be easily added to the shopping basket and checked out.This function is only available in Webshop Plus and Pro. Visitors must be logged in to be able to save products and create and save shopping lists. Enable shopping lists in the themeGo to Appearance -> Themes -> select theme, edit -> Content -> Product page -> Favorites & shopping lists. At "Shopping lists" select "Enabled" and save. How does it work in the shop?Once a visitor has logged in with their customer account, an icon with the text "Add to list" will appear below the buy button on each product page.The first time a visitor clicks on the icon, a box will appear that says "My Lists" and a button to create the first list. Click on the "New List" button and enter a name, for example "Christmas Gifts" and click on the "Create List" button. Then click on the newly created list and the "Add product" button will appear. The product will then be saved in the list. All saved lists are then available under the customer's "My pages".
-

How do I choose the order in which my products appear on product group pages?
27 Nov 2025
Set up automatic or manual sorting on your product group pagesAutomatic sorting on all product group pagesBy default, all product group pages are linked to the sorting selected in the theme (Appearance -> Themes -> select theme, edit -> Content -> Product group page -> scroll down to the section for "Articles" and then Sorting). You can choose from seven different sorting options: name, price, latest, most popular, stock, product number and weight. All items on all product group pages will then be sorted according to the selected sorting above.Change sorting on a specific product group pageIf you want to change sorting on a specific product group page, you can do so. You then have to go to the product group through Assortment -> Productgroups -> select product group, edit -> the tab "Appearance" and click in "Custom appearance". You then get to add a product table and in the product table settings on the right, you choose it to be "Linked" and then a block with "Sorting" appears a little further down. This sorting is a bit different from the theme's sorting but you can choose from the following sorting orders: last modified, last added, cheapest first, product number ascending, product number descending, product name and most sold. The articles on this product group page will then be sorted according to the selected sorting and will ignore the sorting from the theme.Manual sortingIf none of the automatic sorting fits, you can choose to place the items one-by-one in a specific order.Assortment -> Product groups -> select product group, edit -> the "Appearance" tab and click in "Custom Appearance". You then get to add a product table and in the product table settings on the right, you choose it to be "Manual" (instead of "Linked").Now you can select items in each box in any order you like. Move your mouse cursor over one of the boxes in the product table and then press the button with the tick (Select product). Select a product by searching on the name, or by browsing product groups. Click on add and save.One thing to keep in mind when making a product table manually is that new items added to the product group will not be displayed automatically, but you need to go to the product group page and add each new product to the product table manually each time.Note also that a product can only be displayed once on each page. So you cannot add the same product several times in a product table and any duplicates will disappear when you save.
-

Favorites
27 Nov 2025
Enable visitors to mark and save favourite productsWhat are favorites?It is a feature that allows visitors to mark products as favorites and save them in a list. If the feature is enabled, a heart will appear on each product page. If the visitor clicks on the heart, the product will be saved as a favorite and you can then find all the favorites by clicking on another heart at the top of the shopping basket.We have updated the favorites feature so from today onwards you do not need to be logged in to use the feature. Activate favorites in the themeGo to Appearance -> Themes -> select theme, edit -> Content -> Product page -> Favourites & shopping lists.At "Mark as favorite" select "Enabled" and save.How does it work in the shop?On each product page, an icon with a heart will appear below the product price. If the visitor clicks on the icon, the product will be saved in a favorites list. To see the whole favorites list, click on another icon with a heart at the top of the shopping basket. From the list, the customer can go directly to the product page or add it to the shopping cart. If the product has variants/options or requires file uploading, the customer will not be able to add it to the shopping cart directly but will be redirected to the product page to make the mandatory selections first.
-
Customer's choice (sizes and colors)
27 Nov 2025
If you have products where the customer has to make certain choices, such as choosing a colour or size, you use the function called customer choice.What is the customer's choice?There are two different types of customer choice, "option" and "optional text". The option creates a list of choices for the buyer, such as sizes and colors.The "optional text" is a text field where the buyer enters a text. For example, if you are selling a printed sweater, the buyer can enter the text for the print in the text box.Why use customer choice?If you sell products that come in many different varieties, it may be easier to have one item with different choices than to have 20 almost identical items. The choices are presented as a drop-down list (options) or a bulleted list (variants) on the item page, allowing the buyer to easily select a color and/or size of the item and then add it to the shopping basket. Another advantage of creating customer choices is that the filter function works in combination with it. You can then select a color and/or size on a category page and it will list all items that have that size in stock.Example options:Example variants:Create customer choiceGo to Assortment -> Articles -> select an article, edit -> tab "Customer's choice". Click on the link "Add choice". This will open a box on the right where you can make several choices. NameEnter a name for the option, for example, Size or Colour. In our example, we are going to create a color with three choices, so we enter "Colour" as the name. Mandatory (must be selected by the customer)Should the field be mandatory or optional for the buyer? In our example, the buyer must choose a color so we check this box. Any price impact is applied before multiplying the price by the numeric text fields that affect the quantity.If you have an item with a price per square meter, you can create two text fields, one for width and one for height. If you tick this option, the value will be multiplied in these two fields before the price is calculated. In our example, we will not use this so we leave the box unchecked.Own properties (stock balance, article number, image)If you want to be able to specify stock balance, and item number or to be able to link an image to each selection, activate it here. In our example, we want to have a stock balance on the different colors so we tick this box. Create variantsThen we need to create the variants for the customer to choose from. In our example the different colors. Click on the link "Add options". The content of the box changed and now three new headings appear.Name of the optionHere you enter the name of the variant, in our example colors. We enter "Blue" in this box. Price impactIf the choice made by the customer will affect the price, a value can be entered here which will be added to the basic price of the article. In our example, the color choice costs nothing extra so we leave this field blank. Weight impact (grams)If the choice the customer makes will affect the weight, a value can be entered here which is added to the basis weight of the article. In our example, the color choice weighs nothing extra so we leave the field blank. Then we repeat the step and click on " Add options again. We enter a new variant, in our example, we write "Yellow". We repeat the step again and enter "Red". Then we click on the Save button in the top right corner. Now we have created a customer choice with three colors that the buyer can choose on the item. In this view, we can enter the item number for each variant. If you have activated stock management on the article (under the tab Article properties), there are also fields for stock balance at each variant. In order to link different images to the variants, you first need to upload the images under the tab Article properties at "Image". Then a link, "Select image" will appear at the far right of each variant and you can then choose from the uploaded images. Do the variants have to have article numbers?It is not a requirement to use item numbers but if you have an integration to a store or POS system then you must have them for the link between systems to work. Similarly, if you want to easily update stock balances or prices of the variants via an import, each selection must have a unique item number.
-

Show reviews on the product page
27 Nov 2025
Add a widget that can display product reviews from Trustpilot and YotpoWhat are product reviews?It is a feature where customers can review the products they have purchased. The reviews are presented on the product page below the description.What does it look like?TrustpilotYotpoWhat is needed to make it work?TrustpilotTrustpilot requires the standard Trustpilot package and then you add the product review service. You get this on the Trustpilot site: https://www.trustpilot.com/Trustpilot also requires that you have the SKU or product number indicated on the products.YotpoFor Yotpo, their free version is sufficient and you register here on their site: https://www.yotpo.com/.Yotpo requires all products to have a product number listed for it to work and they also do not allow special characters (å,ä,ö) periods or commas in the item number. Only numbers, letters, hyphens and underscores.How do I activate product reviews?Go to Design -> Themes -> select theme, edit -> Content -> Product Pages -> scroll down to "Bottom of product page" -> Add block -> select "Product Reviews Widget" and click the select button. Then choose the service you want to use, Trustpilot or Yotpo:TrustpilotTo activate Trustpilot you need to enter your "Business Unit ID" which you will receive from Trustpilot. You can have different IDs for different languages.You then need to choose an appearance template and there are several to choose from.Then choose a color theme, light or darkYotpoTo activate Yotpo, you need to enter your "App Key" which you will receive from Yotpo. You can have different keys for different languages.To change the appearance of the widget presenting the reviews, you need to log in to your Yotpo account by clicking on the "Change widget appearance" button.⚠️ Yotpo Widget Loading IssueCertain product configurations will prevent the Yotpo (and Trustpilot) review widgets from initializing on your product pages.Unsupported Configurations:• Empty product numbers (and empty SKUs for Trustpilot)• Invalid characters: Product numbers must consist only of letters (A–Z, a–z), digits (0–9), hyphens (-) and underscores (_). Any other character (spaces, punctuation, symbols) will cause the widget to fail.Problematic Examples:• PRODUCT 001 (contains a space)• ITEM#100! (contains punctuation/symbols)• (blank)Valid Example:• ITEM-001_ABC– Uses only letters, digits, hyphens and underscores — the widget will load correctly.Recommendation:Review your products to ensure all product numbers follow the allowed character set and are never left blank. Then if it is still the same, reach out to customer support.
-

How do I add alt text to a product image?
27 Nov 2025
Adding alt text to your product images is beneficial from an SEO perspective, if the image does not load correctly or if a visually impaired person is in your store using a screen reader or other device.To add alt texts to your products, do the following:Go to "Assortment" and "Products"Click on "Edit" for the productLocate the image for which you want to add information by clicking on the icon with a small arrow.Here you add your alt text and image information.Saving You can add all alt texts per language that you have active in your shop. You can also add a unique file name to each product image.If you don't add your own alt text, this will be created automatically based on the name of the product.The file name must not contain special characters, spaces or å, ä, ö.Adding alt texts to images displayed on productgroup pagesOn these pages, you can add alt text to images in the same field where you upload a new image.Click on upload a new imageEnter the description in the field as shown belowSimilarly, add alt text in any context where you use a HTML block.Alt texts for images displayed on the homepageImages that are used on the home page in shopwindows are uploaded or selected from the file archive. They use the text you enter in the text field as alt text. For example, in the image example below, the text "New in the shop" will be used; if you do not use any text, the alt text will be empty.Images used in slideshows are not currently supported to affect the alt text.
-

Product groups
27 Nov 2025
Product groups Product groups are used to organize your products in a convenient way for your customers. They form the basis of your product range. Defined product groups help you to create order in your shop. In admin, you can use folders to create a structure to categorize your products.The structure of the product group created here will be used as the layout for the menu on the website.So plan it very carefully.Tip. A well-designed structure makes navigation easier for your buyers. Easy navigation equals a good user experience and satisfied customers.For example, this is what it might look like when you group all brands under one product group: How do I add product groups?Go to Assortment (A) -> Product groups (B) -> Click on +New product group (C) Enter the "Name of the group" (D) (e.g. Fashion). Click the +Add button (E) to add and save the group . How do I create subgroups? Method 1:Start by creating a new product group. If you are not sure how to do this, see the previous section "How do I add product groups?".Select the main group to which the new product group will belong at "Location" (A). Enter a name for your product group (B).Click on +Add (C) to save your product group.If you click on Assortment -> Product groups (D), you will now see that your main group has a subgroup. Method 2:On the "Product Groups" page, click on the name of the product group (A). A list will appear on the right.Select +New subgroup (B) to add a new subgroup. How do I move groups?Sometimes you may need to move groups, you can do this in two different ways.Method 1:Select the group (A).In the list on the right, select Cut out (B). Click on a group where you want to move the clipboard (C). The list now contains the options Paste in, Paste before and Paste after (D). Paste means that the clipboard will be placed inside the selected group.Paste before means that the clipboard will be placed before the selected group in the tree.Paste after means that the clipboard will be placed after the selected group in the tree.Method 2:Press and drag the folder you want to move to (A). Drop it either on the group in which it will be placed (B).Or between groups to move it within the structure (C). How do I add products to my product groups?Go to Assortment -> Products (A). Create a new product (B), or edit an existing one (C). Under Categorisation (D) you can select a "Product group" for your product (or several if you have a PLUS or PRO subscription).Preview your store and you should see a menu item for each of your product groups.Things to remember: Each product must belong to a product group to appear on the website. (Don't see certain products on the website? Check if they belong to a product group.) You can add a product to multiple product groups, but only one can be treated as the primary group for that specific product. Only products from the primary product group will be included in the sub-shop (if you are using a multi-shop system). When you create a new discount, it will only be applied to products in the primary group and not to products using multiple groups. For example, the discount will only apply to this product via the "Men" category and not via "Watch". If you want to add a discount to this product, the discount must apply to "Men" and the product must have this group set as the primary product group.Other settings and what they do:HideIn the product group settings, there are two ways to hide both groups and/or products. Hide product group and its productsIf you decide to stop selling a certain type or category of product, hiding them one by one is no easy task. With this setting, you hide both the group and its products from the menu and the shop.Things to remember: If you apply the setting to a category at the top level, the subgroups are also hidden from the menu. Products, whose primary product group is "hidden", will not be listed on the website. The products from the subgroups will still be available and can lead you to the page for that group. If you want to hide all groups below the one at the top level, it must be done on each subgroup. Tip! If you have not hidden the group but it is still not visible in the menu, the next place to investigate this is at Appearance (A) -> Themes (B) -> Edit (pen icon) (C) -> Product group page (D) -> Empty groups (E). (The product group may be empty). This also applies to the option "Do not show the product group in the product menu". Do not show the product group in the product menuDo you want to hide the product group from appearing in the menu? Then this is your option.This setting hides the group from the menu, but it will still be searchable and can be accessed via the product group at the top level.Things to consider: This option is not active but still the product group is not available on the website menu? This is not included in the menu under Appearance -> Themes -> Edit -> Content -> Header / Menu (Based on the theme). Your product group is not indexed yet. Wait for 24 hours and if it is still not available please contact us and we will fix it for you. Add an image and description to the product group In this setting, you can add a picture and description for the group. It will appear at the top of the page for the product group.Tip! Choose an image that connects well with your group, this will help your customers navigate more easily.Shop designEach theme has its own design and predefined layout, but at the same time is extremely customizable according to your preferences. You can start humbly and follow the theme layout, or get creative and go for a custom look. The shop design for the shop window is controlled by the shop template: this follows the layout of the active theme selected under Appearance -> Themes.This is the default setting for the product category.Customized store design (Customised look)This is the creative part. Here you can design your own layout for your product group page. The different blocks can be added and rearranged according to your choice. Benefits of using custom look: Flexible design. Control the information displayed. SEO-enhanced custom content. Easy selection & placement of products. Remember: Any settings made here will override the settings made in the active theme under Appearance -> Themes -> Edit -> Product category page. You may encounter some issues with heading tags (H1, H2, etc) that we are currently investigating. Product group tableDisplay the product groups you select. Benefits: Helps customers easily navigate through products in different grippers. Add related grips. Flexible placement on the side (A). Flexible grid (B). Easy selection (C). Easy sorting (D). Product list & tableTo display the products in a grid, list view or both in separate blocks. Linked - Automatic selection & placement of products under selected product group. Manual - Flexible and custom selection of products and their placement in the block. To search or browse for a product to place in block (A). Add a new block to the location (B). To influence the position of the product. Click on the icon and then on the desired location (C). To remove the product from block (D). Fullwidth product It will be in list format like the "product list" block, but with more control and flexibility to choose what information to display about the product on the product group page. Here's an example of what it might look like in full view: Here is an example of what the "Product List" might look like: Optional text/imageThis option provides more extensive control for adding content compared to other blocks. Benefits:Insert links to images and text.Use HTML under source code (<>).Add videos and tables. Remember:Custom scripts may not work and may damage the page.Possible problems with header tags.
-

Pre-ordering of product packages
27 Nov 2025
You can allow ordering of product packages before all its products are in stock.First, you need to make sure that the products in the package can be ordered when they are not in stock. Then the product package will be available for ordering and the stock message will be displayed.Note. As long as the product has a delivery template, the information of the template is displayed at 0 in stock.To display the stock message you need to set "Show no delivery information". Then the stock message will be displayed:Summary & examplesWhen all the products in the package with 0 in stock have "Allow orders even if stock is out and show stock message", the products and the package will be able to be ordered. See example from magnetfiskebutiken.se below:This package uses Delivery Information >> Delivery Template "Delayed Delivery". A product in the package cannot be ordered if there is 0 in stock, therefore it is only possible to monitor the package:After the product with 0 in stock has received "Allow orders even if stock is out and show stock message", the package (and the product) can be ordered. The selected delivery template is displayed:The delivery template information is visible on the packet:Here you can read more about delivery information and stock notification.
-

Selling products without price
27 Nov 2025
To enable the sale of products without price:Go to Assortment >> Settings >> Products without price >> check "Products entered without price are available in the store for viewing and ordering" >> Save.Next, enter a price of 0 for the products that should be able to be sold without a price. When the product's price is 0 instead of "no price", the product will be available for ordering in the store: