
1 min read
Activate delivery point selection - Service point Postnord TA / Shipmondo.
1) Upgrade your subscription to PRO and activate the Postnord integration.
You can read more about the Postnord integration here.
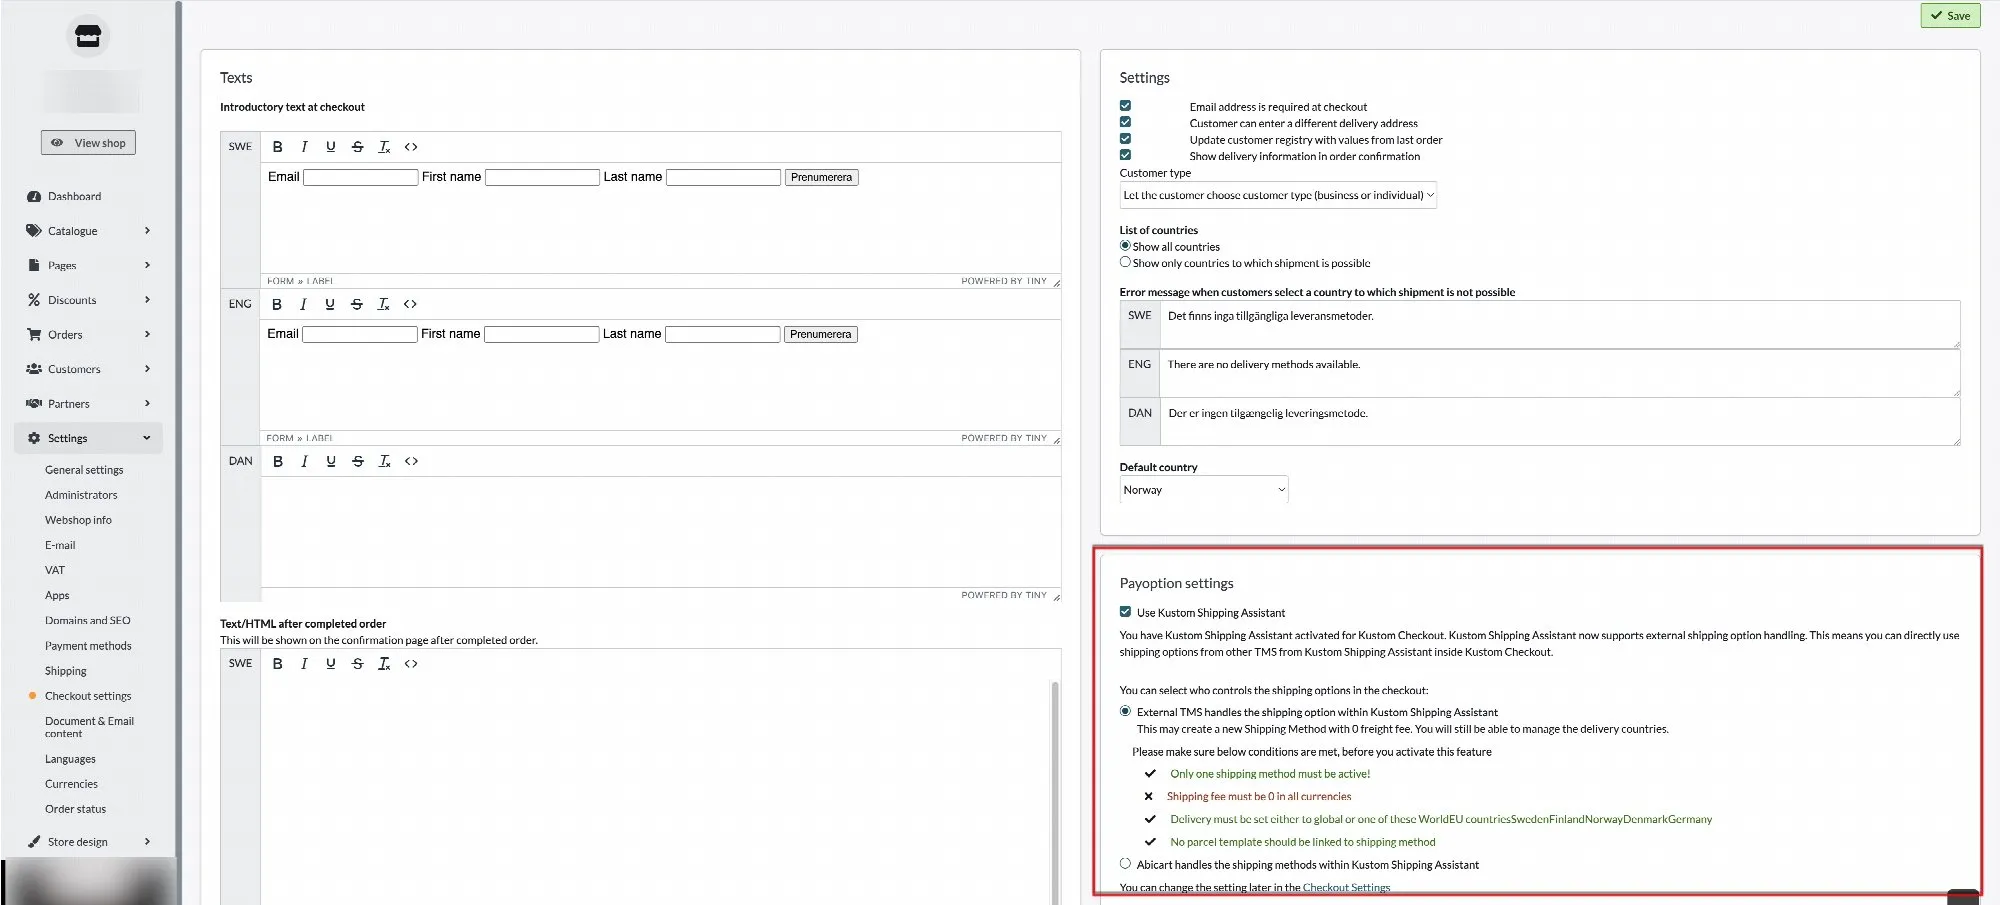
2) Disable Kustom Shipping Assistant (KSA) (skip to point 3 if you don't use KSA).
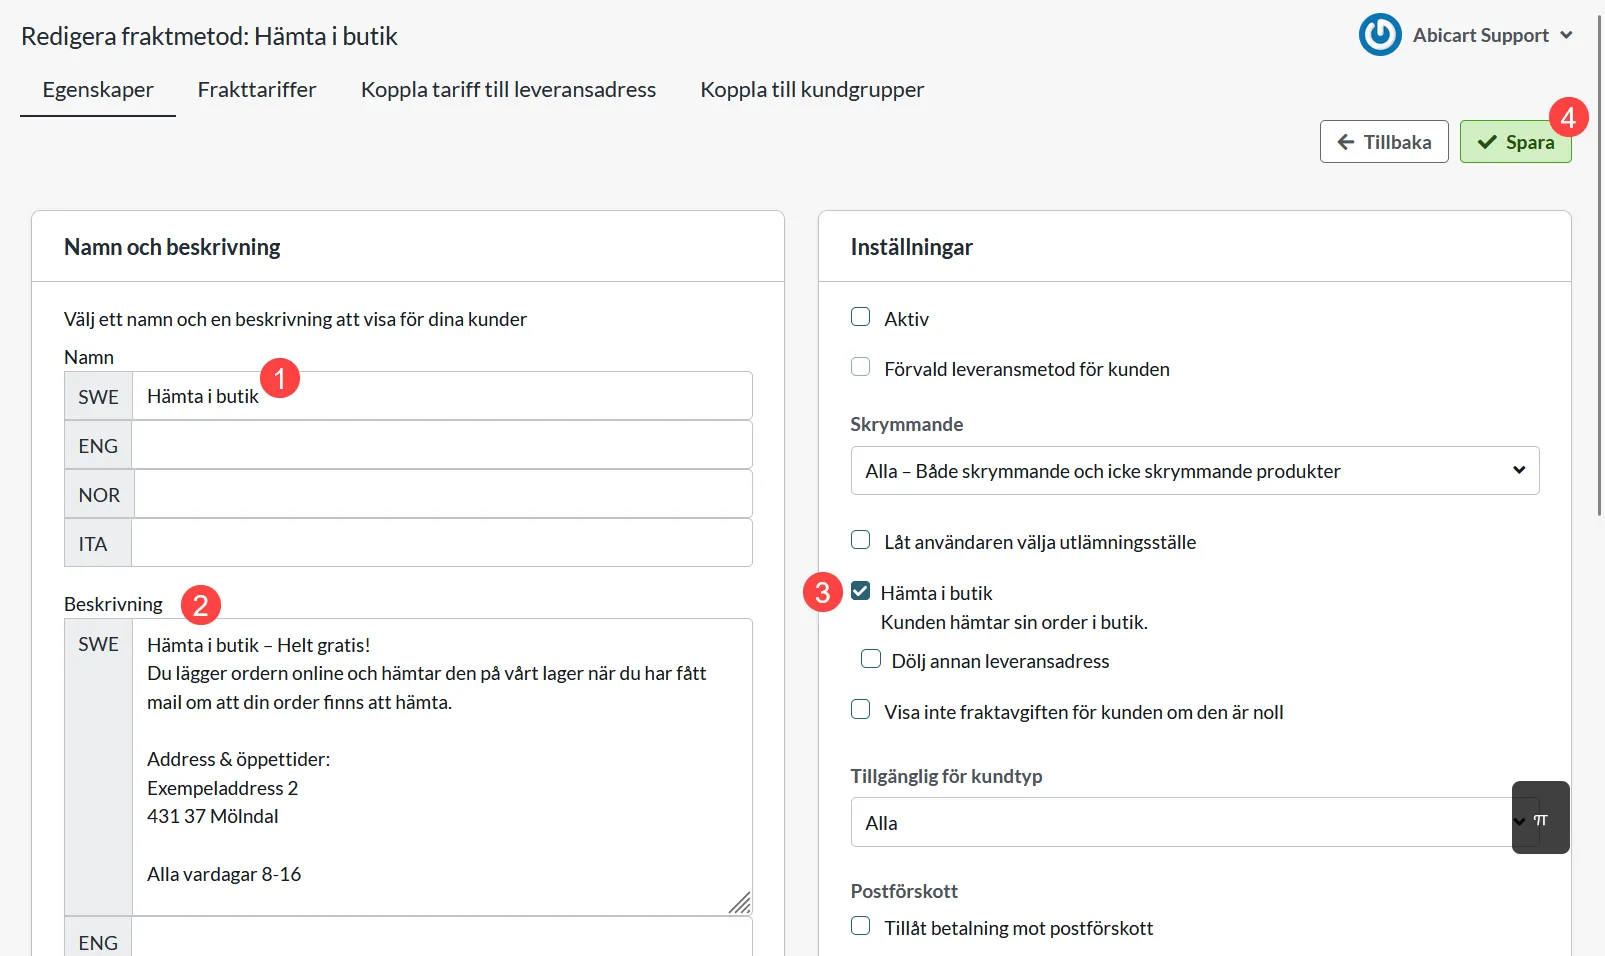
3) Go to Settings >> Shipping and edit the delivery method that should offer delivery to a pickup point.
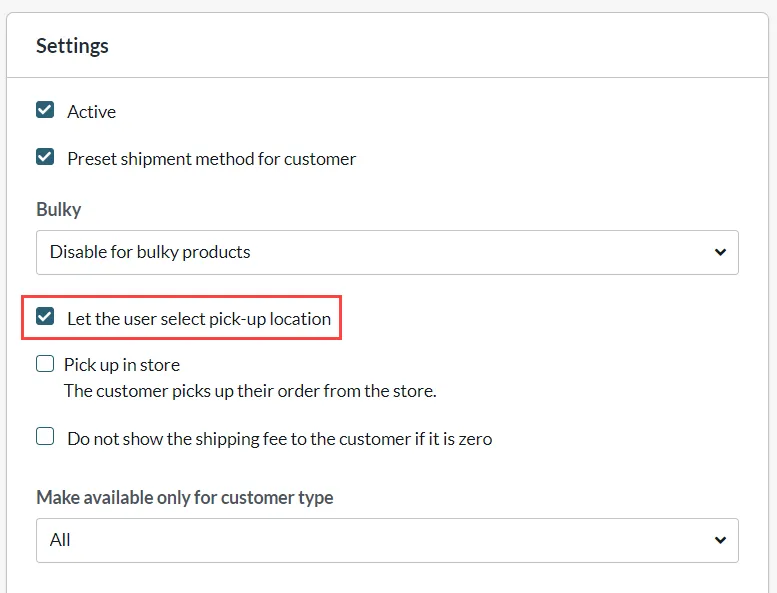
4) Check the box "Let the user select pick-up location" >> SAVE.
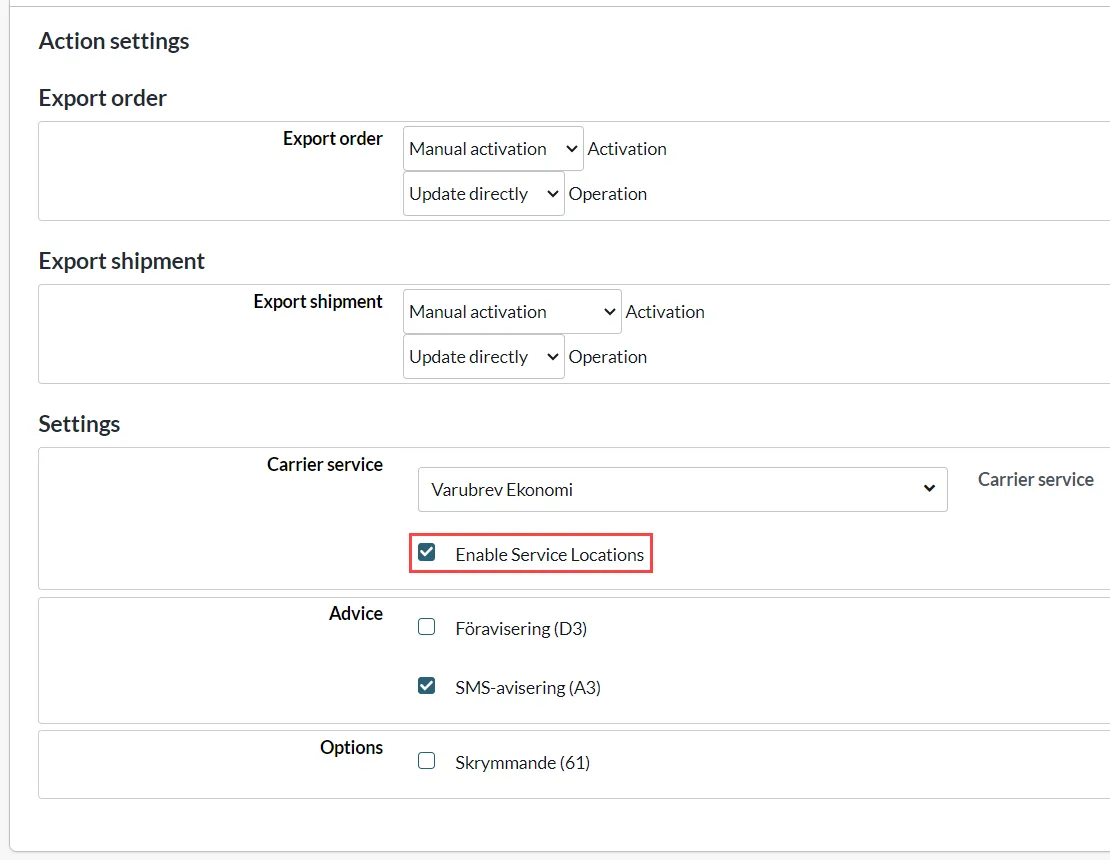
5) Continue down to Postnord TA event settings (Action settings) >> check "Enable Service Locations" >> SAVE
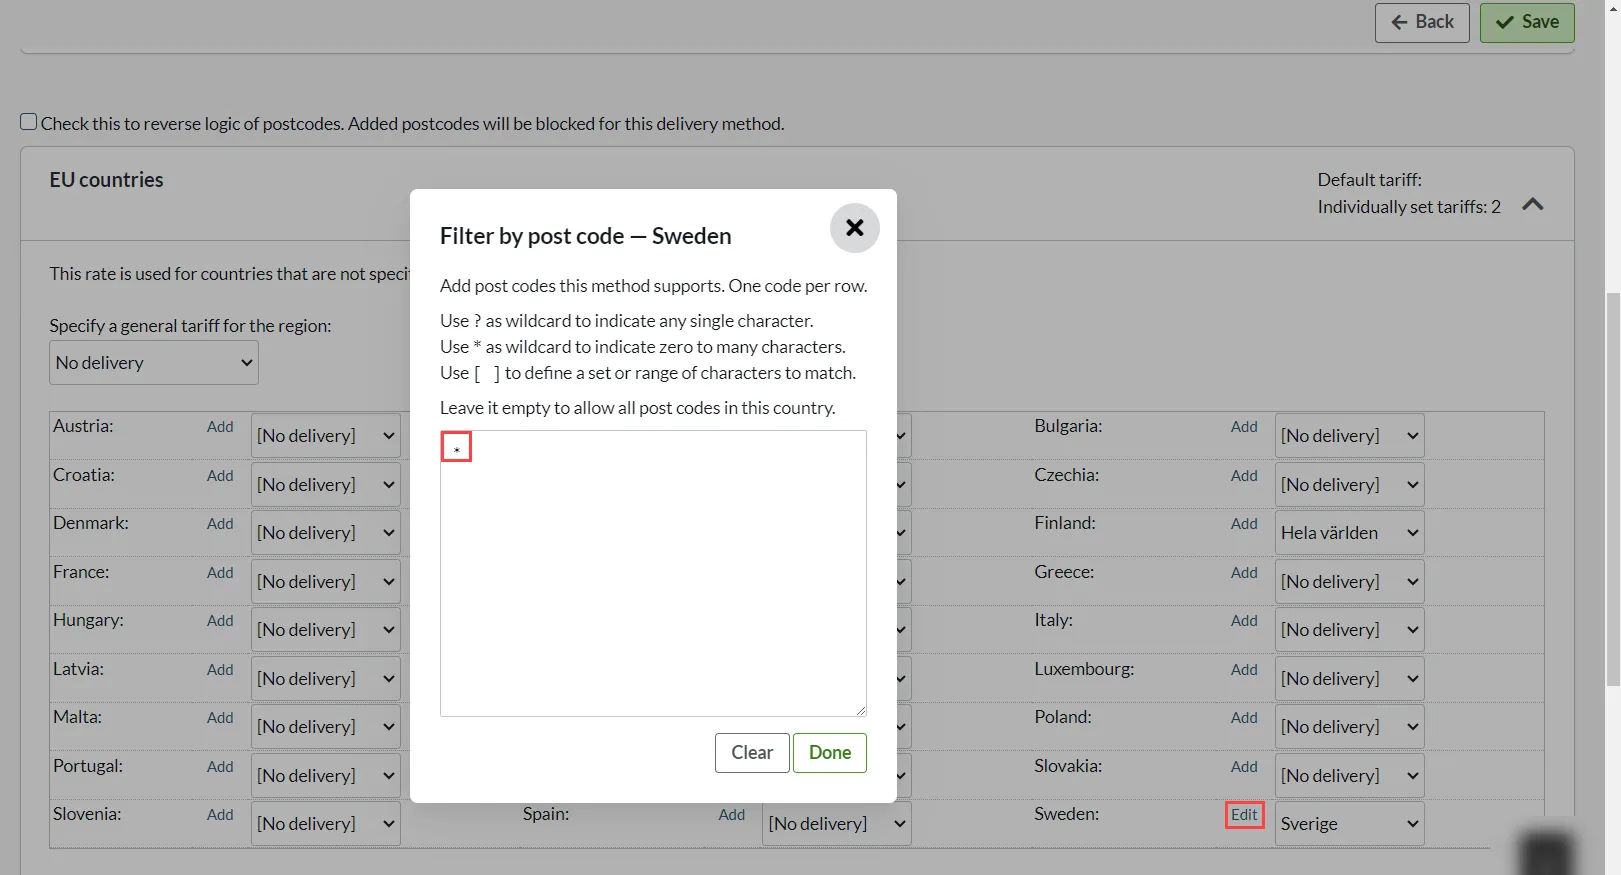
6) Go to Connect rate to delivery address >> Click on EU countries >> Sweden >> Click on "Add" >> Enter * in the postal code field >> Done >> SAVE.
7) Done!
Related pages
-
Shipping and delivery: Pick up in store
2 Mar 2026
Create a delivery method for pickup in your physical storeBefore creating a shipping method, it's a good idea to watch our video guide and read this manual: Shipping and delivery: How do I create my shipping methods? Video guide Download in store Settings >> Shipping >> +New shipping method 1) Create a new shipping method and name it 2) Enter a description 3) Check the box "Pick up in store"Checking this setting is important as it excludes the delivery method from your product feed. Without this setting, misleading information about the free delivery method will be sent to Google. 4) Click on Add 5) Click on Shipping Tariffs >> Introduce new tariff 6) Name the tariff 7) Click on Add 8) Click on Link tariff to delivery address 9) Click on the arrow for countries within the EU* *If your store or warehouse for collection is located in a country other than the EU, select the section that lists the country. 10) Click on the country 11) Click on the tariff you recently created 12) Save Now you see that a country has an active tariff: 13) Click on Properties >> Check Active to activate the delivery method 14) Save Done!
-
Kustom Shipping Assistant (KSA) with External TMS Shipmondo
27 Nov 2025
Here you can read about KSA with external TMS Shipmondo.How to do this 1) First, you have followed the manual Kustom Shipping Assistant (KSA) - Delivery methods via external TMS. 2) Next: Log in to Shipmondo and create your TMS and set up which delivery methods you want to be available. These delivery methods will be displayed through KSA in the Abicart checkout. 3) Log in to Kustom portal and add Shipmondo as TMS. See examples from Kustom portal in the manual for external TMS Postnord. Shipmondo The image below shows KSA checkout with external TMS Shipmondo where you have chosen to use the delivery methods Budbee Home Delivery and Postnord Delivery Point: External TMS Shipmondo where you have chosen to use the delivery methods Budbee Paketskåp and Postnord Utlämningställe: You choose which of Shipmondo's delivery methods you want to use by adding them to Shipmondo: Read more here
-
Kustom Shipping Assistant (KSA) - Shipping Methods in Abicart
27 Nov 2025
This article shows you how to set up Kustom Shipping Assistant according to option 1. Click here to read more about KSA and option 2 (external TMS). 1. KSA with your own shipping methods in Abicart With this set of KSAs, the delivery methods you created in Abicart are still used, but instead of the delivery methods being shown under the shopping cart in the checkout, they are listed in the Kustom payment window. Showing your delivery methods together with customer details etc. in the Kustom window provides a customized checkout experience where the customer makes all choices directly in the Kustom checkout. This is how you do it: Settings in Abicart 1) Go to Settings >> Checkout 2) Check the box "Use Kustom Shipping Assistant" >> Save 3) Go to Settings >> Shipping 4) Edit your shipping methods by clicking on the Edit icon. 5) On each delivery method you want to show in the checkout, you can set three functions: Shipping Type: This sets the method of shipping. "Delivery to Adress/Door" - Home delivery "Pick parcel from Store" - Pick up in store "Delivery to unspecified Pickup point" - Delivery to unspecified pickup point "Delivery using Postal Network" - Delivery to Postal Agent "Carrier decides Shipping Method" - Carrier decides shipping method "Digital delivery for downloadable products" - Digital delivery for downloadable products Carrier: Select which carrier you want to use for this shipping method. See options in the list. Estimated delivery time (in working days): Enter the estimated number of working days for delivery 6) Click on Save You are now ready to activate Klarna Shipping Assistant in your store. To activate KSA, do the following: 7) Go to Settings >> Payment Methods 8) Edit your payment method Kustom Checkout 9) Check "Use Kustom Shipping Assistant" 10) Save When you click "Save", your shipping methods will appear in the Klarna payment window at checkout:
-
Kustom Shipping Assistant (KSA) with External TMS Postnord
27 Nov 2025
Here you can read about how to set up KSA with external TMS Postnord.How to do this 1) First, you have followed the manual Kustom Shipping Assistant (KSA) - Delivery methods via external TMS. 2) Next: Log in to Postnord and create your TMS and set up which delivery methods you want to be available. These delivery methods will be displayed via KSA at the checkout in your store. Link to Postnord. 3) Log in to the Kustom portal and add Postnord as TMS. See steps below: Settings in Kustom 4) Log in to the Kustom portal 5) Click Integrations >> Shipping >> Add New 6) Enter the name of the TMS >> Choose the correct TMS from the drop down >> Add "Identifier" and "key". They are keys for each TMS and can be found in the supplier's portal. If you have signed an agreement for e.g. Postnord, you can download the keys in their portal >> Paste here >> Then click "Create Profile". 8) Click the newly created profile and select the countries you wish to activate it for. How to manage an order with delivery method from TMS: 1) The order is finalized and the order is created 2) The order is sent to the specified TMS - e.g. Postnord (Abicart >> KSA >> TMS). 3) Manage the order in the respective portal - e.g. Postnord's portal. 4) Mark the order as sent in Abicart. 5) Done!
-
Shipmondo
27 Nov 2025
Shipmondo is an e-commerce logistics service that offers companies the opportunity to manage their shipping and delivery processes efficiently.Integration with Shipmondo TA is included at no extra cost in Abicart Pro.Things to consider before activating the integration:Weight must be entered on all products. We cannot export orders to Shipmondo without weight.in addition to the usual details, the following fields are mandatory if you want to create customs documents for exports:HS NumberCountry of OriginSKU NumberYou must select a package template on the delivery method. Here's more information >>Your Shipmondo account needs to have funds at all time. If the balance of the account is emtpy, orders won't be able to export. Get a subscriptionGet a subscription on the Shipmondo website: shipmondo.comActivate the integrationSettings that need to be made at ShipmondoLog in to your Shipmondo account and go to Settings -> API-Access. If there are no API details already entered, click on the button "Generate API keys". You will then see a username (API User) and a password (API Key). There is more information on how to do this in the Shipmondo manual.Settings that need to be made in AbicartThe data created in the step above needs to be entered in the store under Settings -> External connections -> Shipmondo TA. If "Shipmondo TA" is not available under External connections in your store, contact Abicart's customer service and we will activate it for you. Account settingsAPI users - Enter data from the "API User" field in Shipmondo.API Keys - Enter information from the field "API Keys" in Shipmondo.Labels - Choose whether the label type should be printed as PDF or ZPL. Settings on the delivery methodsYou also need to activate the integration on the delivery methods you want to use Shipmondo. There is a block at the bottom of each delivery method for this. Go to Settings -> Shipping -> select delivery method and click on it to edit.Scroll down to Shipmondo TA - Event settings. Here there are three different headings:- Export order- Export shipment- SettingsHere you can choose to export the entire order (Export order) or divide each order into different shipments (Export shipment). If you do not use partial delivery or do not know which one to use, we recommend choosing "Export order". You should not have both active at the same time. Export orderActivation - Recommended setting "The order is registered".Execution - select "Update directly" when everything is ready.We recommend that you make the following settings the first time and then click the save button. This means that the integration is not activated on the delivery method, but it is possible to select the carrier and set up everything before activating the function.Then you will see new options for selecting the Carrier. Select the carrier you want to use and then click the save button again.Then a new setting for Transport service will appear.Select the transportation service and click the save button again.A new setting for Package type will appear. The box under package type is a setting for using your own agreement with the carrier when booking a delivery. If you do not check the box, the Shipmondo agreement is the default.When all the settings above are done, do not forget to activate the export of the orders by selecting "Update directly" at "Run" and save. Export shipmentActivation - Recommended setting "Shipment is sent".Execution - select "Update immediately" when everything is ready.We recommend that you make the following settings the first time and then click the save button. This means that the integration is not activated on the delivery method, but it is possible to select the carrier and set up everything before activating the function.Then you will see new options for selecting the Carrier. Select the carrier you want to use and then click the save button again.Then a new setting for Transport service will appear.Select the transportation service and click the save button again.A new setting for Package type will appear. The box under package type is a setting for using your own agreement with the carrier when booking a delivery. If you do not check the box, the Shipmondo agreement is the default.When all the settings above are done, do not forget to activate the export of the orders by selecting "Update directly" at "Run" and save.Settings blockIn this block, the settings may look slightly different depending on the transport service you have chosen. Each transport service offers different settings for delivery points and services. We list the ones available in your Shipmondo account and/or the selected transport service.ServicesTo send the tracking number from Shipmondo to the recipient, tick "Personalised e-mail" and "Personalised SMS". Then follow Shipmondo's instructions: Link to manual.Shipping Templates: Abicart & Shipmondo IntegrationShipmondo allows only one shipping country per shipping method. If you need multiple countries or configurations, use Shipping Templates. This two-step process lets you define as many templates as you need in Shipmondo, then import and assign them in Abicart.Step 1: Create Shipping Templates in ShipmondoLog in to your Shipmondo account.Navigate to Shipments → Templates.Click + New template and configure:Sender countryDelivery countryWeight rangesPackage dimensions / typesCarrier settingsSave each template.Read more about shipment templates:https://help.shipmondo.com/en/articles/1834976-shipment-templatesStep 2: Activate & Assign in Abicart2.1 Enable Shipping TemplatesIn Abicart, go to Settings → External Connection → Shipmondo TA.Toggle Activate Shipping Templates.Click Save.All your Shipmondo templates will now be imported.2.2 Assign Templates to Shipping MethodsGo to Settings → Shipping → Edit shipping methods.Choose the method you want to link (e.g. “Standard Shipping”).Under Shipmondo TA → Action Settings, select one or more of the imported templates.Click Save.How It WorksWhen an order is placed, Abicart cross-references:Order weightShipping countryDelivery countryPackage type / dimensions…with your selected Shipping Template. The matched template’s settings are then exported to Shipmondo for label creation and rate calculation.Restrictions & Best PracticesOne carrier per shipping methodTemplates only apply to the carrier chosen in the method’s settings—no mixing between carriers.Best-fit template by weightIf multiple templates exist for the same country, Abicart picks the one whose weight-range best matches the order.Package typesOnly consider the package types you’ve added (up to 2 types per method).SummaryCreate all required templates in Shipmondo (Shipments → Templates).Activate Shipping Templates in Abicart (Settings → External Connection → Shipmondo TA).Assign each template to your Abicart shipping methods (Settings → Shipping → Edit shipping methods → Shipmondo TA).Your store can now support multiple countries, weight-based rates and custom packaging rules—automatically handled via your Shipmondo templates.
-
Add logo for payment and delivery methods
27 Nov 2025
Did you know that you can add logos for your payment and delivery methods at checkout?How to do this:1) Click Appearance >> Themes >> Edit active theme2) Content3) Payment and delivery method logos4) Click on the three vertical dots5) Choose between the default logo and uploading your own imageYou can download the payment/delivery method logo on their website search name + logo in your browser. Remember to choose an image of good quality.6) Save at the top of the page with the green buttonRepeat for all payment methods and delivery methods you want to have a logo
-
Print settings Abicart ZPL Print App - Postnord integration
27 Nov 2025
How to set up print settings for the Abicart ZPL Print App - Postnord integration. Once you have installed Abicart ZPL PrintApp for Windows, you will need to make some settings on your computer for the print window to open automatically when you select "perform function on selected orders" in Abicart admin. Tip: In some cases, printing may not start correctly if you already have a pop-up window open in your browser. Please close any pop-ups before sending your EDI shipment. We are aware of the problem and will fix it in the next version of the software.Here's what you do:0) Install Abicart ZPL PrintApp for Windows and export an order to Postnord1) Orders >> Orders >> Produce an order exported to Postnord2) Select the order >> Execute function on selected >> EDI labels. The file will be downloaded.3) Open the file explorer4) Select the file (1)5) Select Open with (2)6) Select choose another app (3)7) Select Abicart ZPL Print App + tick the box + OK8) Repeat: Select order >> Perform function on selected >> EDI labelsNow the window below will open (see picture).Click on (7) and select (8)9) Repeat for the third time: select the order >> Perform function on selected >> EDI labels 10) Then select the printer for printing and save.Link to manual: Postnord Send Direct - Postnord TA
-
Postnord Skicka Direkt - Postnord TA
27 Nov 2025
Postnord Send Direct is available as an integration under Settings >> External connections >> Postnord TA.Integration to Postnord TA is included in Abicart Pro at no extra cost.Checklist before starting the integration:You need to enter the weight of all products in Abicart. We cannot export products without weight.Store information:Enter the address and company information under Settings >> Store information.Reason: We cannot download Postnord's templates, instead we have to create our own templates using the information on this page. The reason is that it is not possible to download Postnord's templates via their API as they belong to the Send Direct portal and cannot be accessed externally.Information required to set up the integration:Account number:Create an account at https://www.postnord.se/ and copy your account number (customer number).API keys:With the customer number, create an account at https://developer.postnord.com/. Once you are logged into the Postnord developer account, go to My Profile >> Apps and copy the API keys.API keyEORI numberThis is mandatory if you plan to use customs declaration declarations.Add this information to the Postnord Integration settings page.Combination to use for different conditions:Once you have entered all the information, you can control the shipping settings under Settings >> Shipping >> select delivery method >> Edit >> Export complete order: (Placed / Paid / Manual)Export shipments individually: (manual, this does not include marking the order as "shipped")Export shipments/orders after the order is marked as "shipped".Mark the exported order as shipped:Manual activation during the order page: (Note: this only works before the shipment is marked as "shipped")Print Zebra labels from your browserProgram to print (zebra) .zpl labels from your browser on a Windows computer. Can be used with Abicart integration to Postnord TA included in Abicart PRO at no extra cost.Abicart ZPL PrintApp for WindowsBenefits:Postnord supports export of multiple shipments. You can set up the integration to export multiple shipments from the same order to Postnord automatically or manually.If the "Customs declaration" section of our Postnord settings is set to CN22 or CN23, we will export customs data to Postnord. We will export the information Postnord needs to process the customs declaration. Regardless of location.In multi-store systems, the specific information from each sub-store is used as labels on the orders in Postnord.Things to remember:You cannot use the integration against nShift or Postnord at the same time. If you want to use both, you can enable manual activation under Settings >> Shipping >> Edit shipping methods >> Postnord settings.We do not interact with shipping fees at all. Postnord's estimate is not something we can influence.If you have marked the order as "shipped", the only way to export the order is to use combination 3.Once an order has been exported, it cannot be removed from Postnord, nor can it be edited.Do not use both "Export shipment" and "Export order" unless you use "Manual activation". .
-
Postcode controlled tariffs
27 Nov 2025
Restrict your delivery to certain postcodesWhat are postcode-controlled tariffs?If you don't want to deliver within an entire country, you can restrict the delivery method so that it only works for one or more different postcodes. For example, if you have a bakery and only want to deliver within Mölndal. Then you can specify to deliver only to postcodes starting with 431.How to do this?Go to Settings -> Shipping and choose a delivery method. Click on the delivery method and then on the tab "Link tariff to the delivery country". In this example, we want to add specific postcodes within Sweden, so we click on the block "Countries within the EU". In front of Sweden, a link, "Add", appears.A new window will open.In the box, you can enter text strings to control which postal codes the delivery method can deliver to.1234? - will match all that start with 1234 and have exactly one optional character after it.123* - will match all that start with 123 and have one or more optional characters after it1234[456] - will match all that start with 1234 and end with 4, 5 or 6In our example, we only want to deliver to Mölndal and enter 431*Then click "Done".The add link has then changed to "Edit".Then click the save button in the top right corner. Done.
-
Kustom Shipping Assistant (KSA)
27 Nov 2025
Get started with Kustom Shipping Assistant (KSA) in your storeKustom Shipping Assistant (KSA) is available with the latest version of Kustom Checkout - Link to the manual: Kustom Checkout V3 KSA can be set up in two ways: With your own shipping methods in Abicart (Your shipping methods are displayed in Kustom's checkout window). With external delivery methods from the TMS via Kustom (The delivery options available at the embedded TMS are shown in the Kustom checkout window). With external TMS , the customer can select the delivery point at checkout. *TMS= Transport Management System 1. KSA with your own delivery methods in Abicart Click here to access the manual: Kustom Shipping Assistant (KSA) - Shipping methods in Abicart. 2. KSA with shipping methods from external TMS via Kustom Click here to access the manual: Kustom Shipping Assistant (KSA) - Shipping methods via external TMS