

My Pages
-
Digital withdrawal function
9 Jun 2026
On June 19, 2026, new amendments to the Distance Contracts Act (DAL) will enter into force. The biggest change is the requirement for a digital withdrawal function - popularly known as the 'undo button'. The aim of the law is to strengthen online consumer protection and counteract so-called 'dark patterns' (designs that make it difficult for the customer to cancel or change something). In short: it should now be as easy for a customer to cancel a purchase online as it was to complete it.New Legal Requirement: The "Cancel Button" in E-commerce On June 19, 2026, new amendments to the Distance Contracts Act (DAL) will take effect. The most significant change is the requirement for a digital cancellation feature —commonly known as the “cancel button.” The purpose of the law is to strengthen consumer protection online and combat so-called “dark patterns” (designs that make it difficult for customers to cancel or change a purchase). In short: it should now be just as easy for a customer to cancel an online purchase as it was to make it. A new legal requirement means that online stores must provide customers with a simple, digital way to exercise their right of withdrawal—without having to call or send a manual email. Important: Deadline June 19,If your online store lacks this feature after June 19, it may be considered a violation of the Marketing Act, which could result in penalties and a significant extension of the customer’s cancellation period. What does this mean for you as an e-retailer? Clear and easily accessible feature: You must provide a clearly placed feature (e.g., on “My Account” or via a direct link in the order confirmation) where the customer can indicate that they wish to exercise their right of withdrawal. The customer should not have to call or send a manual email. Immediate confirmation: When a customer clicks to cancel their purchase, the system must automatically send a confirmation (a receipt) to the customer immediately. Unchanged cancellation period: The right of cancellation itself remains unchanged—the 14-day cancellation period still applies to goods and services covered by the law. It is only the way customers can notify the store of their decision that is being simplified. The Importance of Complying with the Law: If your online store lacks this feature after June 19, it may be considered a violation of the Marketing Act, which could result in penalties and a significant extension of the customer’s cancellation period. Step 1 - Enable the cancellation form in your store The first step is to make the cancellation form visible and accessible to your customers. You can do this via the built-in footer link or by creating your own links in the menu or on other pages. Option A: Enable a link in the footer Supported theme versionsThis setting is only available in Fabrikk 1.6, as well as in Nordic, Hadje, Bountiful, Emporium, Trailblazer, and Brew 1.1, and Azalea 1.2.Recommendation: If your store is using a theme version older than Fabrikk 1.6, Nordic/Hadje/Bountiful/Emporium/Trailblazer/Brew 1.1, or Azalea 1.2, we strongly recommend that you upgrade. The latest theme versions are optimized for modern web technology, which gives your store significantly better performance, faster load times, and stronger SEO (search engine optimization). Go to Appearance → Themes → Edit the active theme → Content → Footer. Scroll down to the “Link to Right of Withdrawal Form” setting. Select the “On” option. If you want to change the default text for the link, you can do so in the field directly below. Click Save. Once the link is enabled, it will appear at the bottom left of the store, below the store’s address information. If you don’t have an address field in your footer, that’s okay—you can still add the link as custom HTML text in your footer. If you’re using custom HTML in all four columns of the footer, you can create a manual link to the cancellation page by following these steps: Go to Appearance → Themes → Edit → Content → Footer. Add the link text for the cancellation link to any HTML block. Then follow Option B. The link will then appear in the footer. You can follow the same steps in your other stores as well. Option B: Create Your Own Link on a Page If you want to link to the form from other places in the store—for example, from the “Terms & Info” page—you can easily create a regular text link. Go to Pages → System Pages → Cancel Purchase. Copy the address listed in the URL field. Note that in a multi-store system, the system page is located in the sub-store. Navigate to the page where you want to place the link, for example, Pages → System Pages → Terms & Info. Type the text that the customer should click on, such as "To the cancellation request form. " Select the text with your mouse and click the link icon in the toolbar to paste your URL. Paste the link to the cancellation form into the “URL” field and save. Then click Save again so that the page saves the changes. Option C: Add a link to the menu Go to Pages → System Pages → Cancellation Request. Copy the address listed in the URL field at the top of the page. Then navigate to the theme menu: Appearance → Themes → Edit Active Theme → Content → Menu. In some themes, such as Fabrikk, the menu is located under Content → Header. Scroll to the bottom of the page to “Menu Items.” Click “Add, ” select “Custom Link,” and paste the link to the cancellation form into the field below. In the “Link Title” field, enter the name you want the link to have in the menu. Click “Add” and then the Save button in the theme. Step 2 - Here’s what it looks like to the customer Once the form is active, this is the process your customers go through when they want to cancel a purchase. 1. The customer navigates to the return form.To return an item, the customer goes to a dedicated page for the right of return. There, they enter the order number and associated email address. 2 . The customer submits their request.Once the system has verified that the order is in the store, a new page appears where the customer can write a message and submit their request. 3 . The customer confirms via email.Once the customer has clicked “Submit Request,” an email is sent asking them to confirm their request. As soon as this is done, the case is forwarded to the store. Step 3 - Manage Incoming Return Requests When cases start coming in, you can manage them all in one place in the admin panel. Under “Orders” and the “Return Requests” tab, all incoming requests from your customers are collected. New, unprocessed requests are automatically assigned the “New” status. To easily sort the list, you can filter your requests by status: “All,” “New,” “Approved,” or “Denied.” Click “Details” to view a detailed overview of each return request. Note that the order cannot be modified directly in this view. The page only displays the customer’s return request—here, you manage the case status and can add your own notes. If the order needs to be adjusted or canceled, this is done on the order page. Click the order number to go there. Once processing is complete, mark the request as 'Accepted' or 'Denied.' The customer is not automatically notified when the status changes. You must therefore always contact the customer and inform them of the decision manually via your email client. Email An email regarding the created case is sent to the customer from the email address specified in the "Order Confirmation Sender" field (Settings >> Email) The email notification to your store is sent to the email address specified in the "Order Confirmation Copies" field (Settings >> Email)
-
Specified page could not be found (404 page)
27 Nov 2025
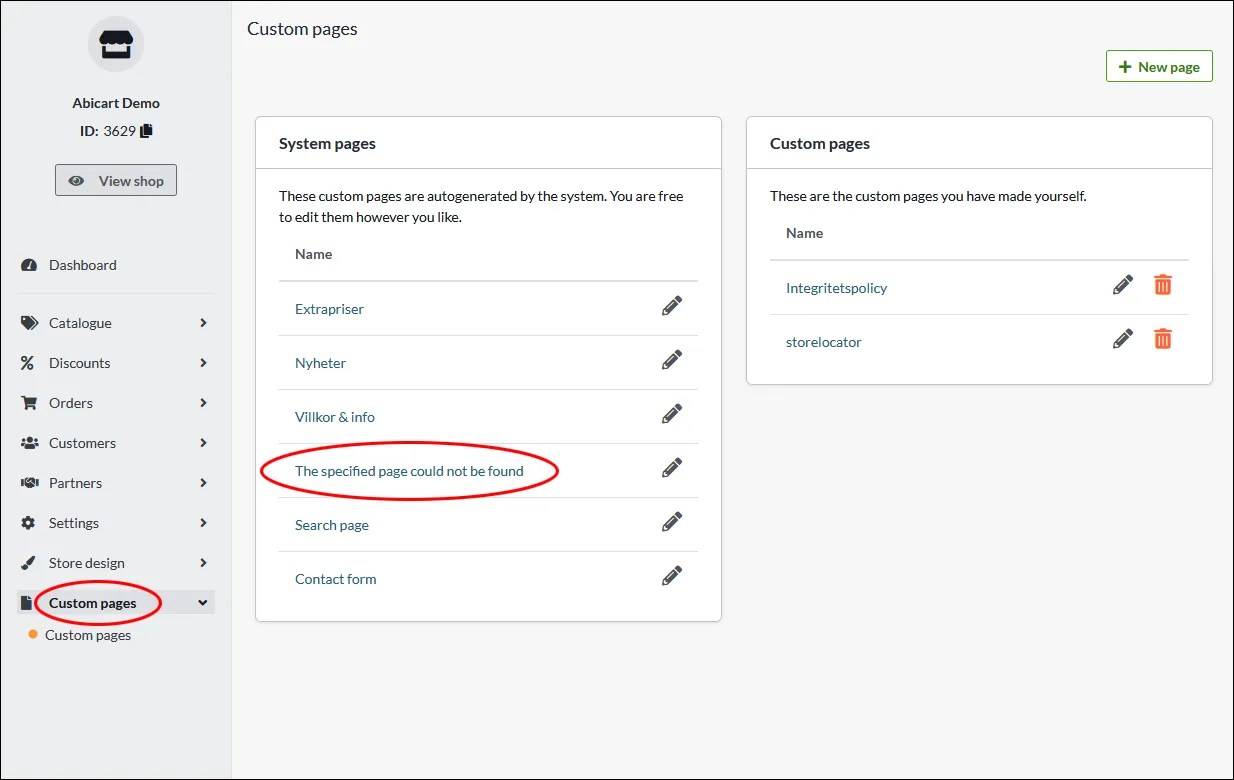
If a visitor surfs to a page that is not in the store, for example if they have entered the wrong address or clicked on a link from a search in a search engine that no longer exists, you can enter your own information text to help the customer move on.What is a 404 page?A 404 page is an HTTP status code that indicates that the requested web page cannot be found on the server where it is expected to be located. When a visiting user tries to reach a particular web address (URL), the server sends back an HTTP status code to indicate the result of the request. The status code 404, or "Not Found" in English, means that the server could not find the requested page.When a user lands on a 404 page, it means that the requested web page has either been deleted, moved to another location, or never existed. Instead of displaying a blank page, website owners can create a 404 page that provides relevant information to the user, such as notifying them that the page could not be found and perhaps providing some alternative links or search tools to help the user find what they are looking for.Editing the 404 pageUnder "Custom pages" there is a default page called "Specified page could not be found". It appears when a visitor lands on a page that no longer exists. Click on the page to edit the content.A default text is displayed that can be freely modified.A tip is to always include a link to the shop's home page so that the visitor can easily move on and look for similar products via the shop's search function or by navigating the menu.
-

Link to custom pages
27 Nov 2025
In this article, you will learn how to link to your own pages.What are custom pages?Own pages are a feature for creating standalone pages that can contain your own free text, images and even products.More info is available here.When you create your own pages, links to these pages are not created automatically. You must create these links yourself.How to create a link to a custom pageThere is a function to create links to your own pages in the menu. Where these settings are located differs depending on the theme being used.FabricGo to Appearance -> Themes -> select theme, edit -> Content -> Header. Scroll down to "Own links".Click on "+ Add". Click on "Pages". A list of all custom pages created in the store will be displayed.Select the page you want to link to.If you want the page to have a different title than what it is called under custom pages, you can specify this in the "Link title" field. Otherwise, leave the field blank.Then click on "Add". Save. Done.AzaleaGo to Appearance -> Themes -> select theme, edit -> Content -> Header. Scroll down to "Menu items".Click on "+ Add". Click on "Pages". A list of all custom pages that have been created in the store will drop down. Select the page you want to link to.If you want the page to have a different title than what it is called under custom pages, you can specify this in the "Link title" field. Otherwise, leave the field blank.Then click on "Add". Save. Done.Remaining themes (Bountiful, Nordic, Brew, Shark, Emporium and Trailblaizer)Go to Appearance -> Themes -> select theme, edit -> Content -> Menu. Scroll down to "Menu items".Click on "+ Add". Click on "Pages". A list of all custom pages that have been created in the store will drop down. Select the page you want to link to.If you want the page to have a different title than what it is called under custom pages, you can specify this in the "Link title" field. Otherwise, leave the field blank.Then click on "Add". Save. Done.
-

Create custom pages
27 Nov 2025
You can easily create information pages in Abicart that can contain text, images, products, videos, etc. For example, "About the company", "Find the store", etc.Standards pagesWhen you start your shop, these six standard pages are created. These pages cannot be removed, but some can be hidden if desired.The following are Abicart's standard pages:Extra prices - A page that automatically displays all products that have an extra price.News - A page that automatically displays all products that are marked as news.Terms & Info - A page where you specify the store's terms of use.Note! Some payment methods require this page to be active for the payment methods to work. It must not be hidden.Page not found (also called 404 page) - A page that you get to if you have browsed to an old page that no longer exists. There is a standard text with information on the page that can be adapted to your needs.Search page - If the customer uses the store's search function, they will be taken to this page.Contact form - A page containing a contact form where customers can easily contact the store. There are five predefined fields, "Your name", "Your email address", "Your phone number (optional)", "Case" and "Message".How do I create my own page?Go to Own pages -> New page. At the top you will see a field with two properties, Page Name and Hide.Page Name - Here you enter the name of the page. In our example, we call the page "About the shop".Hide Page - Here you select whether the page should be hidden or not. Check to hide the page.Insert content on the pageUnder the field there is a new heading called "Add here" and to the right of it there are five buttons:Product Group Table - A showcase that displays product groups (categories).Product List - A display window that shows products in a list.Product Table - A display window that shows products in a table.Full Width Product - A display window showing a product.Optional text/image - A shop window where you can insert texts, images, embed videos (YouTube) etc.Please note that if you create a table and/or insert an image in "Optional text/image", you need to be careful about how the width of these items is specified. If you specify fixed pixel dimensions, the page may be too wide and will not be responsive. Visitors may need to scroll sideways on smaller screens. Further down in the article there are instructions on how to make images and tables responsive.F.A.Q. - Frequently asked questions and answersQ: I created my own page, but it doesn't show up in the store?S: Own pages do not automatically appear in the menu, you have to add a link to the page in the theme. See the "Linking to a custom page" section in the manual.Q: I have created a custom page but it is too wide on mobiles, visitors have to scroll sideways to see the whole page. Why?S: Probably there is an image or a script where there are fixed specified pixel measurements as width. In images, you should remove the HTML code completely for width and height. In tables and scripts, you need to change the width to 100% instead to specify a fixed dimension.ExamplesImagesAbove the large text box found in "Optional text/image" is a toolbar containing two rows of icons. Click on the icon on the far right of the top row, which looks like this:<>You will then see the HTML code and it should look something like this:It's the "width" and "height" code that you need to remove to make the page responsive again.When the code is correctly corrected, it looks something like this:Save.Tables / scriptA table and script look a bit different but there is usually always a width and height included in the code. Here is an example of a table that has four columns and three rows:If we take a look at the code (click on the icon in the toolbar, on the far right of the top line which looks like this: <>):We then see that on the top row, the entire width of the table is set to 1500 px. Then each column also has a fixed value of 250 px. We need to change this to percentage values so that the table is responsive.In this example, it's pretty simple. We change the width to 100% and then it will cover the entire center bar of the store. Then we have to do some math in our heads and figure out what 100 / 4 is. The answer is 25 and then we need to set 25% as the width of all four columns.We adjust the code and, then it will look something like this when we're done:Don't forget to save. Now this table is responsive and will fit on all screens, even the small ones.Search engine optimisation of your own contentSearch engine optimisation is about improving a website to increase its visibility in search engine results. This means making the site easy to navigate, load quickly and contain relevant and unique content. By following good search engine optimisation practices, a website can become more visible to search engines and thus increase its chances of being found by users.Using semantically correct HTML is an important part of search engine optimisation because it helps search engines understand the content of a website and its relevance to different keywords. Here are some tips for using HTML tags such as title, h1, h2 and other semantically correct tags to improve your website:Use the title tag to give your website a unique and descriptive title. This title will appear in the search results and should be short and relevant to the content of your website.Use the h1 tag to highlight your site's main heading. This heading should be clear and relevant to the content of your website and is often used by search engines as an indication of what the website is about.Use h2 tags to highlight smaller headings on your site, such as subheadings or subheadings. These headings should also be clear and relevant to the content of your site.Use other semantically correct HTML tags such as p, ul, ol, li and strong to mark different types of content on your site. These tags help search engines understand the structure and meaning of the content on your site.By using these HTML tags in a semantically correct way, you can help search engines better understand and index the content of your website, which can increase your visibility in search results.