


Google Merchant Center
-

Target Audience
31 Jul 2026
Target audience The Target audience attributes let you describe who a product is intended for. This information is used to guide customers to suitable products and can also be required for compliance in certain product categories. Available attributes: Adult content: indicates whether the product is intended for adults only Suggested age group: the recommended age group for the product Suggested gender: the recommended gender for the product Note: Suggested age group and Suggested gender matter most for categories like clothing, toys, and accessories, where the right value helps customers filter to products meant for them, for example separating kids' shoes from adult shoes, or menswear from womenswear. Fill these in whenever they clearly apply to the product. Setting up Target audience attributes 1. Enable the attributes Go to Assortment → Products → Product Settings. In the panel on the right, locate the Product Attributes section. Scroll down until you find the Target audience heading. For each attribute you wish to use, click the edit icon and select your preferred visibility option, then click Save. 2. Add target audience details to a product Go to Assortment → Products and open the product you wish to edit. Scroll to the bottom-right of the product page. You will find the Target audience fields, where you can fill in the relevant details for each attribute. If you have any questions, please contact customer support.
-

Store - Attributes
31 Jul 2026
Store The Store attributes let you tie a product to a specific physical store location. This is useful for retailers with multiple locations who want to indicate where an item is available. All fields are optional and can be shown to customers on the product page. Available attributes: Store Address: the physical address of the store location Store Code: a unique code identifying the store location About Store Code Use Store Code to tag a product with a short identifier for the physical store it belongs to. Keep the code consistent across your products, since this is what ties a product to a specific location. Using Google local inventory ads or vehicle ads? Google Merchant Center has its own store code requirement, and your code here needs to match the one registered in your Google Business Profile. Read Google's Store code guidelines for the full format requirements. Setting up Store attributes 1. Enable the attributes Go to Assortment → Products → Product Settings. In the panel on the right, locate the Product Attributes section. Scroll down until you find the Store heading. For each attribute you wish to use, click the edit icon and select your preferred visibility option, then click Save. 2. Add store details to a product Go to Assortment → Products and open the product you wish to edit. Scroll to the bottom-right of the product page. You will find the Store fields, where you can enter the store address and store code. If you have any questions, please contact customer support.
-

Stock Export - Google & Facebook Product Feed
1 Jun 2026
The stock export feature allows you to include your product inventory levels in your Google and Facebook product feeds. This gives you greater control over how your stock data is used for campaign segmentation and targeting in Google Merchant Center and Meta. This is an optional feature used exclusively for Google and Facebook product feed integration. Setting up stock information mapping Go to Settings → External Connections → Product Feed → Google & Facebook stock information mapping. Google Enable the stock export option and choose which product feed field your stock quantity should be linked to: quantity — sends stock levels directly as the product quantity field in the feed. custom_label_0 through custom_label_4 — maps stock to one of the five available custom label fields, allowing you to use it for product segmentation in Google Merchant Center. Select your preferred field and save. About custom labels Custom labels (custom_label_0 to custom_label_4) are optional fields in the Google product feed used to segment products in Shopping campaigns. By mapping your stock to a custom label, you can create campaign rules that behave differently depending on whether a product is well-stocked or running low. Note: Custom label values are not shown to customers. They are only visible within Google Merchant Center. If you are already using custom labels for other segmentation purposes (e.g. sale status, margin tier), make sure to map stock to a label that is not already in use. Facebook Enable the stock export option to include your stock quantity in the Facebook product feed. No additional field mapping is required. If you have any questions, please contact customer support and we will be happy to help.
-
Energy Efficiency Class
21 May 2026
Energy Efficiency Class The energy_efficiency_class attribute allows you to communicate how a product rates on a given energy efficiency scale. When using this attribute, you must also provide the full range by setting both a minimum and maximum value: energy_efficiency_class - the actual rating of the product (e.g. A+) min_energy_efficiency_class - the lowest rating on the scale (e.g. D) max_energy_efficiency_class - the highest rating on the scale (e.g. A+++) This is an optional field, used exclusively for Google Merchant Center integration. Important: As of April 2025, these attributes are only available for products targeting Switzerland, Norway, or the United Kingdom. For products targeting EU countries, use the certification attribute instead, which pulls energy efficiency data from the EU's EPREL database. Setting up the Energy Efficiency Class attribute 1. Enable the attributes Go to Assortment → Products → Product Settings. In the panel on the right, locate the Product Attributes section. Scroll down until you find the Energy Efficiency heading. You will see three sub-attributes: Actual Energy Efficiency Class, Maximum Energy Efficiency Class, and Minimum Energy Efficiency Class. For each one, select the option Include in product feed and click Save. Note: The option to mark a field as private will hide it from customers, but to send the value to Google you must select the product feed option. 2. Add energy efficiency details to a product Go to Assortment → Products and open the product you wish to edit. Scroll to the bottom-right of the product page. You will find the Energy Efficiency fields, where you can enter the actual, minimum, and maximum class values. 3. Export to Google Merchant Center Once energy efficiency values have been added to a product, they will be included in your Google product feed automatically. In Google Merchant Center, the energy efficiency information will be displayed on your product listing where supported. If you have any questions, please contact customer support.
-
Certification
21 May 2026
Certification With the certification attribute, you can describe the certifications required under local regulations for a product, such as energy labeling or carbon class. To display a certification on Google, you must provide a supported combination of the following sub-attributes: certification_authority - the body that issued the certification (e.g. EU) certification_name - the name of the certification (e.g. Energy Label) certification_code - the specific rating or code (e.g. A+) This is an optional field, used exclusively for Google Merchant Center integration. Note: If you do not provide certification information, Google may automatically add it based on your product's GTIN and MPN data. You can always correct or update this by submitting new values. Setting up the Certification attribute 1. Enable the attributes Go to Assortment → Products → Product Settings. In the panel on the right, locate the Product Attributes section. Scroll down until you find the Certification heading. You will see three sub-attributes: Certification Authority, Certification Code, and Certification Name. For each one, select the option Include in product feed and click Save. Note: The option to mark a field as private will hide it from customers, but to send the value to Google you must select the product feed option. 2. Add certification details to a product Go to Assortment → Products and open the product you wish to edit. Scroll to the bottom-right of the product page. You will find the Certification fields, where you can enter values for authority, name, and code. 3. Export to Google Merchant Center Once certification details have been added to a product, the values will be included in your Google product feed automatically. In Google Merchant Center, the certification information will be displayed on your product listing where supported. If you have any questions, please contact customer support.
-
Shipping label
21 May 2026
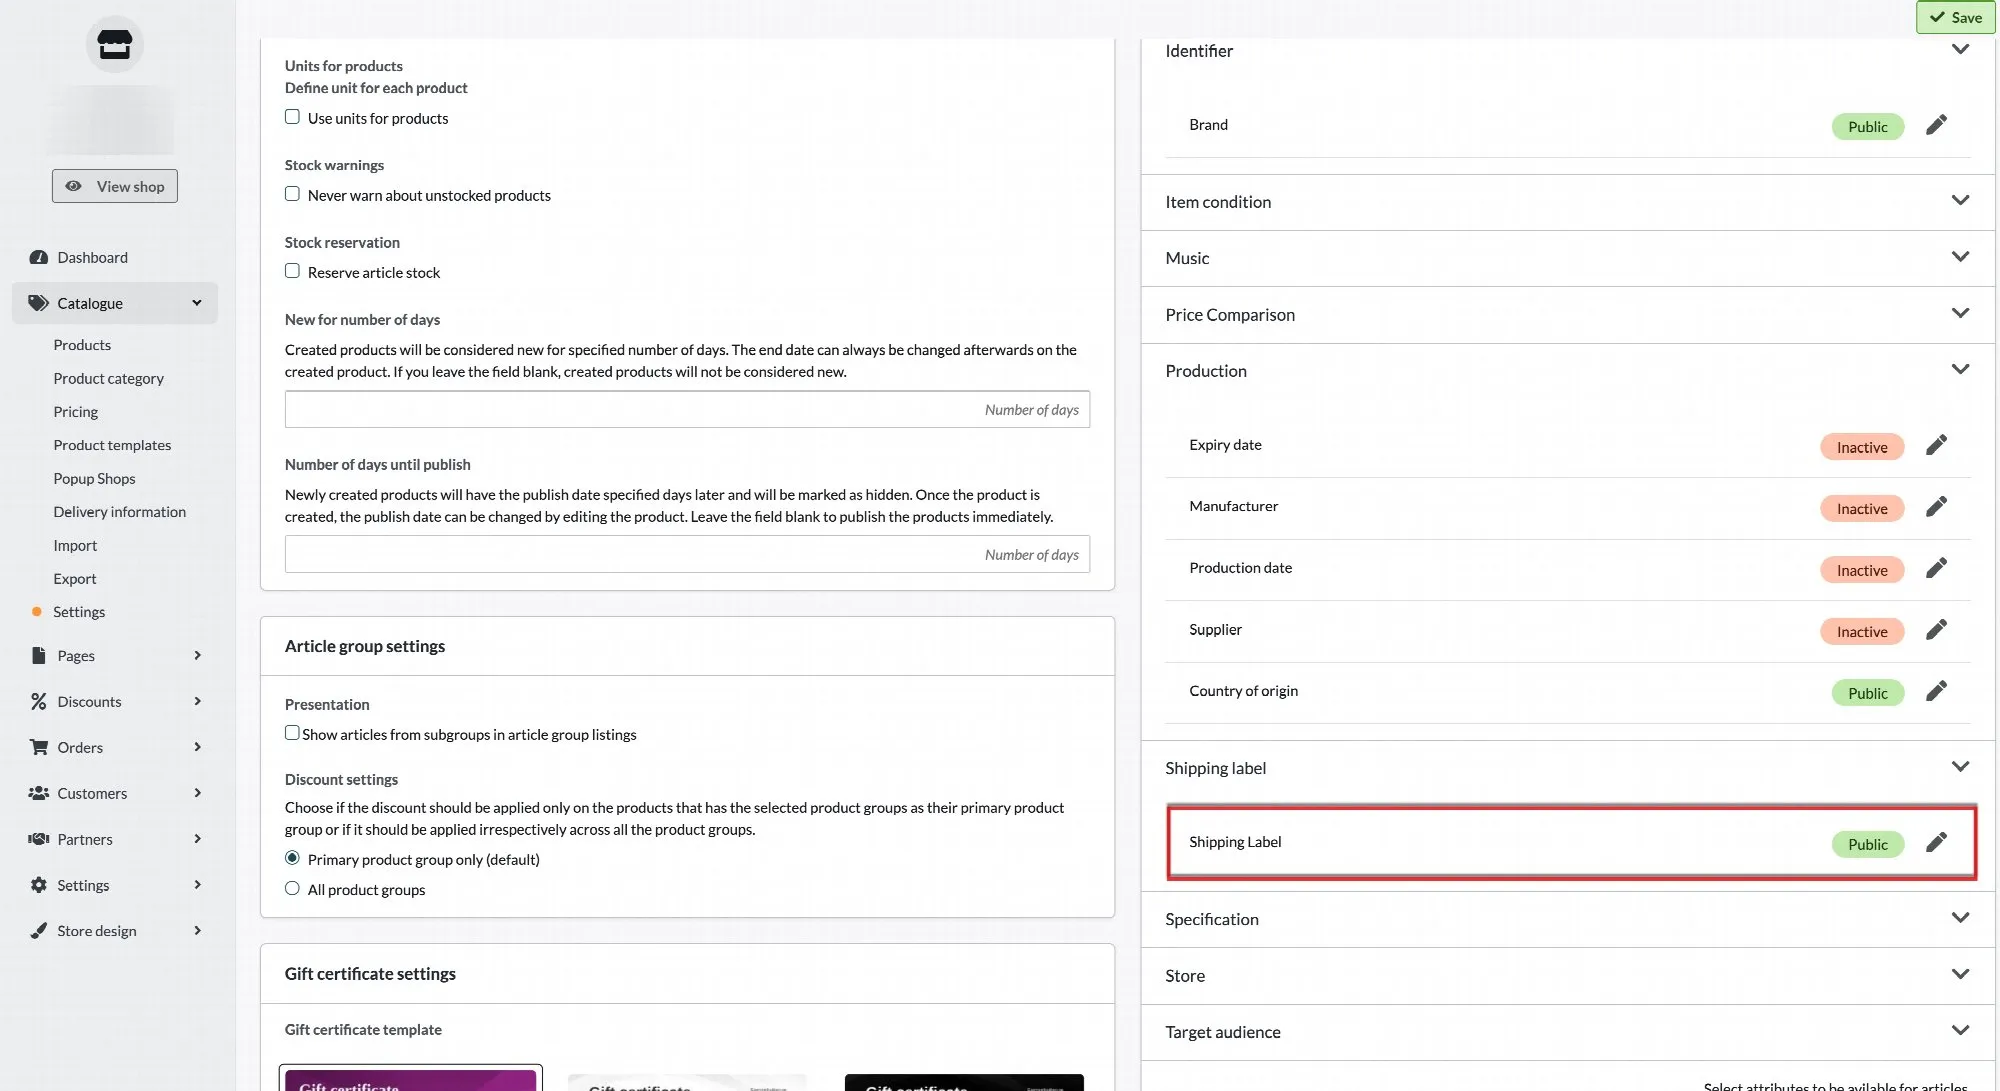
Shipping Label The shipping_label attribute allows you to group products together in order to set up specific shipping rates in Google Merchant Center. The information entered in this field is not visible to customers. You can use shipping labels to categorize products - for example as oversized, perishable, or free shipping. This is an optional field, used exclusively for Google Merchant Center integration. Setting up the Shipping Label attribute 1. Enable the attribute Go to Assortment → Products → Product Settings. In the panel on the right, locate the Product Attributes section. Scroll down until you find the Shipping Label heading. Select the option Include in product feed and click Save. Note: The option to mark the field as private will hide it from customers, but to send the value to Google you must select the product feed option. 2. Add a shipping label to a product Go to Assortment → Products and open the product you wish to edit. Scroll to the bottom-right of the product page. You will find the Shipping Label field, where you can enter the desired label value. 3. Export to Google Merchant Center Once a shipping label has been added to a product, the value will be included in your Google product feed automatically. In Google Merchant Center, you can then use this label under Products → Delivery & Returns to configure shipping rules based on the label. If you have any questions, please contact customer support.
-
Connect Abicart's product feed to Google Merchant Center
27 Nov 2025
Connect Abicart's product feed to Google Merchant Center so that Google can automatically fetch product information, prices, and stock status. You prepare the products in Abicart, copy the feed's URL, and add it as a product source in Merchant Center. This guide also helps you find the cause when a product is missing or disapproved. Subscriptions and prerequisites The product feed is included in all standard subscriptions: Abicart Go, Plus, and Pro, with no extra charge for the feed itself. Google Merchant Center is free. Paid advertising via Google Ads is a separate option with its own costs. You need access to the store's administration panel and the correct Google Merchant Center account. The store must use HTTPS. Also, complete Google's account settings, verify and claim your store's website, and provide the shipping and return information that Google requires. The products and their images must be accessible without a customer login. The information in the feed must match what the customer sees on the product page and at checkout. The feed contains main products. Options under Customer’s choices are not sent as separate product lines. Therefore, the number of options in the store is not the same as the number of products in the feed. Do you already have an Abicart source in Merchant Center? Start by opening the existing source and checking the URL and the latest update. Only create a new source if it's really necessary. Multiple sources for the same products can make it difficult to see which source controls the data. How to connect the product feed 1. Prepare the products in Abicart Open Catalogue → Products and check a product you want to send to Google: It has a unique Product number and is available in the correct store. It has a product name and descriptive text in the language to be used in the feed, the correct price, and a main image of the item. It has a Google Taxonomy, either directly on the product or inherited from the product category. Also, check that the product is not set to be hidden from Google Shopping. The Brand and product identifiers are correctly filled in for the item. GTIN (Global Trade Item Number) is not required for every type of product. If the manufacturer has assigned a GTIN to the item, you must use the correct number. Never invent a GTIN. Need help with categories, brand, or identifiers? See Product data and Google Taxonomy below. 2. Select the language, currency, and country for the feed Go to Settings → Apps → Product Feeds in Abicart and find Google Merchant Center. Check the setting for which text is used as the product description: Description, Introductory text or both. Choose an option that your products actually have text for and save if you change the setting. Select Language and Currency. Select Country if Abicart should calculate and send shipping information for that delivery country. The country selection also affects the VAT handling of prices. Copy the entire URL from Generated URL or URL. If your view has a format option, use the standard tab-delimited format for Google's product feed. Example: for a Swedish store selling to Sweden in Swedish kronor, you select Swedish, SEK, and Sweden. Check that the price and shipping in the final file are correct for a typical customer in Sweden. Product Feeds is located under Apps. The choice of text field for the product description is also here. Language, currency, and country determine which version of the feed you copy. If you select “No country”: the feed will not contain calculated shipping information for a delivery country. You will then need to specify the shipping in Merchant Center. Even when a country is selected, you should check that Google's shipping details match your store's terms. Multi-store systems: ensure you are working in the store that the feed is supposed to represent. The correct language and currency are not enough if the URL refers to the wrong store or product selection. 3. Check the feed URL before adding it to Google Open the copied feed URL. It should provide a product file, sometimes as a download, and not a login page or an error message. Open the file as text or in a spreadsheet program. The standard feed is tab-delimited. Select tab as the delimiter if everything ends up in a single column. Keep product numbers and GTINs as text so that leading zeros are not lost. Search for the test product's product number in column id. Check the name, description, price, currency, stock status, image link, and product link. If there is an active campaign, the regular price may be in price and the sale price in sale_price. Is the product already missing from the file? Start with Abicart's product settings in the troubleshooting. Recreating the source in Google will not solve a product being missing from the source file. 4. Open Data sources in Merchant Center Open Google Merchant Center and select the correct account. Go to Settings → Data sources. In some views, you can also go via Products → Manage product sources. Open the existing Abicart source if you are updating a connection. For a new connection, select Add product source. Open Data sources via the settings menu. The menu's location may vary between Merchant Center views. Add product source is used for a new connection. You open an existing connection from the list. Looking for “Feeds” or “Scheduled fetch”? In Merchant Center, use Data sources and Enter a link to your file. Follow these choices in the next step. 5. Add the link and select automatic fetching Existing file source: check or change the file URL and fetch schedule in the source's settings. Then go to step 6. Use the following choices when adding a new source. Select Add products from a file and then Enter a link to your file. Paste the entire feed URL from Abicart. Use the link to the product file, not the store's homepage or the URL of an individual product. Check the fetch schedule. Google defaults to fetching every 24 hours. Adjust the time and time zone if needed. Leave the authentication details blank for Abicart's standard feed URL, which should be accessible without a login. Check the country of sale and language to ensure they match the feed. Give the source a clear name if Google offers the option, for example, “Abicart – Swedish – SEK”. Select Continue and complete the steps shown in your account. Choose file via link for automatic fetching. A one-time upload from your computer does not provide the same continuous updates. Check the country of sale and language before you continue. The entire generated Abicart URL should be in the link box. Continue once the details are checked. 6. Check that the connection is working Open the product source under Data sources. Check the Latest update, that the fetch was successful, and that the file contains products. Use Update when you need to request a new fetch. Search for the test product in Merchant Center. Check that its product ID, price, currency, image, and link match the feed. Open the product link from the feed. Check that the correct item, currency, and price are displayed without a customer login. Also, test the image link separately. Go to Products → Needs attention and check if the product or account has issues that need to be fixed. The connection is working when Google has fetched the correct file and the test product's data has been processed correctly. After that, check the product's approval status. A successful file fetch does not mean that all products are approved or that they will appear in every search. Google's processing and review happen separately. Troubleshoot from the right place Select an affected product and follow it through Abicart → product file → Merchant Center → product's page. This will show you where the data disappears or becomes incorrect. The product is missing from the Abicart product file Check that you are using the correct store's feed and the correct language version. Open the product in Abicart. Check the product number, that the product is available in the store, and that it is not hidden. Check the Google Taxonomy on the product and in its primary product category. A category on another group is not necessarily the one the product inherits. Also, check the option to hide the product from Google Shopping. Save changes and check an updated product file. If your administration panel has daily generation of product files, also check when the file was last created. A product may need to be corrected in Abicart before it is included in the feed. Google's general rules and Abicart's selection criteria are different things: Google can categorize products automatically, whereas Abicart's standard Google feed, in its current implementation, uses a specified or inherited Google Taxonomy to include the product. Do you expect a row for each color or size under Customer’s choices? Those options are not separate product lines in this feed. If the count is still incorrect, contact support with a specific product number and the feed URL. The product is in the file but is missing or disapproved by Google Check which file URL the current product source is fetching and when it was last processed. Open Products → Needs attention, select the error, and read which products and fields it applies to. For processing errors, you can open Data sources → Product sources → Primary sources → source name → Latest update → Your product file → What needs attention. Download the report if Google offers it. Correct the information in Abicart if it comes from the Abicart feed. Check the new file and then request a new fetch in Google. Do not create multiple new sources to test the same URL. First, check if the same product is already handled by another source. Description or brand is missing Empty description: check both the product's text in the selected language and which text field the product feed uses. Text in “Introductory text” won't help if the feed is only set to read “Description”. Empty brand: activate the correct global attribute and fill in the value on the product according to Brand, GTIN, and MPN. Then check the column brand in the file. A custom attribute that happens to be called 'Brand' is not automatically the same as the global attribute that the feed uses. Google says the image is too small, invalid, or cannot be retrieved Copy the address from the product's image_link in the feed and open that specific image. Check the original file's dimensions and format; the size of the image as displayed in the store is not sufficient. Use a clear image of the actual item. For example, avoid promotional text, watermarks, and placeholder images. Google has special exceptions for certain product categories. Google supports formats such as JPEG, WebP, and PNG. The file type must match the actual image format. The current limit is a maximum of 16 MB and 64 megapixels. Preferably, choose original images of at least 1,500 × 1,500 pixels, which Google recommends. Google has announced that the minimum requirement of 500 × 500 pixels for all product images will be enforced starting January 31, 2027. Check the specific error message and Google's current image requirements. If you can open the image but Google still can't retrieve it, send the image link, the product number, and Google's exact error message to support. The fact that it works in your browser does not prove that Google's fetch will succeed. Google cannot read the product's page Open the exact address listed in the feed's link, including any parameters. Verify that the page displays the correct product without requiring a login and does not produce an error or redirect the visitor to another item. Do not remove twsCurrency or twsShipmentCountry as a general troubleshooting measure. Abicart may add them to select the currency and delivery country. They are not, in themselves, proof that the link is incorrect. If the error persists, especially for many products, contact Abicart support with the error message and the time of Google's last attempt. Access or response time issues need to be investigated even if the page works for regular visitors. Do not recreate the product source solely because of this error. Price, currency, shipping, or stock status is incorrect Verify that the feed's language, currency, country, and store are the intended ones. Compare the values in the file with the same product link and the same delivery country in the store. For promotions, also verify that sale_price shows the correct sale price. Check the product's stock settings, for example, if purchases are allowed when the stock is depleted. The feed's availability is not necessarily the same as a numerical stock balance. Check the shipping settings in both the store and Merchant Center. A selected country in the feed does not replace checking what the customer actually pays at checkout. I have changed information, but Google shows the old data First, check if the change is present in the product file. If it's missing, Abicart's file needs to be updated before a new Google fetch can help. If your view has daily file generation, check its status and the latest generation time. Use the function to regenerate the file if available and wait for it to complete. Once the file is correct, open the source in Merchant Center and select Update or wait for the next scheduled fetch. Check the latest update and product status after processing. Google's check of the product page itself is an additional step. Abicart's file generation and Google's fetch schedule are two separate stages. Therefore, there is no general guarantee that a change will be visible on Google immediately after you save it. Product data and Google Taxonomy What needs to be filled in? Product number: a unique and stable number for each main product. It is sent as id. Name and description: relevant text in the feed's language. Check which description field has been selected under Product Feeds. Price, image, and product link: the correct currency, a current product image, and an accessible page for the same item. Also, check stock status and shipping. Product category and Google Taxonomy: the store's own product category organizes the catalogue. The Google Taxonomy is Google's separate categorization, which can be set or inherited in Abicart. Identifiers and other attributes: depends on the item and Google's rules for its category. Brand, GTIN, MPN, color, size, or certification may be required; do not fill all fields with guessed values. This is a check of the data quality, not a promise that a product will be approved just because the fields are filled in. Read the product's specific issues in Merchant Center. The column names in Google's standard file are in English. Use this translation when checking a product: Column in fileWhat you are checking idThe product number in Abicart. titleThe product name in the feed's language. descriptionThe text from the description field you have selected. price and sale_priceRegular price and any sale price. The currency code is included in the price value. availabilityAvailability, for example in_stock or out_of_stock. linkThe link to the item in the store, with any currency and country parameters. image_linkThe address of the product's main image. brandThe value in the global Brand attribute. gtin and mpnGTIN/EAN and the manufacturer's part number from MPN/SKU, respectively. google_product_categoryThe product's specified or inherited Google category. What is Google Taxonomy? Google Product Taxonomy is Google's predefined list of product categories. The categories have both names and numeric IDs. Choose the most specific category that actually describes the item, for example, a category for USB hubs instead of just electronics. A correct category helps Google understand and classify the item and can be used for grouping and reporting in advertising. It does not guarantee visibility, approval, or correct tax calculation. Check taxes, VAT, and prices separately. Google product category (google_product_category) must come from Google's list. Product type (product_type) instead describes the store's own categorization. They are not interchangeable. See Google's guidelines for product category. Set taxonomy for a product category Go to Catalogue → Product category and open the category. Find Google Taxonomy and select the pencil icon to edit. Choose a category that fits the category's products. Try searching for the plural form, for example, 'shirts', if a search yields no results. If the category should have its own category instead of inheriting, change the inheritance setting and select the category. Save in the dialog box and save the product category. A common category on the product category reduces the work for products that should inherit the same taxonomy. Set or change taxonomy for an individual product Go to Catalogue → Products and open the product. Under Categorization open Google Taxonomy with the pencil icon. Choose whether the product should inherit from its primary product category or have its own category. A product's own category takes precedence over the one set for its product category. Verify that the product is not marked to be hidden from Google Shopping. Save the dialog box and the product. Also check the product's primary product category when using inherited taxonomy. Update Google Taxonomy for many products Prepare a CSV or text file with two columns: product number and the numeric Google Taxonomy ID to be set for each product. Keep the exact product number values. Go to Catalogue → Import, select the file, and choose to update the information for existing products. In the column mapping, select the field for product number for the first column and Google Taxonomy ID for the category column. This mapping determines how the columns are used; a custom column header is not sufficient. Check if the first row contains headers. Check the preview and first try with a small sample. Start the import when the mapping is correct. Read the import result and check an updated product and its row in the feed. Select Google Taxonomy ID in the import's column mapping. Use the category ID, not a made-up category name. Follow the product import guide for file format, header row, and column mapping. Brand, GTIN, and MPN Brand: go to Catalogue → Settings → Product attributes → Identifier and open Brand. Activate it for the product feed, or as public if it should also be displayed in the store. Save and then enter the correct brand on the affected products. Simply activating the field does not populate the values for the products. The global product attributes are found under Catalogue → Settings. Open Identifier to manage Brand. The screenshot shows the Swedish interface. GTIN: use the number that the manufacturer has assigned to the exact item. EAN is a common type of GTIN. Do not use the store's internal product number as a substitute. For products that have not been assigned a GTIN, other identification rules apply; inventing a number or borrowing another item's number will be incorrect. MPN: the manufacturer's part number is entered in the product's field MPN/SKU. It needs to be the manufacturer's actual designation when sent as mpn. Which combinations of brand, GTIN, and MPN are needed depends on the product. See Google's GTIN requirements. More attributes: under Product attributes, you can also find certification, target audience, and store information. Activate and fill in what is relevant for your product category and use case. Store code and store address apply to special needs and are not general requirements for all standard web products. Read more about product properties and attributes. Three different addresses – use the right one at the right step The store's web address is the website associated with the Merchant Center account and verified with Google. The feed address is copied from Product Feeds in Abicart and entered as the link to the product file in Merchant Center. It may start with https://admin.abicart.se/pricefile/ without being a login address. The product link is found in the file's link and leads to a specific item. Parameters like twsCurrency=SEK and twsShipmentCountry=SE may be needed for the correct currency and delivery country. When you need help from support Send the following via your store's regular support channel so we can start investigating the right part immediately: Store ID and which store it concerns if you have a multi-store system. The feed address and the selected language, currency, and country. One or two affected product numbers and whether they are in the product file itself. Google's exact error message, preferably a screenshot, and the date/time of the last fetch or error. The affected product or image link with the parameters intact, as well as what you have already checked. Do not send passwords or login credentials. With this information, support can distinguish between product data, file fetching, and problems with Google's access to product or image pages.