


Google Merchant Center
-

Target Audience
31 Jul 2026
Target audience The Target audience attributes let you describe who a product is intended for. This information is used to guide customers to suitable products and can also be required for compliance in certain product categories. Available attributes: Adult content: indicates whether the product is intended for adults only Suggested age group: the recommended age group for the product Suggested gender: the recommended gender for the product Note: Suggested age group and Suggested gender matter most for categories like clothing, toys, and accessories, where the right value helps customers filter to products meant for them, for example separating kids' shoes from adult shoes, or menswear from womenswear. Fill these in whenever they clearly apply to the product. Setting up Target audience attributes 1. Enable the attributes Go to Assortment → Products → Product Settings. In the panel on the right, locate the Product Attributes section. Scroll down until you find the Target audience heading. For each attribute you wish to use, click the edit icon and select your preferred visibility option, then click Save. 2. Add target audience details to a product Go to Assortment → Products and open the product you wish to edit. Scroll to the bottom-right of the product page. You will find the Target audience fields, where you can fill in the relevant details for each attribute. If you have any questions, please contact customer support.
-

Store - Attributes
31 Jul 2026
Store The Store attributes let you tie a product to a specific physical store location. This is useful for retailers with multiple locations who want to indicate where an item is available. All fields are optional and can be shown to customers on the product page. Available attributes: Store Address: the physical address of the store location Store Code: a unique code identifying the store location About Store Code Use Store Code to tag a product with a short identifier for the physical store it belongs to. Keep the code consistent across your products, since this is what ties a product to a specific location. Using Google local inventory ads or vehicle ads? Google Merchant Center has its own store code requirement, and your code here needs to match the one registered in your Google Business Profile. Read Google's Store code guidelines for the full format requirements. Setting up Store attributes 1. Enable the attributes Go to Assortment → Products → Product Settings. In the panel on the right, locate the Product Attributes section. Scroll down until you find the Store heading. For each attribute you wish to use, click the edit icon and select your preferred visibility option, then click Save. 2. Add store details to a product Go to Assortment → Products and open the product you wish to edit. Scroll to the bottom-right of the product page. You will find the Store fields, where you can enter the store address and store code. If you have any questions, please contact customer support.
-
Stock Export - Google & Facebook Product Feed
1 Jun 2026
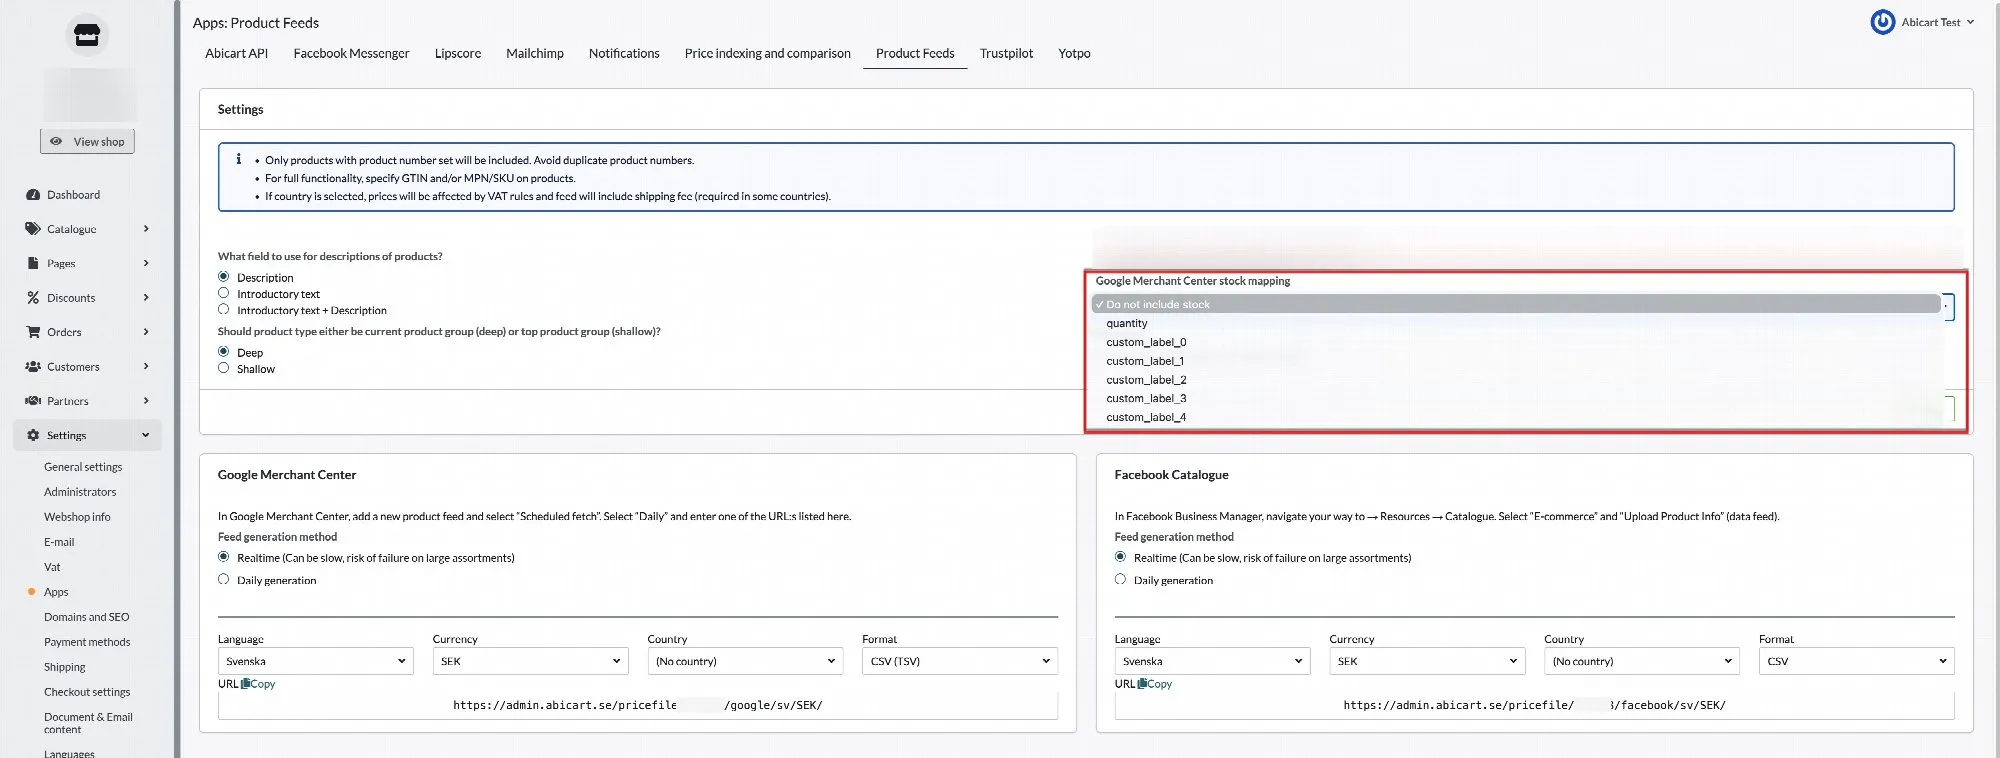
The stock export feature allows you to include your product inventory levels in your Google and Facebook product feeds. This gives you greater control over how your stock data is used for campaign segmentation and targeting in Google Merchant Center and Meta. This is an optional feature used exclusively for Google and Facebook product feed integration. Setting up stock information mapping Go to Settings → External Connections → Product Feed → Google & Facebook stock information mapping. Google Enable the stock export option and choose which product feed field your stock quantity should be linked to: quantity — sends stock levels directly as the product quantity field in the feed. custom_label_0 through custom_label_4 — maps stock to one of the five available custom label fields, allowing you to use it for product segmentation in Google Merchant Center. Select your preferred field and save. About custom labels Custom labels (custom_label_0 to custom_label_4) are optional fields in the Google product feed used to segment products in Shopping campaigns. By mapping your stock to a custom label, you can create campaign rules that behave differently depending on whether a product is well-stocked or running low. Note: Custom label values are not shown to customers. They are only visible within Google Merchant Center. If you are already using custom labels for other segmentation purposes (e.g. sale status, margin tier), make sure to map stock to a label that is not already in use. Facebook Enable the stock export option to include your stock quantity in the Facebook product feed. No additional field mapping is required. If you have any questions, please contact customer support and we will be happy to help.
-
Energy Efficiency Class
21 May 2026
Energy Efficiency Class The energy_efficiency_class attribute allows you to communicate how a product rates on a given energy efficiency scale. When using this attribute, you must also provide the full range by setting both a minimum and maximum value: energy_efficiency_class - the actual rating of the product (e.g. A+) min_energy_efficiency_class - the lowest rating on the scale (e.g. D) max_energy_efficiency_class - the highest rating on the scale (e.g. A+++) This is an optional field, used exclusively for Google Merchant Center integration. Important: As of April 2025, these attributes are only available for products targeting Switzerland, Norway, or the United Kingdom. For products targeting EU countries, use the certification attribute instead, which pulls energy efficiency data from the EU's EPREL database. Setting up the Energy Efficiency Class attribute 1. Enable the attributes Go to Assortment → Products → Product Settings. In the panel on the right, locate the Product Attributes section. Scroll down until you find the Energy Efficiency heading. You will see three sub-attributes: Actual Energy Efficiency Class, Maximum Energy Efficiency Class, and Minimum Energy Efficiency Class. For each one, select the option Include in product feed and click Save. Note: The option to mark a field as private will hide it from customers, but to send the value to Google you must select the product feed option. 2. Add energy efficiency details to a product Go to Assortment → Products and open the product you wish to edit. Scroll to the bottom-right of the product page. You will find the Energy Efficiency fields, where you can enter the actual, minimum, and maximum class values. 3. Export to Google Merchant Center Once energy efficiency values have been added to a product, they will be included in your Google product feed automatically. In Google Merchant Center, the energy efficiency information will be displayed on your product listing where supported. If you have any questions, please contact customer support.
-
Certification
21 May 2026
Certification With the certification attribute, you can describe the certifications required under local regulations for a product, such as energy labeling or carbon class. To display a certification on Google, you must provide a supported combination of the following sub-attributes: certification_authority - the body that issued the certification (e.g. EU) certification_name - the name of the certification (e.g. Energy Label) certification_code - the specific rating or code (e.g. A+) This is an optional field, used exclusively for Google Merchant Center integration. Note: If you do not provide certification information, Google may automatically add it based on your product's GTIN and MPN data. You can always correct or update this by submitting new values. Setting up the Certification attribute 1. Enable the attributes Go to Assortment → Products → Product Settings. In the panel on the right, locate the Product Attributes section. Scroll down until you find the Certification heading. You will see three sub-attributes: Certification Authority, Certification Code, and Certification Name. For each one, select the option Include in product feed and click Save. Note: The option to mark a field as private will hide it from customers, but to send the value to Google you must select the product feed option. 2. Add certification details to a product Go to Assortment → Products and open the product you wish to edit. Scroll to the bottom-right of the product page. You will find the Certification fields, where you can enter values for authority, name, and code. 3. Export to Google Merchant Center Once certification details have been added to a product, the values will be included in your Google product feed automatically. In Google Merchant Center, the certification information will be displayed on your product listing where supported. If you have any questions, please contact customer support.
-
Shipping label
21 May 2026
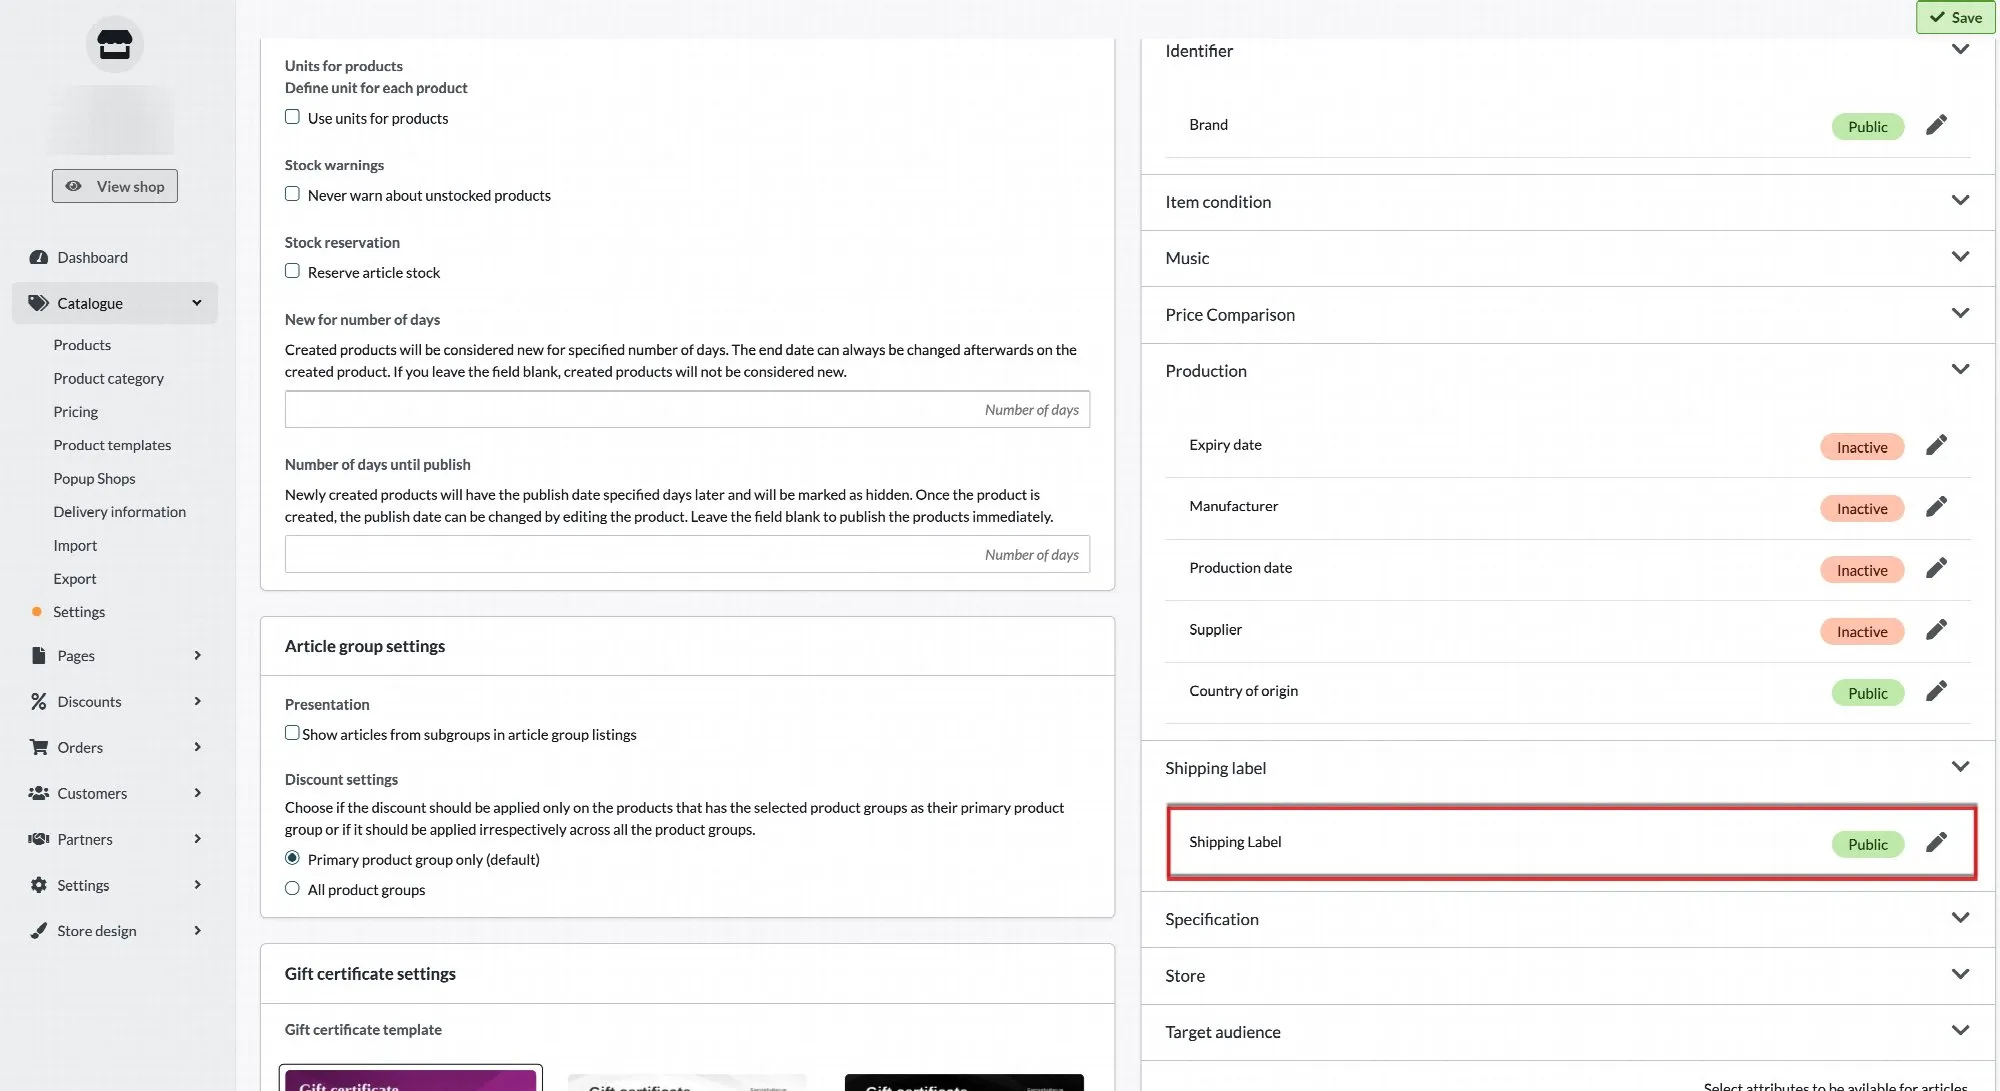
Shipping Label The shipping_label attribute allows you to group products together in order to set up specific shipping rates in Google Merchant Center. The information entered in this field is not visible to customers. You can use shipping labels to categorize products - for example as oversized, perishable, or free shipping. This is an optional field, used exclusively for Google Merchant Center integration. Setting up the Shipping Label attribute 1. Enable the attribute Go to Assortment → Products → Product Settings. In the panel on the right, locate the Product Attributes section. Scroll down until you find the Shipping Label heading. Select the option Include in product feed and click Save. Note: The option to mark the field as private will hide it from customers, but to send the value to Google you must select the product feed option. 2. Add a shipping label to a product Go to Assortment → Products and open the product you wish to edit. Scroll to the bottom-right of the product page. You will find the Shipping Label field, where you can enter the desired label value. 3. Export to Google Merchant Center Once a shipping label has been added to a product, the value will be included in your Google product feed automatically. In Google Merchant Center, you can then use this label under Products → Delivery & Returns to configure shipping rules based on the label. If you have any questions, please contact customer support.
-
How to Add Your Abicart Product Feed to Google Merchant Center
27 Nov 2025
This is a two-step process: Prepare your product feed in Abicart Add the scheduled feed to your Google Merchant Center account Step 1: Prepare Your Feed in Abicart Mandatory Prerequisites Make sure each product in your Abicart store has these fields filled out: Product number Product name Description and/or introductory text Product group Price GTIN (Global Trade Item Number) Google Taxonomy code If you need additional attributes (e.g. store code, store address, certificates), go to Catalogue → Settings → Product attributes. Let's break down Google Product Taxonomy, since it's the single most important factor for your products to appear in the Google feed. Even if every other mandatory field is filled out, a missing Google Taxonomy code will prevent that product from being included in your feed. What Is Google Product Taxonomy? Google Product Taxonomy is a hierarchical list of predefined product categories that Google uses to organize every item in its Shopping ecosystem. Think of it like nested folders, from broad categories (e.g. "Electronics") down to very specific ones ("Electronics > Computers > Computer Accessories > USB Hubs"). Why It Matters Better visibility & targetingAssigning the correct Google Product Taxonomy ensures your items show up for the most relevant searches. When Google understands exactly what you're selling, it can match your products to shopper queries like "USB hub for MacBook" rather than generic "electronics." Consistent classificationUsing the official taxonomy prevents mismatches from homemade labels. Everyone, retailer, Google, and end-user, refers to the same category names and numeric IDs, which reduces errors and disapprovals in Merchant Center. Simplified reporting & biddingOnce your items share a standardized category, you can group them in Merchant Center and Google Ads for bulk reporting, bid adjustments, and campaign structuring. For example, you can raise bids on "Electronics > Audio > Headphones" as one unit instead of tweaking each SKU individually. Accurate tax calculationIn regions like the U.S., certain product categories carry specific tax rates. Providing the right taxonomy code lets Google automatically apply the correct sales tax rules, ensuring compliance and avoiding surprises at checkout. How to Add or Update Google Taxonomy in Abicart Catalogue → Product groups → Edit product group Assign one taxonomy code to the entire group. Catalogue → Products → Edit product Under Product category, enter a taxonomy code per product to override the group. Catalogue → Import Create an import file with product_number and google_taxonomy columns and import for bulk updates. Generate Your Feed URL Go to Settings → External Connection (Apps) → Product feed → Google feed Select Country, Language, and Currency Copy the final Feed URL that Abicart generates. Note: Shipping info is only included if you select a delivery country here. If you prefer to set up shipping in Google Merchant Center directly, you can skip that selection. Step 2: Add the Feed to Google Merchant Center Open Google Merchant Center Go to https://merchants.google.com and sign in. Navigate to Feeds Click Tools & settings (wrench icon) in the top right, then choose "Data Source". Create a Scheduled Fetch Click the + button and select Scheduled fetch. Enter Feed Details Feed name: e.g. "Abicart Daily Feed" Country of sale & Language: match your Abicart settings Fetch URL: paste the URL you copied from Abicart Set Fetch Schedule Choose Frequency (Daily, Weekly, Monthly) Set the Time (in your account's time zone) Review & Create Click Create Feed. Google will fetch your feed at the next scheduled time. Tips & Troubleshooting Verify URL access: Open your feed URL in a browser to ensure the file loads. Monitor Diagnostics: Check the Diagnostics tab in Merchant Center for errors or warnings. Automatic Updates: Any changes in Abicart will be picked up at the next scheduled fetch. With these steps, your Abicart product feed will be automatically synchronized with Google Merchant Center and kept up to date.