


-
Product feed: Google Shopping
7 Oct 2026
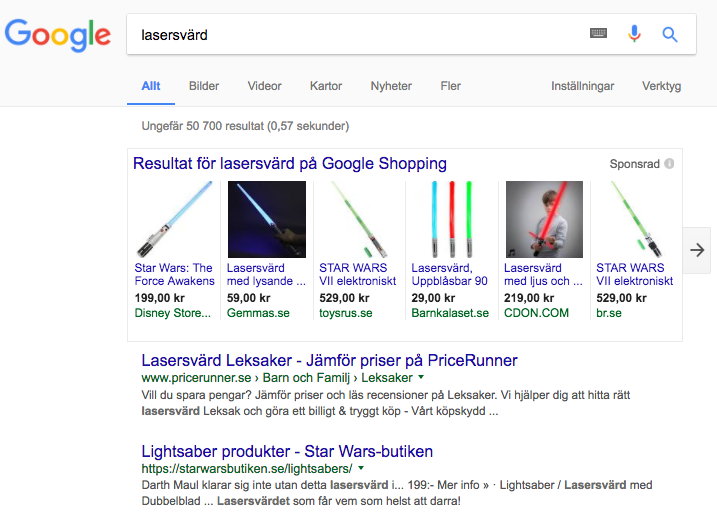
Feed for Google Shopping. The feed can be found under Settings>External links>Product feeds.What is Google Shopping?Google Shopping works much like AdWords, but unlike AdWords text ads, the search results display both image, price and product details, making it easier for visitors to compare products before buying.
-

Target Audience
31 Jul 2026
Target audience The Target audience attributes let you describe who a product is intended for. This information is used to guide customers to suitable products and can also be required for compliance in certain product categories. Available attributes: Adult content: indicates whether the product is intended for adults only Suggested age group: the recommended age group for the product Suggested gender: the recommended gender for the product Note: Suggested age group and Suggested gender matter most for categories like clothing, toys, and accessories, where the right value helps customers filter to products meant for them, for example separating kids' shoes from adult shoes, or menswear from womenswear. Fill these in whenever they clearly apply to the product. Setting up Target audience attributes 1. Enable the attributes Go to Assortment → Products → Product Settings. In the panel on the right, locate the Product Attributes section. Scroll down until you find the Target audience heading. For each attribute you wish to use, click the edit icon and select your preferred visibility option, then click Save. 2. Add target audience details to a product Go to Assortment → Products and open the product you wish to edit. Scroll to the bottom-right of the product page. You will find the Target audience fields, where you can fill in the relevant details for each attribute. If you have any questions, please contact customer support.
-

Store - Attributes
31 Jul 2026
Store The Store attributes let you tie a product to a specific physical store location. This is useful for retailers with multiple locations who want to indicate where an item is available. All fields are optional and can be shown to customers on the product page. Available attributes: Store Address: the physical address of the store location Store Code: a unique code identifying the store location About Store Code Use Store Code to tag a product with a short identifier for the physical store it belongs to. Keep the code consistent across your products, since this is what ties a product to a specific location. Using Google local inventory ads or vehicle ads? Google Merchant Center has its own store code requirement, and your code here needs to match the one registered in your Google Business Profile. Read Google's Store code guidelines for the full format requirements. Setting up Store attributes 1. Enable the attributes Go to Assortment → Products → Product Settings. In the panel on the right, locate the Product Attributes section. Scroll down until you find the Store heading. For each attribute you wish to use, click the edit icon and select your preferred visibility option, then click Save. 2. Add store details to a product Go to Assortment → Products and open the product you wish to edit. Scroll to the bottom-right of the product page. You will find the Store fields, where you can enter the store address and store code. If you have any questions, please contact customer support.
-

Stock Export - Google & Facebook Product Feed
1 Jun 2026
The stock export feature allows you to include your product inventory levels in your Google and Facebook product feeds. This gives you greater control over how your stock data is used for campaign segmentation and targeting in Google Merchant Center and Meta. This is an optional feature used exclusively for Google and Facebook product feed integration. Setting up stock information mapping Go to Settings → External Connections → Product Feed → Google & Facebook stock information mapping. Google Enable the stock export option and choose which product feed field your stock quantity should be linked to: quantity — sends stock levels directly as the product quantity field in the feed. custom_label_0 through custom_label_4 — maps stock to one of the five available custom label fields, allowing you to use it for product segmentation in Google Merchant Center. Select your preferred field and save. About custom labels Custom labels (custom_label_0 to custom_label_4) are optional fields in the Google product feed used to segment products in Shopping campaigns. By mapping your stock to a custom label, you can create campaign rules that behave differently depending on whether a product is well-stocked or running low. Note: Custom label values are not shown to customers. They are only visible within Google Merchant Center. If you are already using custom labels for other segmentation purposes (e.g. sale status, margin tier), make sure to map stock to a label that is not already in use. Facebook Enable the stock export option to include your stock quantity in the Facebook product feed. No additional field mapping is required. If you have any questions, please contact customer support and we will be happy to help.
-
Energy Efficiency Class
21 May 2026
Energy Efficiency Class The energy_efficiency_class attribute allows you to communicate how a product rates on a given energy efficiency scale. When using this attribute, you must also provide the full range by setting both a minimum and maximum value: energy_efficiency_class - the actual rating of the product (e.g. A+) min_energy_efficiency_class - the lowest rating on the scale (e.g. D) max_energy_efficiency_class - the highest rating on the scale (e.g. A+++) This is an optional field, used exclusively for Google Merchant Center integration. Important: As of April 2025, these attributes are only available for products targeting Switzerland, Norway, or the United Kingdom. For products targeting EU countries, use the certification attribute instead, which pulls energy efficiency data from the EU's EPREL database. Setting up the Energy Efficiency Class attribute 1. Enable the attributes Go to Assortment → Products → Product Settings. In the panel on the right, locate the Product Attributes section. Scroll down until you find the Energy Efficiency heading. You will see three sub-attributes: Actual Energy Efficiency Class, Maximum Energy Efficiency Class, and Minimum Energy Efficiency Class. For each one, select the option Include in product feed and click Save. Note: The option to mark a field as private will hide it from customers, but to send the value to Google you must select the product feed option. 2. Add energy efficiency details to a product Go to Assortment → Products and open the product you wish to edit. Scroll to the bottom-right of the product page. You will find the Energy Efficiency fields, where you can enter the actual, minimum, and maximum class values. 3. Export to Google Merchant Center Once energy efficiency values have been added to a product, they will be included in your Google product feed automatically. In Google Merchant Center, the energy efficiency information will be displayed on your product listing where supported. If you have any questions, please contact customer support.
-
Certification
21 May 2026
Certification With the certification attribute, you can describe the certifications required under local regulations for a product, such as energy labeling or carbon class. To display a certification on Google, you must provide a supported combination of the following sub-attributes: certification_authority - the body that issued the certification (e.g. EU) certification_name - the name of the certification (e.g. Energy Label) certification_code - the specific rating or code (e.g. A+) This is an optional field, used exclusively for Google Merchant Center integration. Note: If you do not provide certification information, Google may automatically add it based on your product's GTIN and MPN data. You can always correct or update this by submitting new values. Setting up the Certification attribute 1. Enable the attributes Go to Assortment → Products → Product Settings. In the panel on the right, locate the Product Attributes section. Scroll down until you find the Certification heading. You will see three sub-attributes: Certification Authority, Certification Code, and Certification Name. For each one, select the option Include in product feed and click Save. Note: The option to mark a field as private will hide it from customers, but to send the value to Google you must select the product feed option. 2. Add certification details to a product Go to Assortment → Products and open the product you wish to edit. Scroll to the bottom-right of the product page. You will find the Certification fields, where you can enter values for authority, name, and code. 3. Export to Google Merchant Center Once certification details have been added to a product, the values will be included in your Google product feed automatically. In Google Merchant Center, the certification information will be displayed on your product listing where supported. If you have any questions, please contact customer support.
-
Shipping label
21 May 2026
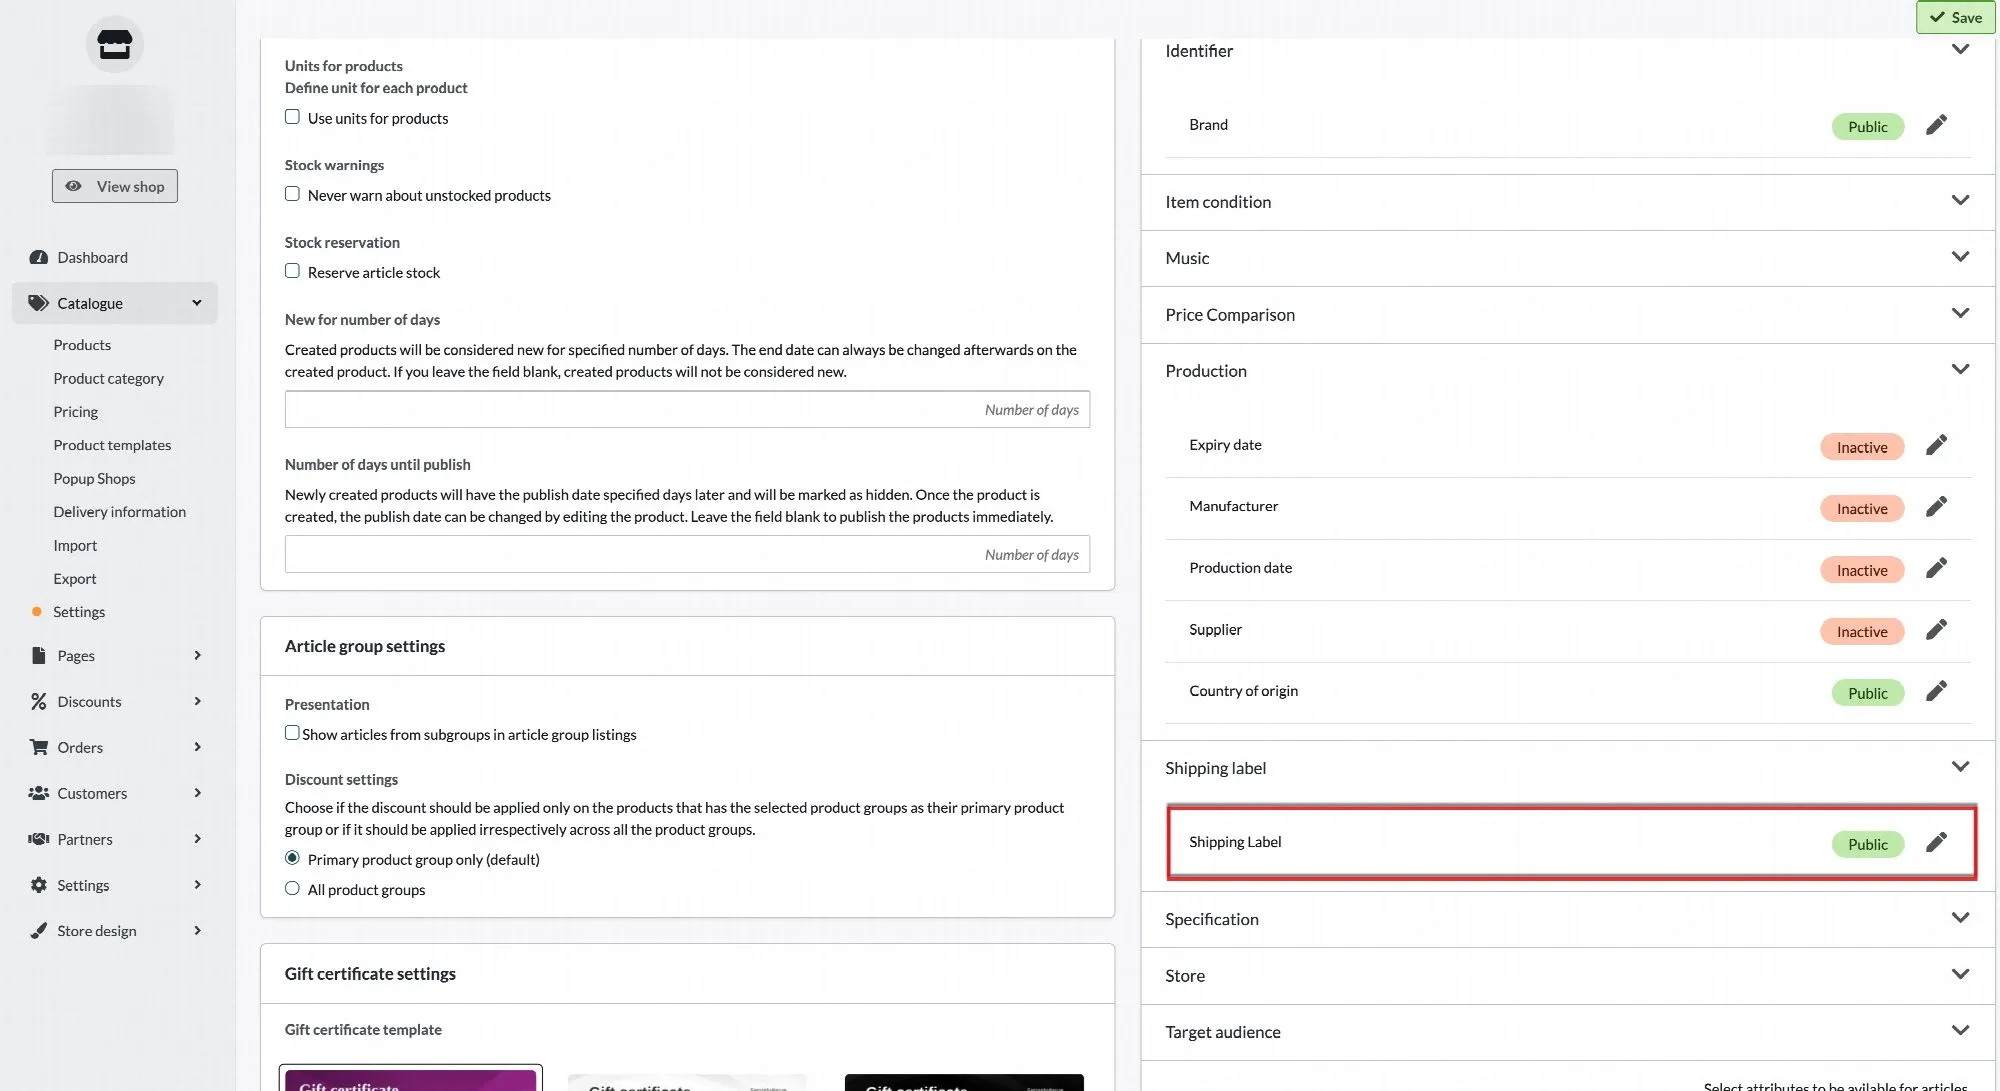
Shipping Label The shipping_label attribute allows you to group products together in order to set up specific shipping rates in Google Merchant Center. The information entered in this field is not visible to customers. You can use shipping labels to categorize products - for example as oversized, perishable, or free shipping. This is an optional field, used exclusively for Google Merchant Center integration. Setting up the Shipping Label attribute 1. Enable the attribute Go to Assortment → Products → Product Settings. In the panel on the right, locate the Product Attributes section. Scroll down until you find the Shipping Label heading. Select the option Include in product feed and click Save. Note: The option to mark the field as private will hide it from customers, but to send the value to Google you must select the product feed option. 2. Add a shipping label to a product Go to Assortment → Products and open the product you wish to edit. Scroll to the bottom-right of the product page. You will find the Shipping Label field, where you can enter the desired label value. 3. Export to Google Merchant Center Once a shipping label has been added to a product, the value will be included in your Google product feed automatically. In Google Merchant Center, you can then use this label under Products → Delivery & Returns to configure shipping rules based on the label. If you have any questions, please contact customer support.
-
Connect Abicart's product feed to Google Merchant Center
27 Nov 2025
Connect Abicart's product feed to Google Merchant Center so that Google can automatically fetch product information, prices, and stock status. You prepare the products in Abicart, copy the feed's URL, and add it as a product source in Merchant Center. This guide also helps you find the cause when a product is missing or disapproved. Subscriptions and prerequisites The product feed is included in all standard subscriptions: Abicart Go, Plus, and Pro, with no extra charge for the feed itself. Google Merchant Center is free. Paid advertising via Google Ads is a separate option with its own costs. You need access to the store's administration panel and the correct Google Merchant Center account. The store must use HTTPS. Also, complete Google's account settings, verify and claim your store's website, and provide the shipping and return information that Google requires. The products and their images must be accessible without a customer login. The information in the feed must match what the customer sees on the product page and at checkout. The feed contains main products. Options under Customer’s choices are not sent as separate product lines. Therefore, the number of options in the store is not the same as the number of products in the feed. Do you already have an Abicart source in Merchant Center? Start by opening the existing source and checking the URL and the latest update. Only create a new source if it's really necessary. Multiple sources for the same products can make it difficult to see which source controls the data. How to connect the product feed 1. Prepare the products in Abicart Open Catalogue → Products and check a product you want to send to Google: It has a unique Product number and is available in the correct store. It has a product name and descriptive text in the language to be used in the feed, the correct price, and a main image of the item. It has a Google Taxonomy, either directly on the product or inherited from the product category. Also, check that the product is not set to be hidden from Google Shopping. The Brand and product identifiers are correctly filled in for the item. GTIN (Global Trade Item Number) is not required for every type of product. If the manufacturer has assigned a GTIN to the item, you must use the correct number. Never invent a GTIN. Need help with categories, brand, or identifiers? See Product data and Google Taxonomy below. 2. Select the language, currency, and country for the feed Go to Settings → Apps → Product Feeds in Abicart and find Google Merchant Center. Check the setting for which text is used as the product description: Description, Introductory text or both. Choose an option that your products actually have text for and save if you change the setting. Select Language and Currency. Select Country if Abicart should calculate and send shipping information for that delivery country. The country selection also affects the VAT handling of prices. Copy the entire URL from Generated URL or URL. If your view has a format option, use the standard tab-delimited format for Google's product feed. Example: for a Swedish store selling to Sweden in Swedish kronor, you select Swedish, SEK, and Sweden. Check that the price and shipping in the final file are correct for a typical customer in Sweden. Product Feeds is located under Apps. The choice of text field for the product description is also here. Language, currency, and country determine which version of the feed you copy. If you select “No country”: the feed will not contain calculated shipping information for a delivery country. You will then need to specify the shipping in Merchant Center. Even when a country is selected, you should check that Google's shipping details match your store's terms. Multi-store systems: ensure you are working in the store that the feed is supposed to represent. The correct language and currency are not enough if the URL refers to the wrong store or product selection. 3. Check the feed URL before adding it to Google Open the copied feed URL. It should provide a product file, sometimes as a download, and not a login page or an error message. Open the file as text or in a spreadsheet program. The standard feed is tab-delimited. Select tab as the delimiter if everything ends up in a single column. Keep product numbers and GTINs as text so that leading zeros are not lost. Search for the test product's product number in column id. Check the name, description, price, currency, stock status, image link, and product link. If there is an active campaign, the regular price may be in price and the sale price in sale_price. Is the product already missing from the file? Start with Abicart's product settings in the troubleshooting. Recreating the source in Google will not solve a product being missing from the source file. 4. Open Data sources in Merchant Center Open Google Merchant Center and select the correct account. Go to Settings → Data sources. In some views, you can also go via Products → Manage product sources. Open the existing Abicart source if you are updating a connection. For a new connection, select Add product source. Open Data sources via the settings menu. The menu's location may vary between Merchant Center views. Add product source is used for a new connection. You open an existing connection from the list. Looking for “Feeds” or “Scheduled fetch”? In Merchant Center, use Data sources and Enter a link to your file. Follow these choices in the next step. 5. Add the link and select automatic fetching Existing file source: check or change the file URL and fetch schedule in the source's settings. Then go to step 6. Use the following choices when adding a new source. Select Add products from a file and then Enter a link to your file. Paste the entire feed URL from Abicart. Use the link to the product file, not the store's homepage or the URL of an individual product. Check the fetch schedule. Google defaults to fetching every 24 hours. Adjust the time and time zone if needed. Leave the authentication details blank for Abicart's standard feed URL, which should be accessible without a login. Check the country of sale and language to ensure they match the feed. Give the source a clear name if Google offers the option, for example, “Abicart – Swedish – SEK”. Select Continue and complete the steps shown in your account. Choose file via link for automatic fetching. A one-time upload from your computer does not provide the same continuous updates. Check the country of sale and language before you continue. The entire generated Abicart URL should be in the link box. Continue once the details are checked. 6. Check that the connection is working Open the product source under Data sources. Check the Latest update, that the fetch was successful, and that the file contains products. Use Update when you need to request a new fetch. Search for the test product in Merchant Center. Check that its product ID, price, currency, image, and link match the feed. Open the product link from the feed. Check that the correct item, currency, and price are displayed without a customer login. Also, test the image link separately. Go to Products → Needs attention and check if the product or account has issues that need to be fixed. The connection is working when Google has fetched the correct file and the test product's data has been processed correctly. After that, check the product's approval status. A successful file fetch does not mean that all products are approved or that they will appear in every search. Google's processing and review happen separately. Troubleshoot from the right place Select an affected product and follow it through Abicart → product file → Merchant Center → product's page. This will show you where the data disappears or becomes incorrect. The product is missing from the Abicart product file Check that you are using the correct store's feed and the correct language version. Open the product in Abicart. Check the product number, that the product is available in the store, and that it is not hidden. Check the Google Taxonomy on the product and in its primary product category. A category on another group is not necessarily the one the product inherits. Also, check the option to hide the product from Google Shopping. Save changes and check an updated product file. If your administration panel has daily generation of product files, also check when the file was last created. A product may need to be corrected in Abicart before it is included in the feed. Google's general rules and Abicart's selection criteria are different things: Google can categorize products automatically, whereas Abicart's standard Google feed, in its current implementation, uses a specified or inherited Google Taxonomy to include the product. Do you expect a row for each color or size under Customer’s choices? Those options are not separate product lines in this feed. If the count is still incorrect, contact support with a specific product number and the feed URL. The product is in the file but is missing or disapproved by Google Check which file URL the current product source is fetching and when it was last processed. Open Products → Needs attention, select the error, and read which products and fields it applies to. For processing errors, you can open Data sources → Product sources → Primary sources → source name → Latest update → Your product file → What needs attention. Download the report if Google offers it. Correct the information in Abicart if it comes from the Abicart feed. Check the new file and then request a new fetch in Google. Do not create multiple new sources to test the same URL. First, check if the same product is already handled by another source. Description or brand is missing Empty description: check both the product's text in the selected language and which text field the product feed uses. Text in “Introductory text” won't help if the feed is only set to read “Description”. Empty brand: activate the correct global attribute and fill in the value on the product according to Brand, GTIN, and MPN. Then check the column brand in the file. A custom attribute that happens to be called 'Brand' is not automatically the same as the global attribute that the feed uses. Google says the image is too small, invalid, or cannot be retrieved Copy the address from the product's image_link in the feed and open that specific image. Check the original file's dimensions and format; the size of the image as displayed in the store is not sufficient. Use a clear image of the actual item. For example, avoid promotional text, watermarks, and placeholder images. Google has special exceptions for certain product categories. Google supports formats such as JPEG, WebP, and PNG. The file type must match the actual image format. The current limit is a maximum of 16 MB and 64 megapixels. Preferably, choose original images of at least 1,500 × 1,500 pixels, which Google recommends. Google has announced that the minimum requirement of 500 × 500 pixels for all product images will be enforced starting January 31, 2027. Check the specific error message and Google's current image requirements. If you can open the image but Google still can't retrieve it, send the image link, the product number, and Google's exact error message to support. The fact that it works in your browser does not prove that Google's fetch will succeed. Google cannot read the product's page Open the exact address listed in the feed's link, including any parameters. Verify that the page displays the correct product without requiring a login and does not produce an error or redirect the visitor to another item. Do not remove twsCurrency or twsShipmentCountry as a general troubleshooting measure. Abicart may add them to select the currency and delivery country. They are not, in themselves, proof that the link is incorrect. If the error persists, especially for many products, contact Abicart support with the error message and the time of Google's last attempt. Access or response time issues need to be investigated even if the page works for regular visitors. Do not recreate the product source solely because of this error. Price, currency, shipping, or stock status is incorrect Verify that the feed's language, currency, country, and store are the intended ones. Compare the values in the file with the same product link and the same delivery country in the store. For promotions, also verify that sale_price shows the correct sale price. Check the product's stock settings, for example, if purchases are allowed when the stock is depleted. The feed's availability is not necessarily the same as a numerical stock balance. Check the shipping settings in both the store and Merchant Center. A selected country in the feed does not replace checking what the customer actually pays at checkout. I have changed information, but Google shows the old data First, check if the change is present in the product file. If it's missing, Abicart's file needs to be updated before a new Google fetch can help. If your view has daily file generation, check its status and the latest generation time. Use the function to regenerate the file if available and wait for it to complete. Once the file is correct, open the source in Merchant Center and select Update or wait for the next scheduled fetch. Check the latest update and product status after processing. Google's check of the product page itself is an additional step. Abicart's file generation and Google's fetch schedule are two separate stages. Therefore, there is no general guarantee that a change will be visible on Google immediately after you save it. Product data and Google Taxonomy What needs to be filled in? Product number: a unique and stable number for each main product. It is sent as id. Name and description: relevant text in the feed's language. Check which description field has been selected under Product Feeds. Price, image, and product link: the correct currency, a current product image, and an accessible page for the same item. Also, check stock status and shipping. Product category and Google Taxonomy: the store's own product category organizes the catalogue. The Google Taxonomy is Google's separate categorization, which can be set or inherited in Abicart. Identifiers and other attributes: depends on the item and Google's rules for its category. Brand, GTIN, MPN, color, size, or certification may be required; do not fill all fields with guessed values. This is a check of the data quality, not a promise that a product will be approved just because the fields are filled in. Read the product's specific issues in Merchant Center. The column names in Google's standard file are in English. Use this translation when checking a product: Column in fileWhat you are checking idThe product number in Abicart. titleThe product name in the feed's language. descriptionThe text from the description field you have selected. price and sale_priceRegular price and any sale price. The currency code is included in the price value. availabilityAvailability, for example in_stock or out_of_stock. linkThe link to the item in the store, with any currency and country parameters. image_linkThe address of the product's main image. brandThe value in the global Brand attribute. gtin and mpnGTIN/EAN and the manufacturer's part number from MPN/SKU, respectively. google_product_categoryThe product's specified or inherited Google category. What is Google Taxonomy? Google Product Taxonomy is Google's predefined list of product categories. The categories have both names and numeric IDs. Choose the most specific category that actually describes the item, for example, a category for USB hubs instead of just electronics. A correct category helps Google understand and classify the item and can be used for grouping and reporting in advertising. It does not guarantee visibility, approval, or correct tax calculation. Check taxes, VAT, and prices separately. Google product category (google_product_category) must come from Google's list. Product type (product_type) instead describes the store's own categorization. They are not interchangeable. See Google's guidelines for product category. Set taxonomy for a product category Go to Catalogue → Product category and open the category. Find Google Taxonomy and select the pencil icon to edit. Choose a category that fits the category's products. Try searching for the plural form, for example, 'shirts', if a search yields no results. If the category should have its own category instead of inheriting, change the inheritance setting and select the category. Save in the dialog box and save the product category. A common category on the product category reduces the work for products that should inherit the same taxonomy. Set or change taxonomy for an individual product Go to Catalogue → Products and open the product. Under Categorization open Google Taxonomy with the pencil icon. Choose whether the product should inherit from its primary product category or have its own category. A product's own category takes precedence over the one set for its product category. Verify that the product is not marked to be hidden from Google Shopping. Save the dialog box and the product. Also check the product's primary product category when using inherited taxonomy. Update Google Taxonomy for many products Prepare a CSV or text file with two columns: product number and the numeric Google Taxonomy ID to be set for each product. Keep the exact product number values. Go to Catalogue → Import, select the file, and choose to update the information for existing products. In the column mapping, select the field for product number for the first column and Google Taxonomy ID for the category column. This mapping determines how the columns are used; a custom column header is not sufficient. Check if the first row contains headers. Check the preview and first try with a small sample. Start the import when the mapping is correct. Read the import result and check an updated product and its row in the feed. Select Google Taxonomy ID in the import's column mapping. Use the category ID, not a made-up category name. Follow the product import guide for file format, header row, and column mapping. Brand, GTIN, and MPN Brand: go to Catalogue → Settings → Product attributes → Identifier and open Brand. Activate it for the product feed, or as public if it should also be displayed in the store. Save and then enter the correct brand on the affected products. Simply activating the field does not populate the values for the products. The global product attributes are found under Catalogue → Settings. Open Identifier to manage Brand. The screenshot shows the Swedish interface. GTIN: use the number that the manufacturer has assigned to the exact item. EAN is a common type of GTIN. Do not use the store's internal product number as a substitute. For products that have not been assigned a GTIN, other identification rules apply; inventing a number or borrowing another item's number will be incorrect. MPN: the manufacturer's part number is entered in the product's field MPN/SKU. It needs to be the manufacturer's actual designation when sent as mpn. Which combinations of brand, GTIN, and MPN are needed depends on the product. See Google's GTIN requirements. More attributes: under Product attributes, you can also find certification, target audience, and store information. Activate and fill in what is relevant for your product category and use case. Store code and store address apply to special needs and are not general requirements for all standard web products. Read more about product properties and attributes. Three different addresses – use the right one at the right step The store's web address is the website associated with the Merchant Center account and verified with Google. The feed address is copied from Product Feeds in Abicart and entered as the link to the product file in Merchant Center. It may start with https://admin.abicart.se/pricefile/ without being a login address. The product link is found in the file's link and leads to a specific item. Parameters like twsCurrency=SEK and twsShipmentCountry=SE may be needed for the correct currency and delivery country. When you need help from support Send the following via your store's regular support channel so we can start investigating the right part immediately: Store ID and which store it concerns if you have a multi-store system. The feed address and the selected language, currency, and country. One or two affected product numbers and whether they are in the product file itself. Google's exact error message, preferably a screenshot, and the date/time of the last fetch or error. The affected product or image link with the parameters intact, as well as what you have already checked. Do not send passwords or login credentials. With this information, support can distinguish between product data, file fetching, and problems with Google's access to product or image pages.
-
Google Ads Enhanced conversions
27 Nov 2025
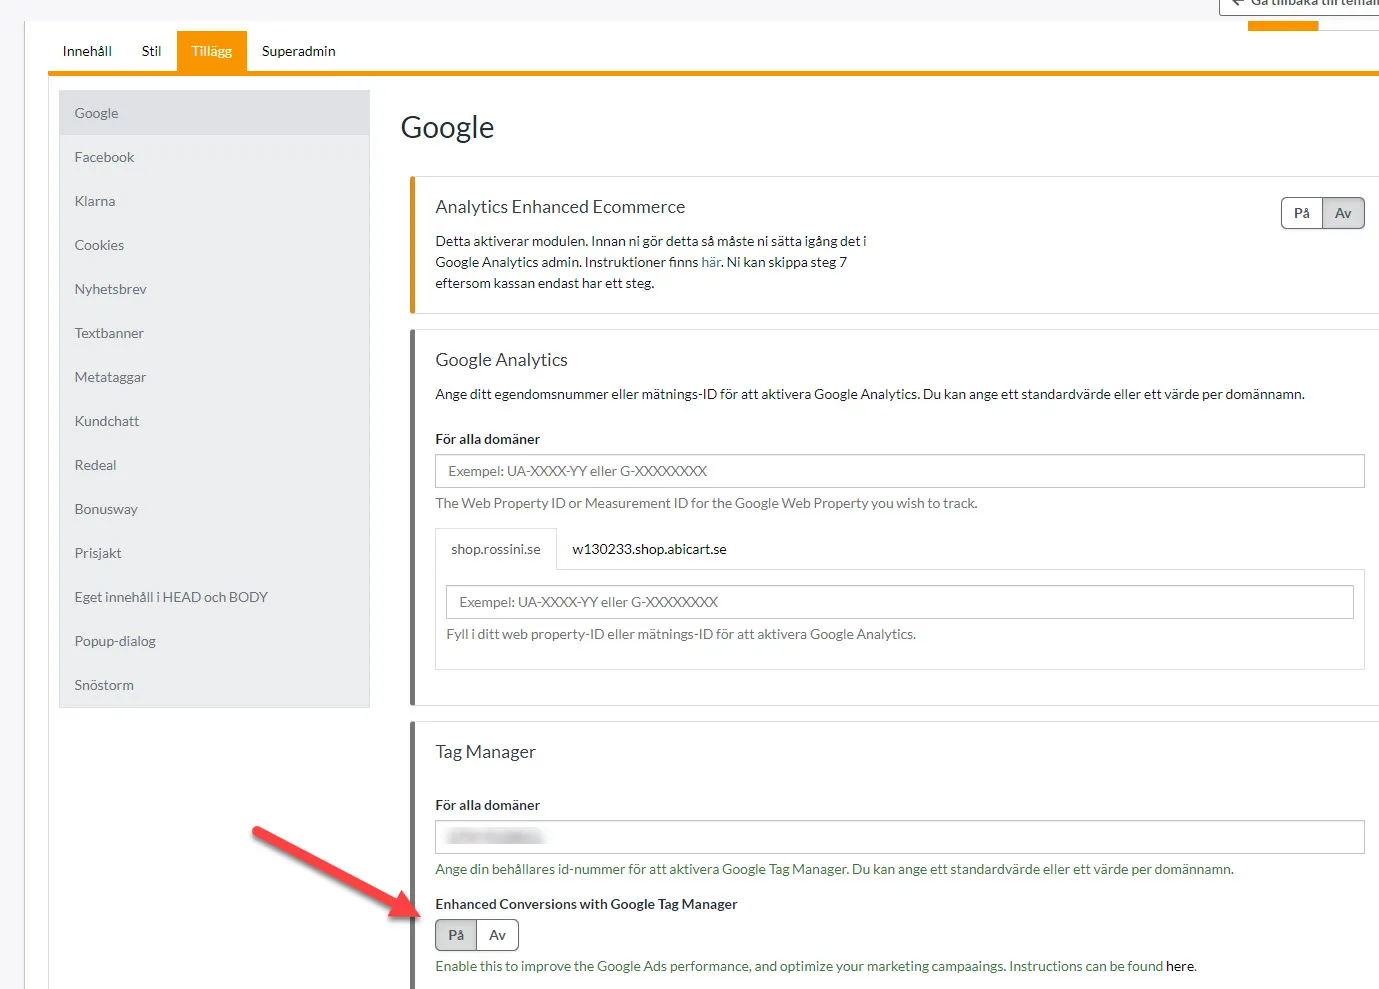
Now we're sending you user parameters to help you set up enhanced conversions via Google Tag Manager.To set this up, follow these steps:Step 1Log in to Abicart admin:Store design >> Themes >> Edit >> Addons >> Google >> Google Tag Manager.Enable the Enhanced Conversion option, as shown in the image.Step 2.Configure Enhanced Conversions in Google Tag Manager:Log in to Google Tag Manager. Make sure you are in the right container linked to your website.Create a new tag for Enhanced ConversionsActivate Enhanced Conversions and enter your Conversion ID and Label from your Google Ads account.Map your Data Layer variables.Use the Enhanced Conversion settings to map your user data (that we already send) with your Data Layer. Make sure the data from Abicart matches the fields required by Google Tag Manager.Set up triggers.Add a trigger for when a conversion event occurs (such as on the purchase confirmation page). This ensures that the tag is executed at the right time.Test and publishUse Preview mode in Google Tag Manager to test your enhanced conversion tag. If everything looks good, click Submit and publish your changes.Google supportFor basic guidance on how to set this up, see information from GoogleSetting up enhanced conversions for the web with Google Tag Manager
-
FAQ - GA4 Via GTM Enhanced Ecommerce Package
27 Nov 2025
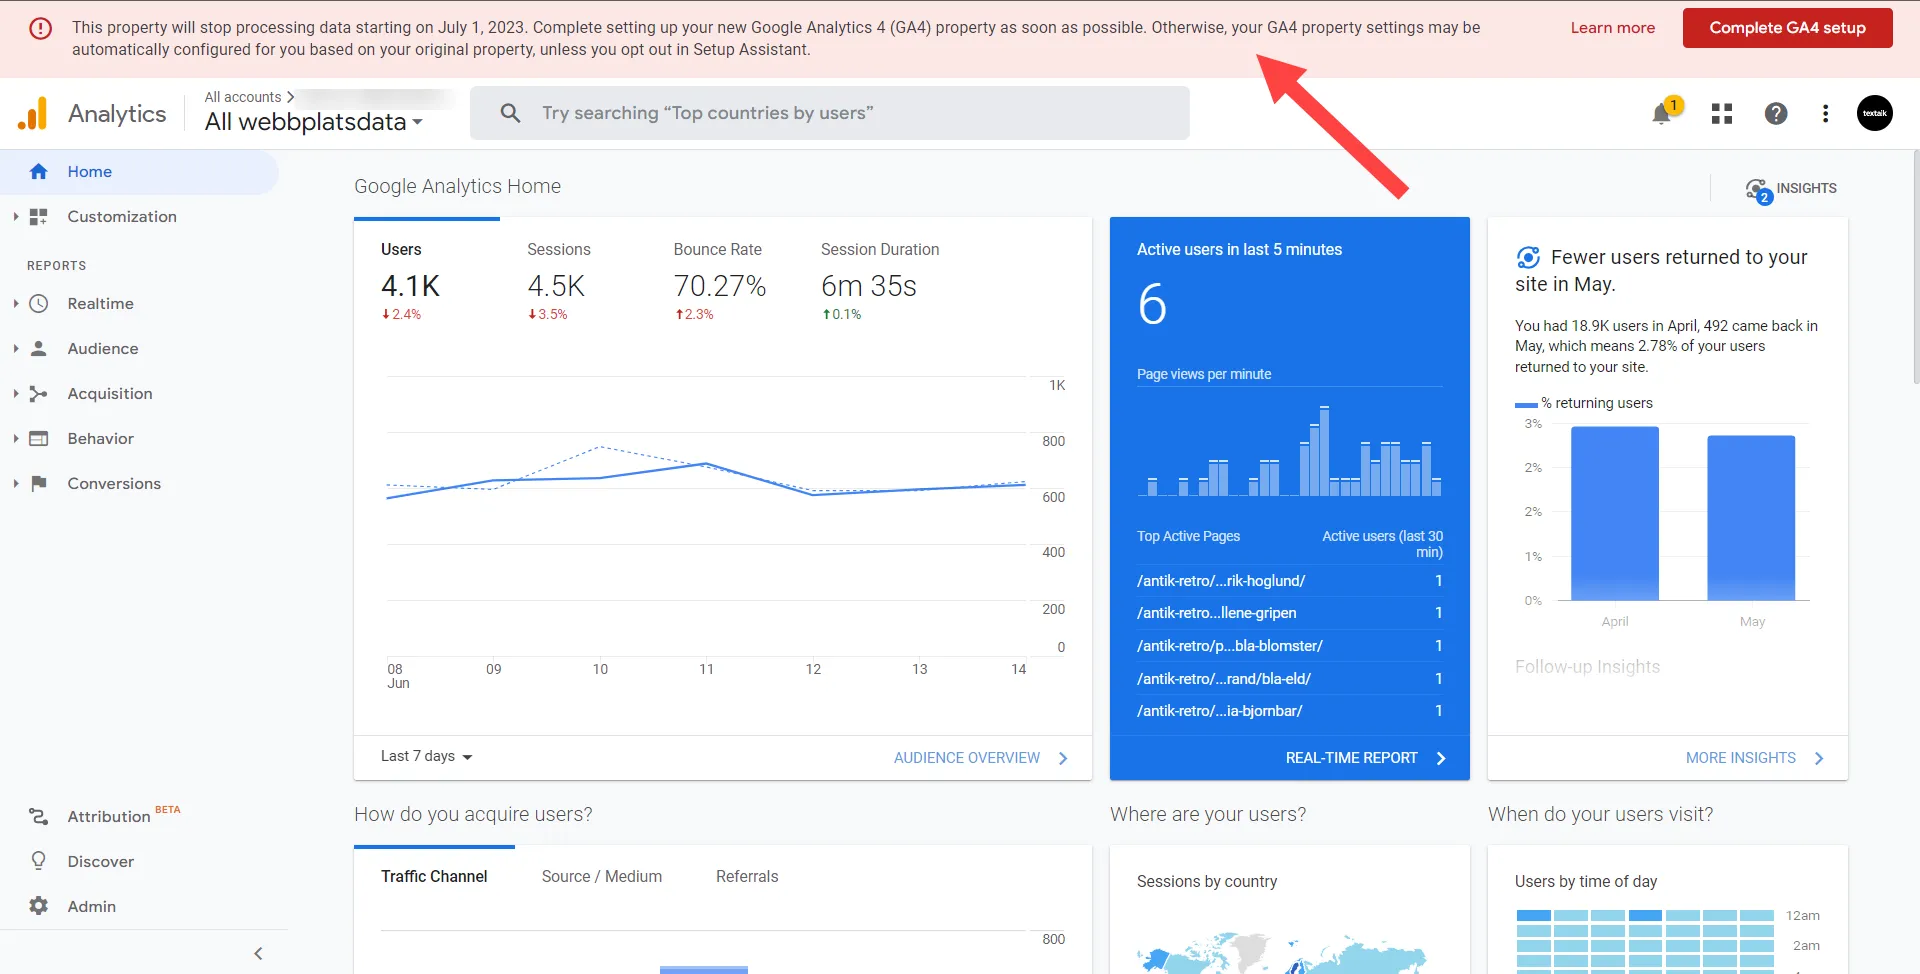
Here are some frequently asked questions around the Enhanced Ecommerce package href="https://www.abicart.se/experts/boostcommerce-analytics-ga4-gtm-e-handelsoptimering" >Abicart Analytics Pro: GA4 & GTM E-handelsoptimeringFAQOnce you have implemented Enhanced Ecommerce, you can start analyzing data about sales in your webshop. However, Google Analytics will still encourage you to complete GA4. You will get far with just Enhanced Ecommerce, but if you use Google Ads or Audiences, these need to be linked/created. The completion of that is not included in the Enhanced Ecommerce setup package.Useful Google guides:[GA4] Configure your GA4 property using Setup AssistantUniversal Analytics fasas ut[UA→GA4] Automatiskt skapade Google Analytics 4-egendomarWhy do I still see the UA upgrade message in my Google Analytics?The red text box at the top of the page in Google Analytics which encourage switching to GA4 is a standard message that Google displays regardless of whether you've started using GA4 or not.You can ignore this message if we have reached out to you to let you know GA4 and Enhanced Ecommerce has been implemented per your order.The count down pop-up in Google Analytics >> Universal Analytics can also be ignored if you have purchased the enhanced ecommerce package and heard back from us.Why does a message in Google Analytics say I need to complete my GA4 even though I bought the Enhanced Ecommerce package?Enhanced Ecommerce is a part of GA4, but the configuration of Enhanced Ecommerce will not complete your GA4 setup. The red top message in the GA4 section is asking you to complete your GA4 setup. Read more here:[GA4] Konfigurera din GA4-egendom med hjälp av konfigurationsassistenten(The package include "Implementation of GA4 and GTM" which means we implement GA4 and GTM-related to Enhanced Ecommerce. If you don’t have a GA4/GTM account we create it for you, but completing the GA4 setup still remain. Hence the message)Where do I see the implementation of the enhanced ecommerce package?In the section of GA4 >> Reports >> Acquisition, Engagement & Monetization. See navigation under the next question.How do I navigate in GA >> GA4?When you start at the home screen you might be in the UA section. From there you (1) click on "All webshop data"(2) Then you hover over the GA4 option and click open:(3) Once you get into GA4 you hover by the house icon to open the menu Then you click Reports:(4) Now you can choose to look at Acquisition, Engagement or Monetization to gain insights collected through enhanced ecommerce:Why does GA4 Setup Assistant say my GA4 is not completed?The package enhanced ecommerce includes configuring enhanced ecommerce. It doesn't cover configuring your whole analytics. Use the checklist and the guide below to set it up:[GA4] Configure your GA4 property using Setup AssistantUseful Google guides:[GA4] Konfigurera din GA4-egendom med hjälp av konfigurationsassistentenUniversal Analytics fasas ut[UA→GA4] Automatiskt skapade Google Analytics 4-egendomar[GA4] Configure your GA4 property using Setup Assistant
-

Creating and linking a Tag Manager account
27 Nov 2025
Get Started with Google Tag Manager A quick guide to what Tag Manager is, how it works, and how to connect it to your store. Google Tag Manager (GTM) lets you add marketing scripts, tracking pixels, and code snippets to your website without editing your theme's code every time. Everything is managed from one dashboard instead. All of our latest themes support Google Consent Mode, so Tag Manager automatically respects the privacy choices your visitors make about their data. GTM is built around four building blocks: Containers Tags Triggers Variables The Building Blocks Containers The master file you create when you first log in to Tag Manager. It holds all of your tags, triggers, and variables. Every container gets a unique Container ID, which you'll add to your store theme (steps below). Tags The actual snippet of code that runs on a page. For example, if you want to install a Meta (Facebook) pixel or Google Analytics, you'd add it as a tag. Triggers Tells Tag Manager when and where a tag should fire, for example "fire on all pages" or "only fire on the checkout page." A tag won't run without at least one trigger attached. Variables Optional placeholders for values that tags and triggers can reference, such as a customer's order value or a product ID during checkout. Create and Link Your Tag Manager Account Step 1: Log in Go to tagmanager.google.com and log in using your Google account. Step 2: Create an account and container You'll first create a top-level account (usually your company name), then a container for your specific website. Click Create Account. Under Container setup, enter your store's domain name (e.g. yourstore.com) in the Container name field. Under Target platform, select Web. Click Create and accept the Terms of Service. Step 3: Copy your Container ID A pop-up with installation code will appear. You don't need any of the full code blocks, just the short ID that starts with GTM-, highlighted in red below. Click OK to close the box. Step 4: Add the GTM ID to your store theme Log in to your store admin panel and navigate to: Appearance → Themes → Select your theme → Edit → Extensions → Google → Google Tag Manager Paste your GTM ID into the field, then save. Your store is now connected to Google Tag Manager.
-

Google: Add Search Console to your theme
27 Nov 2025
Connect Google Search Console to the store. What is Google Search Console? Google Search Console is one of Google's free tools for managing search engine optimisation for a website. Among other things, you can see the indexing status and optimize your website's visibility in the search engines. What do I need to do to get started? You first need to enter some data in Search Console and then you need to verify your site by adding some code to the store's theme.Adding the domain in Search ConsoleLog in to Google Search Console.In Google Search Console, under Home page, there is a field for "Website". Enter your store's address (domain) in that field. Then click on the "Add property" button.Once you click on "Add property" you will see two tabs, "Recommended method" and "Alternative methods". Click on the "Alternative methods" tab and select "HTML tags".You will now see a meta-tag that looks something like this:<meta name="google-site-verification" content="xXxXxXx" />.It is the content contained in "content" that we need and will put into the theme. Copy (CTRL + C) only the content inside the quotation marks in content.Do not click on "Verify" yet.Add the code to the shop's themeOpen a new tab in your browser and then log in to the store. Go to Appearance -> Themes -> select theme, edit -> Add-ons tab -> Google -> Google Search Console.Paste the code in the Google Search Console field.Make sure that only the content inside the quotation marks in "content" is included.Save.Verify in Google Search ConsoleGo back to the Google Search Console tab in your browser, then click the Verify button. You've now verified your domain in Google Search Console. Great job! :-)
-

GA4: Triggers and variables in Google Tag Manager
27 Nov 2025
A list of triggers and variables for use in Google Tag Manager for Google Analytics 4 (GA4).Triggers and Variables in Google Tag Manager (GTM) for Google Analytics 4 (GA4) Triggers and variables are what is available to track in GTM (Google Tag Manager). New updated data layers and variables 1. Data Layer Event – view_item (Variable) This event is triggered when a customer has viewed an item/article/product. Datalayer Event: view_item ecommerce A list (Array) of products articleId Item ID (if available) articleNumber Item number (if available) name Item name ecommerce consists of: currency Currency code items A list (Array) of product details item_id Specific Item ID (if available) item_name Specific item name quantity Item quantity 2. Data Layer Event – add_to_cart (Variable) This event is triggered when a customer has added an item/article/product to their cart. Datalayer Event: add_to_cart ecommerce A list (Array) of products articleId Item ID (if available) articleNumber Item number (if available) name Item name articleName Item name articlePrice Item price transactionId Order number transactionTotal Total amount excluding VAT totalIncVat Total amount including VAT orderItem Includes each item in the shopping cart with the following information ecommerce consists of: currency Currency code transaction_id Order number value Shopping cart total (if available) items A list (Array) of product details item_id Specific Item ID (if available) item_name Specific item name price Item price quantity Item quantity 3. Data Layer Event – begin_checkout (Variable) This event is triggered when a customer has started the checkout process. Datalayer Event: begin_checkout ecommerce A list (Array) of products articleId Item ID (if available) articleNumber Item number (if available) name Item name articleName Item name articlePrice Item price transactionId Order number transactionTotal Total amount excluding VAT totalIncVat Total amount including VAT orderItem Includes each item in the shopping cart with the following information ecommerce consists of: currency Currency code transaction_id Order number value Shopping cart total (if available) items A list (Array) of product details item_id Specific Item ID (if available) item_name Specific item name price Item price quantity Item quantity 4. Data Layer Event – purchase_GA4 (Variable) This event is triggered when a customer has made a purchase. Datalayer Event: purchase_GA4 ecommerce consists of: currency Currency code transaction_id Order number value Shopping cart total (if available) items A list (Array) of product details item_id Specific Item ID (if available) item_name Specific item name price Item price quantity Item quantity
-

Google: Add Analytics to your store
27 Nov 2025
Create an account with Google and add Analytics to your store theme. What is Google Analytics? Google Analytics is a free tool to see how many people visit your site, where they live, if anyone links to you and which pages in your store are most popular.Create an account in AnalyticsGo to https://analytics.google.com/ and log in (or create an account).Once you have logged in, click on "Register".Fill in all the details:Account name (e.g. company name)Property name (e.g. shop name or URL followed by GA4). Be sure to choose the right time zone and currency from the beginning. You can change the time zone at a later date but the new setting will not apply retroactively.Business detailsBusiness objectives (you can select "Get baseline reports" here if you don't know).Accept the terms and conditionsNow it's time to start collecting data. Select the Web platform and enter your store's URL and a name for your stream, leaving the default settings filled in. Click on Create stream.In this mode, do not use the script in the installation instructions. Close the box and instead copy the measurement id that was created (format e.g. G-111222AAA8).Add the ID to your themeNow we will add the measurement id you copied to the theme.Go to Appearance -> Themes -> select theme, edit -> Add-ons -> Google -> Google Analytics.Enter your ID given to you by Google in the field. Google Analytics and Save.Important information for those obtaining an SSL certificateWhen you get an SSL certificate, you need to change from http to https in Google Analytics.
-

Google: Set up goal conversion in Analytics
27 Nov 2025
Understand your visitors' behaviour and their experiences to set up different strategies for your store. What is target shifting? For example, if you advertise online and want to promote a specific product page or category page, you can use target conversion to understand visitors' behaviour and their experience of the site. In this way, you can see gaps and opportunities in an easy-to-understand way. With this as a basis, you can set up different strategies for your store.Note that target conversionis notthe same as e-commerce tracking.Create goal conversion in AnalyticsLog in to Analytics accountHere's how to set up Google Analytics account for responsive themes to enable tracking of completed goals. This goal we're creating now will give you a funnel of how many customers came to a completed purchase.Start by logging in to your Google account and clicking on the "Gear".Under "View" you will find "Goal".Create a conversion goalCreate a conversion goal to measure, for example, how many of your visitors reach a campaign page or a new product that you recently launched. Click on "New goal".Name it for example "Completed purchase".In type we select "Goal" and click "Next step".In "Goal settings" select "Custom" and then click "Continue".In "Goal description" we type for example "Campaign" then type should be on "Goal". Click on "Continue".In "Target information" we select "Start with" and type the file name for the page (product or product group). e.g. /summer campaign/. Tick: Shift-sensitive."Value" we leave off because there is an e-commerce tracking that you can activate instead if you want to follow the value of your orders.Don't forget to save! Now this page will be tracked and you will find the statistics under your profile → Conversions → Overview.Please note that the statistics displayed in Google are delayed by a maximum of one day, so it may take a while for the correct results to appear.Please also note that orders placed by a logged-in administrator are not reported to Google Analytics.
-

How do I add a sitemap to Google Search Console?
27 Nov 2025
What is a sitemap? A sitemap is a web site map that contains information about everything on your site. Google and other search engines can read your page even if you don't upload a sitemap, but it doesn't hurt to give Google as much information as possible.Submitting your sitemap in Search ConsoleLog in to Google Search Console.Go to the home page and click on your website.Then go to Search Actions -> SitemapsClick the "Add/Test Sitemap" button in the top right corner.Enter sitemap.xml into the empty box and click the submit button.Ready!
-

Google: Connect Search Console with Analytics
27 Nov 2025
Use the search information and read it in Analytics.Connecting Search Console with Analytics Connecting Search Console to your Analytics account brings your organic search data into one place. You'll be able to see how your pages rank, which searches bring visitors to your site, and what those visitors do once they arrive, all without switching between two separate tools. Once the two are linked, Search Console data appears directly inside Analytics, so you only need to log in to one place. How to Connect In Admin, under Product links, click Search Console Links. In the link table, click Link. If you are a verified owner for one or more Search Console properties, in the row for "Link to Search Console properties I manage", click Choose accounts, then select the account you want to link your property to. Click Confirm. Click Next. Select the web data stream for your site. Click Next, then review and submit your configuration settings. Where to Find Your Data Once connected, go to Acquisitions → Domains & SEO in Analytics to view your Search Console data.