


Import and Export
-
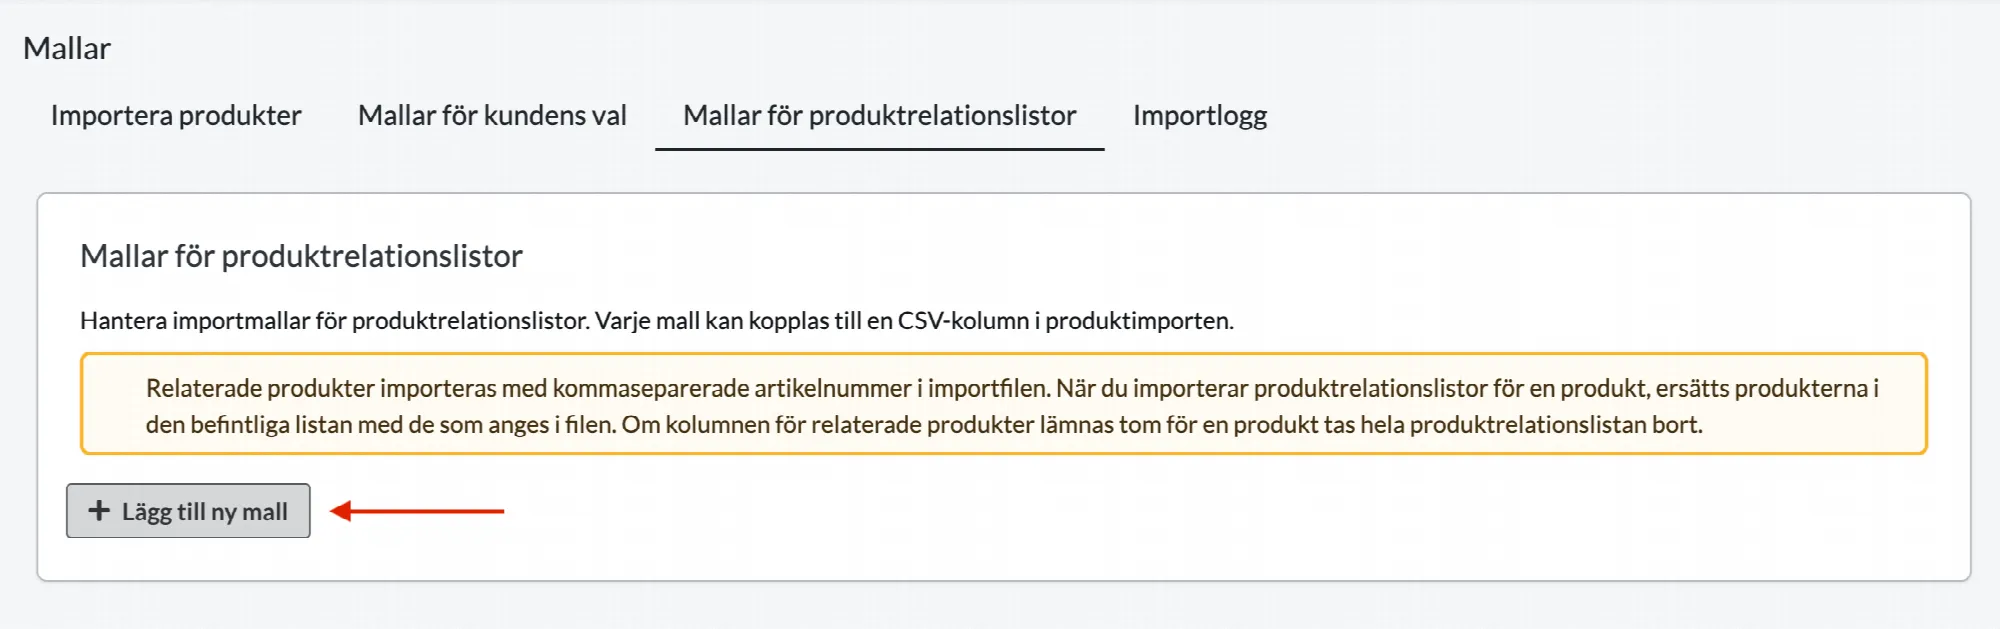
Importing related products (product relationship lists)
5 Mar 2026
Product import allows you to add related products to your store via an import file. The feature uses so-called product relationship lists, where you specify related products on a specific product.In this guide, we'll walk you through how to create an import template for relationship lists and how to import related products to your products.Step 1 – Create a template for product relation lists Before you can import related products, you need to create a product relation list template. Go to Catalogue → Import Open the tab Templates for related products Click Add new template Enter: Name of the relation list (for example "Similar products") Visibility settings Click Create list The template is used to tell the system which relation list the import should update. Step 2 – Prepare your import file Related products are specified in the import file using product numbers separated by commas.Important to keep in mind: The product number for the main product must be on the same row The related products are specified using product numbers separated by commas Example: In this example, the products with product numbers T-SHIRT-002, T-SHIRT-003 and T-SHIRT-004 will be added as related products to T-SHIRT-001. Step 3 – Upload your import file You can now import related products. Go to Catalogue → Import Upload your import file Make sure that "Automatic" is selected for both "Fields separated by" and "Character encoding", and that "Update information" is selected under "If the product already exists in the catalog". Step 4 – Map the columns in the import For the system to know what information is contained in each column, you need to map the columns to the correct properties.Since the import file has clear column headers, this is easy to do.For example, you need to specify: the column containing the product number for the main product the column containing related products – here you select the name of the template you created earlier, for example "Similar products" In this example, the first row of each column in the import file contains headers. We do not want to import these, so we check "First row contains column headers".Here we have selected the column content for each column in our import file: Product number, Product name (sv) and Related products → Similar products. Step 5 – Start the import Once the columns are mapped, click Start import.The system will now create or update the product relation list depending on whether this list already exists on the product or not. Result after the import When the import is complete, you can check the result by: Opening a product Going to Related products Here you will see that the relation list has been created and is linked to the template used for the import.In this example, we import only one list of related products, but it is possible to import multiple product relation lists for the same product. In that case, simply add another column for related products (for example "Matching accessories") and make sure to create a corresponding import template before uploading the import file.It is only possible to import related products to relation lists that are linked to an import template. Lists that were created manually cannot be updated via import.Here we can see that the product relation list "Similar products" has been created after the import.The list can be edited manually afterwards by clicking the name or the "edit" icon on the previous page. Important to know about importing related products When importing product relation lists, the following applies: The products in the existing list will be replaced by those specified in the import file. If the column for related products is left empty for a product in the import file, the entire product relation list will be removed from the product (if there is already a relation list linked to this import template).
-

Automatic product export via FTP/SFTP
27 Nov 2025
-

Video guide: importing images - How to import images into your Abicart Webshop
27 Nov 2025
-

Video guide: product import, how to import products in Abicart
27 Nov 2025
In this guide we will go through how to import a file with products.To import new products, certain mandatory properties must be included in the file, such as the product number, the product name in the base language and the price in the base currency.To update existing products, only the product number and the property you want to update, such as stock balance or price, need to be included in the file.Many shops usually receive products from their suppliers in a text file. The supported formats are CSV, txt, Tab or skv. If the file is in any other format, for example, excel, xls, xlsx or Mac and numbers, the file must be resaved before it can be imported. We will go through this a little later in the Guide. Start by opening the file in a spreadsheet program. In this example, we're using the free LibreOffice Calc, but Excel and other spreadsheet programs will also work.The most important thing when you open the file, and see what the contents look like, is that the properties are in separate columns, and that special characters like å ä ö look correct. If something is not correct, you have to close the file and try to open it again. If you use LibreOffice Calc, you can easily make sure that you open the file correctly. Once you have double-clicked on the file, a preview window will open. In this window you can choose how to open the file.In this example the large field looks a bit messy, so we need to make some adjustments before we can open the fileIf we look in the preview window, we can see on the top line, that the headings are there and there is also a semicolon between each heading. We can then assume that the semicolon is the field separator in this file. We check the semicolon and see how it turns out. Much better!But there still seems to be something wrong. And we can see it in some characters like Å Ä and Ö. This means that the character encoding is not set correctly. The most common character encoding used is Windows 1252, also called Windows Latin 1, or utf-8. In this example, the default is windows 1252 and win latin 1, and then we test changing to utf-8. Now it looks good! Å, Ä and Ö are correct. Then we open the file. If we look at the products, we can see that all products, except one, have a stock balance, and four products have a discount. No problem, this file can be imported.Keep in mind that if the file is in any other format than csv, txt, tab or skv, the file must be resaved. In that case, go to Archive, Save as. At file format, select text csv, tick edit filter settings and then click the save buttonIn the popup box that appears, we select utf-8 as the character encoding, semicolon as the field delimiter, and then we make sure that the quotation marks are selected in the string delimiter. Then click the OK button.Now the file is ready to be imported.Go to Assortment / Import. Select the file to be imported and then select: automatically, at, Fields separated by, and, Character encoding. The system will then detect which separators and character encoding are in the file.Then click on Continue.Since our import file contains column headings in the first line, we check: First line contains column headings. Then you need to explain to the system which column contains which property. Since we have column headings in the first row, it is easy to select and match each column.In this example, we know that the column named EAN is completely empty. Then there is no need to select it, but leave it set to ignore column. This will then be skipped in the import. If you know that you are going to redo this import several times, maybe once a week, or once a month, you can save a template with the column order, so you don't have to match the columns one by one each time. In this case, check: save column order for future imports. Then click on Start import.If you have checked: save column order for future imports, you will need to enter a name for this template. Enter a name, such as today's date and new products. Then click on save and start the import.Depending on how many products are to be imported, this can take anywhere from a few seconds to several hours. We can see how many lines were found in the file, as well as how many products were imported. Since we only have seven products, this is very fast. We can click on Products in the menu to see the result. Here are our products. We can also make sure that the product groups were correct. Click on Product Groups in the menu, and the groups and their sub-levels are shown here. Everything looks correct and this file is now imported. Hope this guide has clarified how to import products in Abicart. Please feel free to comment and leave feedback in the comments section. If you have any questions, please feel free to contact our customer service by logging into admin and clicking on My Customer Service.
-

Product import with customer choice
27 Nov 2025
You can sell products where the buyer can choose different variants, such as size, colour, model, material or similar. This is called "customer choice" in Abicart. To avoid having to enter this manually on each product, you can do this via an import.What should the file look like to import the customer's choices?In a normal import, only the item number is needed to identify the product, but to import the customer's choice, an additional item number is needed for the choice (variant) itself. So, to create a brand new product with the customer's choice via import, at least the following properties need to be included in the file:article number (for the main product)product name (in the store's base language)item number for customer selectionName of customer's choice, e.g. "Colour"price (in the store's base currency)Example of what the import file might look like when importing a product with three sizes and two colours.In the example above, the sizes small and medium cost the same, 100 SEK, while large costs 125 SEK. You can also import other product properties such as description, weight, etc. in the import, but above are the columns that are mandatory to create a new product in an import.It does not matter in which order the properties are located in the file. When you do the actual import, you select the property for each column. More on this below.Create import templatesIn order to import the customer's choices, you first need to create so-called import templates for the choices. For example, if you want to import sizes and/or colors, you need to create a template for each customer choice. In this example, one for "Size" and one for "Color".Go to Assortment -> Import.In the top block "About Import", there is a heading a bit down called "Importing the customer's selection". Then click on the link "Customer Choice Import Templates"Click on "Add new".Here are a number of options:Name - Please enter a name for the template, for example "Size".This option may have a price impact - If certain options are to cost extra, you need to enable this setting.A possible price impact is applied before the price is multiplied by the numeric text fields that affect the quantity - If you use two text fields where the buyer has to enter different values, for example if you sell a product where the buyer has to enter his own measurements for height and width. Then you can check this setting and these values will be multiplied before the price is added. This will give you, for example, a price per square metre of the product.This selection may affect weight - If some selections weigh more than the original product, you need to activate this setting.Single properties (stock balance, item number, picture) - If you want to be able to specify a stock balance or link a picture to each selection, this setting should be enabled. You should always check this box.Click the save button when the template is finished.The most common settings are "This selection may have price impact" and "Custom properties".If you have products with several different properties, such as color, size, model, material, etc., you need to create a template for each property.Import customer's choice in AbicartGo to Assortment -> Import.In "Select file", select the file you want to import.Double check that "Automatic" is selected in both "Fields are separated by" and "Character coding" and that "Update information" is selected in "If product already exists in the assortment". See picture.Then click the continue button in the bottom right corner.This will take us to the following page.In this example, there are headings in the first row of each column in the import file. We don't want to import these, so we check "First row contains column headings".In order for the system to know which column contains each property, we need to select this. Since we have clear column headings, it is easy to select. Part number in the first column and product name in the second, etc. Select the column for all properties to be imported.If you have many properties, you may need to scroll sideways to see all the columns. If there is a property you don't want to update, select "Ignore Column" and it will be skipped.Before we start the import, there is a checkbox called "Save column order for future imports". If you have a lot of properties that you want to update, and you know that you will be doing this kind of import several times, you can save a template for the column order.If you tick it, next time you can click on the "Load saved column order" link instead of selecting each column one by one. Note that it must be exactly the same column order in the file for it to be correct.If you know that this import will only be done once, leave the checkbox next to "Save column order for future imports" blank, and then click "Start import".Depending on how many lines (articles) there are in the file, this will take different amounts of time. If there are only a few lines, it can be done in a few seconds, but if there are many, thousands of lines, it can take half an hour, an hour or even several hours. Wait until everything is ready. Hopefully it will look something like this picture.In this case, there were seven lines in the file. We checked that the first line contained headers, so it was ignored. The remaining six lines were imported.Things to consider:Products with customer selections must have a master item number and a unique item number on each selection.Variants of the same product must be directly below each other in the file. They are imported in the order they are listed in the file.
-
Product export
27 Nov 2025
You can export all your products, and their properties, in your store to a text file. This is useful if, for example, you want to update several products at the same time, or if you just want to have a backup of all products.Product export is a function to save all products in a text file. You can choose to export all properties, or just selected ones.How do I use product export?Go to Products -> Export. Here you can choose which properties you want to export. Once you have made your selections, press the "Export" button located in the top right corner.Now you have a text file with the properties you selected, which you can use for whatever you want. The file can be opened in spreadsheet programs such as Excel, Numbers, LibreOffice Calc, etc.NOTE! Remember to always export the art.nr property. It is the primary key used to identify each item. The item number must be present in order to import the file again.A more detailed instruction on this can be found further down in the article.You can generate art.nr automatically using the setting under Catalogue >> Settings >> Product numberThings to keep in mindBefore exporting, you should review the store's export settings. These can be found under Settings -> General -> Export settings.Here you can choose how the file will be saved, you can choose for example "Delimiters" and "Character encoding". DelimiterThere are three different "Delimiters" to choose from: commasemicolontabIf you choose "comma", the file will be saved with the extension .CSV.If you choose "semicolon", the file will be saved with the extension .SKV. If you choose "tabulator" the file will be saved with the extension .TAB. All these three formats can be opened in any spreadsheet program. The most common way is to save the file with "comma" and get a text file with a .CSV extension.Character encodingA character encoding is a way of representing, encoding, a selected set of characters, of binary digital encoding used in communication and data storage in computers. There are two character encodings to choose from:ISO-8859-1 (Latin 1, Western European)UTF-8 (universal)Most commonly, Windows uses "ISO-8859-1 (Latin 1, Western European)" and Mac and other operating systems use UTF-8. Exporting a fileGo to Assortment -> Export.This displays all properties that can currently be exported. Select the properties to be exported, and also tick the box "Include column headings in first row" at the bottom left. Then click on the export button in the top right corner. Then you just have to wait a bit. Normally it takes 5-10 seconds for the file to generate if you have 500-1000 products. If you have more products, it may take much longer. Open the file in the spreadsheet programOnce the file is exported, we open it in our spreadsheet program. Remember to open the file after the export settings we made above. If we saved the file with file extension CSV and character encoding UTF-8, the file must be opened this way in the spreadsheet program for it to be correct. Once the file has been opened, check it quickly and make sure the contents are in their columns. Also check that special characters such as å, ä, ö are correct.If something is not right, do not save the file now. It will not be possible to use it again. In that case, close the file without saving. Tips and troubleshootingBelow are examples of common errors that can occur if you have opened the file with the wrong delimiter and/or the wrong character encoding.The examples shown below are made in the free program "LibreOffice Calc" which can be downloaded here.File opens incorrectlyIf everything is "all over the place" and not column by column when you open the export file, you have chosen the wrong delimiter. If å,ä,ö and other letters have been replaced by "strange" characters and symbols, the wrong character encoding has also been chosen. In the example below, both the delimiter and the character encoding are wrong.There are two ways to solve this:- Review the export settings (settings > general) and change the delimiter and character encoding. Then re-export the file. Now it should open correctly.- Choose how the spreadsheet should open the file. In Calc you will always be asked how to open the file.Choose the character encoding.Select delimiter.Preview what the file will look like when opened.In this case, you can already see in the third box that the information is not in columns and that the text "Purchase price" in the first line contains incorrect characters.To open the file correctly in this example, we need to change:character encoding to "UTF-8"the delimiter to comma.Now we see in the preview that it looks correct.Then when we open the file, it looks good:Price with decimal point instead of commaFor the Swedish language, commas are used as decimal separators in prices. In English, for example, it is a period instead.If you open the export file and the decimal separator of the prices is a dot instead of a comma, you need to change the separator in the export settings. If you use a semicolon as the delimiter, the comma will be used as the decimal separator. If you use a comma as a delimiter, the decimal separator will be a dot.In the example below, "comma" is selected as the delimiter.In the example below, "semicolon" is chosen as delimiter.First zero disappears in some columnsSometimes item numbers and/or other fields start with a zero followed by other numbers. Some spreadsheet programs automatically interpret fields containing only numbers as numbers and the leading zero disappears when the file is opened. To prevent this from happening, we need to tell the program to interpret the columns as text and then the zero will remain. We do this before opening the file in Calc.1. Click on the column heading containing leading zeros to select the column.2. Then select "Text" from the drop-down list.When the file is opened, the leading zeros will remain.
-

Product import
27 Nov 2025
If you have a lot of products to add to the store or to update, there is an import function. This means you don't have to do it manually for each product. It is important to remember that all products must have a unique item number for the import to work. Calculator You first prepare the import in a spreadsheet program, such as Google Sheets (free), LibreOffice (free), OpenOffice (free) or Excel (Windows), Numbers (Mac) . You enter a property in each column where the item number is the "key" the product is identified with. For example, if you want to update the price and stock balance of several products, it is sufficient to have three columns in the file. Column A for the article number, column B for the price and column C for the stock balance.Video guide: What file formats are supported? In order for the file to be imported, it must be a text file of type .CSV, .TXT or .SKV.A text file can also contain different character encoding and our import supports two different ones, "Windows UTF-8 (universal)" and "Windows ISO-8859-1 (Latin 1, Western European)". If you receive a file with items from a supplier, you should be able to get them in one of these formats.If you create the products in a spreadsheet program, such as Excel, you can choose the file format by selecting "Save as" and then selecting "File type" from the list. What is needed to create a completely new product via import? To create a brand new product, at least the following fields are required: Item number Product name (in the basic language of the shop) Product description (in the basic language of the shop) Price (in the store's base currency) An example of what this looks like in an import file: What is needed to update an existing product via import? It is quite common to need to update a property of the products, such as stock balance or perhaps setting a new price in case of a sale. To update a product that already exists in the store, only two columns are needed in the import file: the item number and the property to be updated, such as price. An example of what this looks like in the import file: The system then uses the item number to identify the product and then updates the prices of all item numbers included in the file. Nothing is changed on the product other than the property or properties on file. I have an Excel file, how do I import it? Many suppliers use Excel (xls, xlsx) as a file format and this cannot be imported directly into our system. You must first resave the file to a text file before it can be imported. Below are guides on how to resave an Excel file to a text file in Excel and "Libre Office (Open Office)". Excel (Microsoft Office): Open the file and then go to File - "Save As". (If you are using Excel 2007, click the Microsoft Office button and then click Save As.) The "Save As" dialog box opens. Select the text file format for the spreadsheet in the "File Format" box. Click CSV (comma delimited). Drag to the location where you want to save the new text file, then click Save. A dialog box will appear. It says that only the current spreadsheet will be saved in the new file. If you are sure that the current spreadsheet is the one you want to save as a text file, click OK. You can save other spreadsheets as separate text files by repeating the procedure for each spreadsheet. A second dialog box appears, stating that the spreadsheet may contain features that are not supported by the text file format. Click Yes if you only want to save the spreadsheet data in the new text file. The file is now ready to be used for import. Open Office / LibreOffice: Open the file and then go to File -> Save As Click on the list next to "File Format" to expand it. Select "Text CSV" Also check "Edit filter settings" and then click the save button. For "Character set", select "Unicode (UTF-8)".For "Field delimiter", select "comma".For "Text delimiter", select "quote". Import a file of products into the store We now have a text file in the correct format (see above) that contains products and is ready to be imported.Go to Assortment -> Import.In "Select file" select the file you want to import.Double-check that "Automatic" is selected for both "Separate fields with" and "Character encoding" and that "Update information" is selected for "If item already exists in assortment". See picture. Then click the continue button in the bottom right corner. This will take us to the following page. In this example, there are headers in the first row of each column in the import file. We do not want to import these, but check "First row contains column headings". In order for the system to know which column contains each property, we need to select this. Since we have clear column headings, it is easy to select. Part number in the first column and product name in the second, etc. Select the column for all properties to be imported. If you have many properties, you may need to scroll sideways to see all the columns. If there is a property you don't want to update, select "Ignore Column" and it will be skipped. Before we start the import, there is a checkbox called "Save column order for future imports". If you have a lot of properties that you want to update, and you know that you will be doing this kind of import several times, you can save a template for the column order. If you tick it, next time you can click on the "Load saved column order" link instead of selecting each column one by one. Note that it must be exactly the same column order in the file for it to be correct. If you know that this import will only be done once, leave the checkbox next to "Save column order for future imports" empty, and then click "Start import". Depending on how many lines (articles) there are in the file, this will take different amounts of time. If there are only a few lines, it can be done in a few seconds, but if there are many, thousands of lines, it can take half an hour, an hour or even several hours. Wait until everything is ready. Hopefully it will look something like this picture. In this case, there were seven lines in the file. We checked that the first line contained headers, so it was ignored. The remaining six lines were imported. Importing multiple product categories on one product In Abicart Plus and Pro, a product can belong to several product categories, and this can also be solved via import. You then add a new line to the file and enter the product number again and then type the name of the second product group in the product group column. In this example, the beach ball will end up in three product groups: "Beach", "Toys" (subgroup of "Beach") and in "Offers". You can only put the product in one product group via import. If you want to remove the link between a product and a product group, you need to do it manually in admin. Importing multiple images of a product To import multiple images on a product, add a new line to the file and enter the item number again, then enter the image filename/url of the second image in the image column. In this example, the Badball product will have three images imported. If you have a file where the images are in different columns, you will have to solve the import by importing each image column separately. You do a full import first with all properties and select "Image" for the first image column in the file. Once that import is complete, you do a new import with just the product number and image column 2. If there are more columns with images, you repeat the import with the product number and image column 3, image column 4, etc. Example, what should the import file look like? Updating prices For updating prices of existing products only, the file can look like this: The only thing needed is the item number of the products to be updated and the new prices. Article number in column A and the new prices in column B. Update stock balance To update stock balances on existing products only, the file can look like this: In this example, three columns are needed. Item number, inventory management (1 = yes, 0 = no) and inventory balance. We therefore import a one in column B to enable inventory management on the item and then the inventory balance itself in column C. F.A.Q. Question: I did an import but all the lines were ignored, why? Answer: Most likely there is a setting in step 1 of the import that is wrong. Under Assortment -> Import at "Import settings" -> "If the item is already in the assortment:" then "Ignore" is selected. Change the setting to "Update information" and rerun the import. Question: many of my products are marked as "New". How do I unmark them all as new in the easiest way? Answer: The quickest way is to do an export of all products (Assortment -> Export). Export the properties "item number" as well as "novelty". Open the file in a spreadsheet program and enter a zero on all lines in the column "Novelty". Save the file and then do an import. Then all items will be unmarked as new.
-

Translations - Export/import texts in multiple languages
27 Nov 2025
As your store expands and gets bigger, you may want to expand your shop to include more countries, currencies, and languages. In the past, you had to translate all your administration texts manually (apart from the product range). Now you can export all the texts in the shop instead.You must first go to Settings -> Languages to activate the languages you want in your store.If you want to activate a language but do not want to display it in the shop directly, click on the language in "Hidden". Then only the language fields will be displayed in the shop administration.Do not make changes during this processNote: When exporting texts, do not make changes in the shop before importing the new language. Exported language strings are imported with the same keys, so if you make changes in the store before importing, there is a risk that text strings will be imported incorrectly.Video guideExport file for translationGo to Settings -> Language -> Export.Export translationsHere you will see several choices that need to be made.Which language do you want to translate from? - Here you will see a list of the languages entered in the store under Settings -> Languages.For example, if you want to translate from Swedish to English, select Swedish. Your exported file will then contain three columns: Id, source language (in this example in English) and an empty column where you write your translations.Which file format do you prefer? - You can choose between three different formats in which the file will be exported, CSV (semicolon-separated text file), ODS (Libre Office) or XLSX (Excel).If you are not sure which to choose, we recommend XLSX, which can be easily opened in Excel.What data do you want to include? - If you want to translate all the texts already entered in the shop, tick all the boxes for Articles, Article groups, Delivery methods, Payment methods, Delivery information, Article template, Own pages and Theme.Theme - Here a list will be displayed with all the store's themes. Select the store's active team. In the exported file, there is a ready column for the translations (translation) in the export file, where you enter your translations for the language of the respective text field.Then click on export.Where do I put the translations in the file?Once you have exported a file, open it in a spreadsheet program, such as Excel, Libre Office Calc or similar. The file should then contain three columns, key, content and translation, and look something like this.Column A: key - This column contains the property to which the text applies. For example, in the picture above, line 2 is an "article" with article ID 12565483 and the content "aftertext" which is the field for text that appears after the order. In column B of line 2 we can see the English text that applies which is "Text after order".Column B: content - In the second column, the English text is shown in this case (as we chose to export the translation from English above).Column C: translation - In the third column we translate the text in column B into the language we want to add to the shop, for example English.How do I import a file once the texts have been translated?Once you have translated a file and want to import translations, go to Settings -> Language -> Import.Import translationsSelect the language to import - A list of the store's active languages will be displayed. If you have translated a file from English and entered English texts in column C, select "English" from this list.Select the file you want to import - Select the translated file from your computer.Then click on the import button. Done!Important informationPlease note:When exporting texts, do not make changes to the store before importing the new language.The language must be added to the store.You can only import one language at a time.If you have exported the file as CSV, the file must be saved with the character encoding "UTF-8" and the delimiter set as "comma" in order to be imported.
-

Image import
27 Nov 2025
If you have a lot of products, and don't want to manually add images to each product, you can use image import. Images can be imported at the same time as other product properties (price, description, product group, etc.).Video guideHow does the image import work?You cannot add an image directly to the import file, instead you must enter a file name or URL for the image. The image must be available on a server at the time of import and it works to import images from an FTP server or a web server. The images will be downloaded and placed on the respective product at import time.After the image import is complete, the images can be deleted from the server.Web serverFor imports where the images are on a web server, enter the full URL of the image in the image column of the import file.FTP serverFor imports where the images are on an FTP server, you need to enter the login details (server, username and password) for the server in step 1 of the import (Products -> Product import).In the import file, enter the file name of the image in the image column.To import the file into Abicart, fill in the fields for FTP settings.Go to Products -> Import. Enter the server, username, password and directory.Importing multiple images on the same productIf you are adding multiple images to a product, you must create a new line in the import file for each new image.The product number (Column A) is repeated for each new image and then you place the new images in the correct row in the image column (Column C).In the example below, the soccer ball will have two images and the lego will have three images.