

Appearance
-
Google Ads Conversion Tracking - Themes
27 Nov 2025
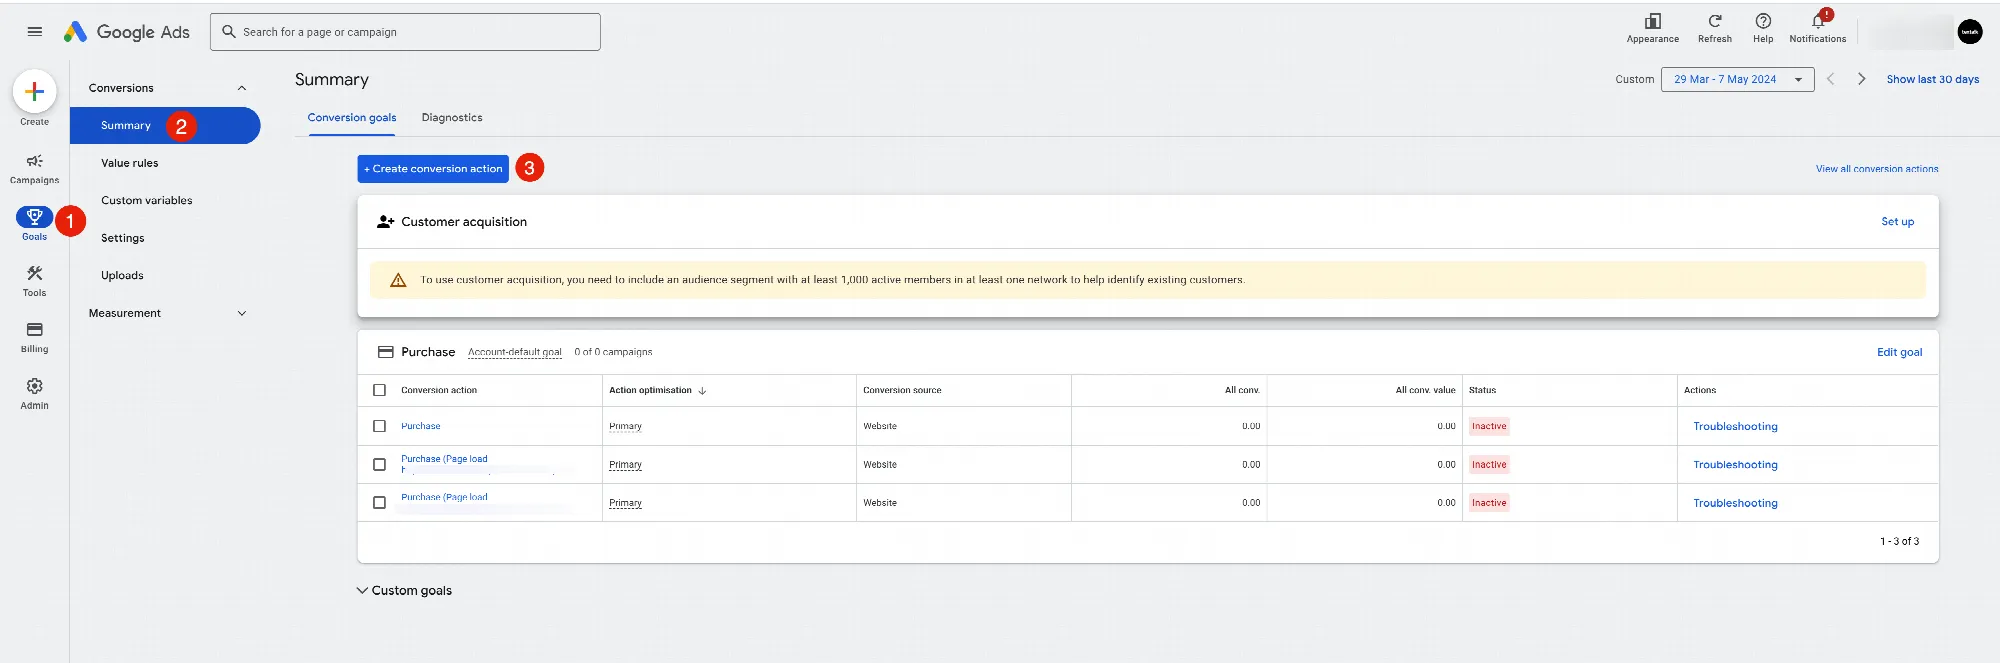
What is Google Ads? Google Ads is an advertising platform that allows you to create, optimize, and track your ads and their performance. It not only helps you to place ads; but it helps you manage every step of the process, including: Campaign Creation & Management: Build and manage your advertising campaigns to reach your target audience. Goal Setting & Tracking: Define your desired outcomes (conversions) and track their progress. Budget & Bidding: Set your spending limit and determine how much you're willing to pay for ad clicks. Keyword Planning: Research and identify relevant keywords that potential customers are searching for. Why Link Google Ads Conversion Tracking? To understand how well your Google Ads campaigns perform, you need to link them to your website. Conversion tracking allows you to keep track of the buyer and what actions they take on your website after clicking your ad. Without linking conversion tracking, you wouldn't be able to differentiate between website traffic coming organically (through search engines) and traffic by your paid ads. This makes it crucial to link your Google Ads conversion tracking to your website for accurate measurement of your ad performance. Please follow the below steps to find your Google Ads Tracking ID in your account: Add it here in themes:
-
Google Consent Mode Version 2
27 Nov 2025
Google Consent Mode version 2 is an updated version of Google's consent framework that allows website owners to customize how Google services use cookies and collect data based on visitors' consent. As of March 2024, Google Consent Mode version 2 will be mandatory for all users of Google's ad services. This update is essential to comply with data protection laws such as the GDPR. Abicart now supports Google Consent Mode V2. It is important that you enable this so that measurement and advertising via Google is not negatively affected.
-
Event counting
27 Nov 2025
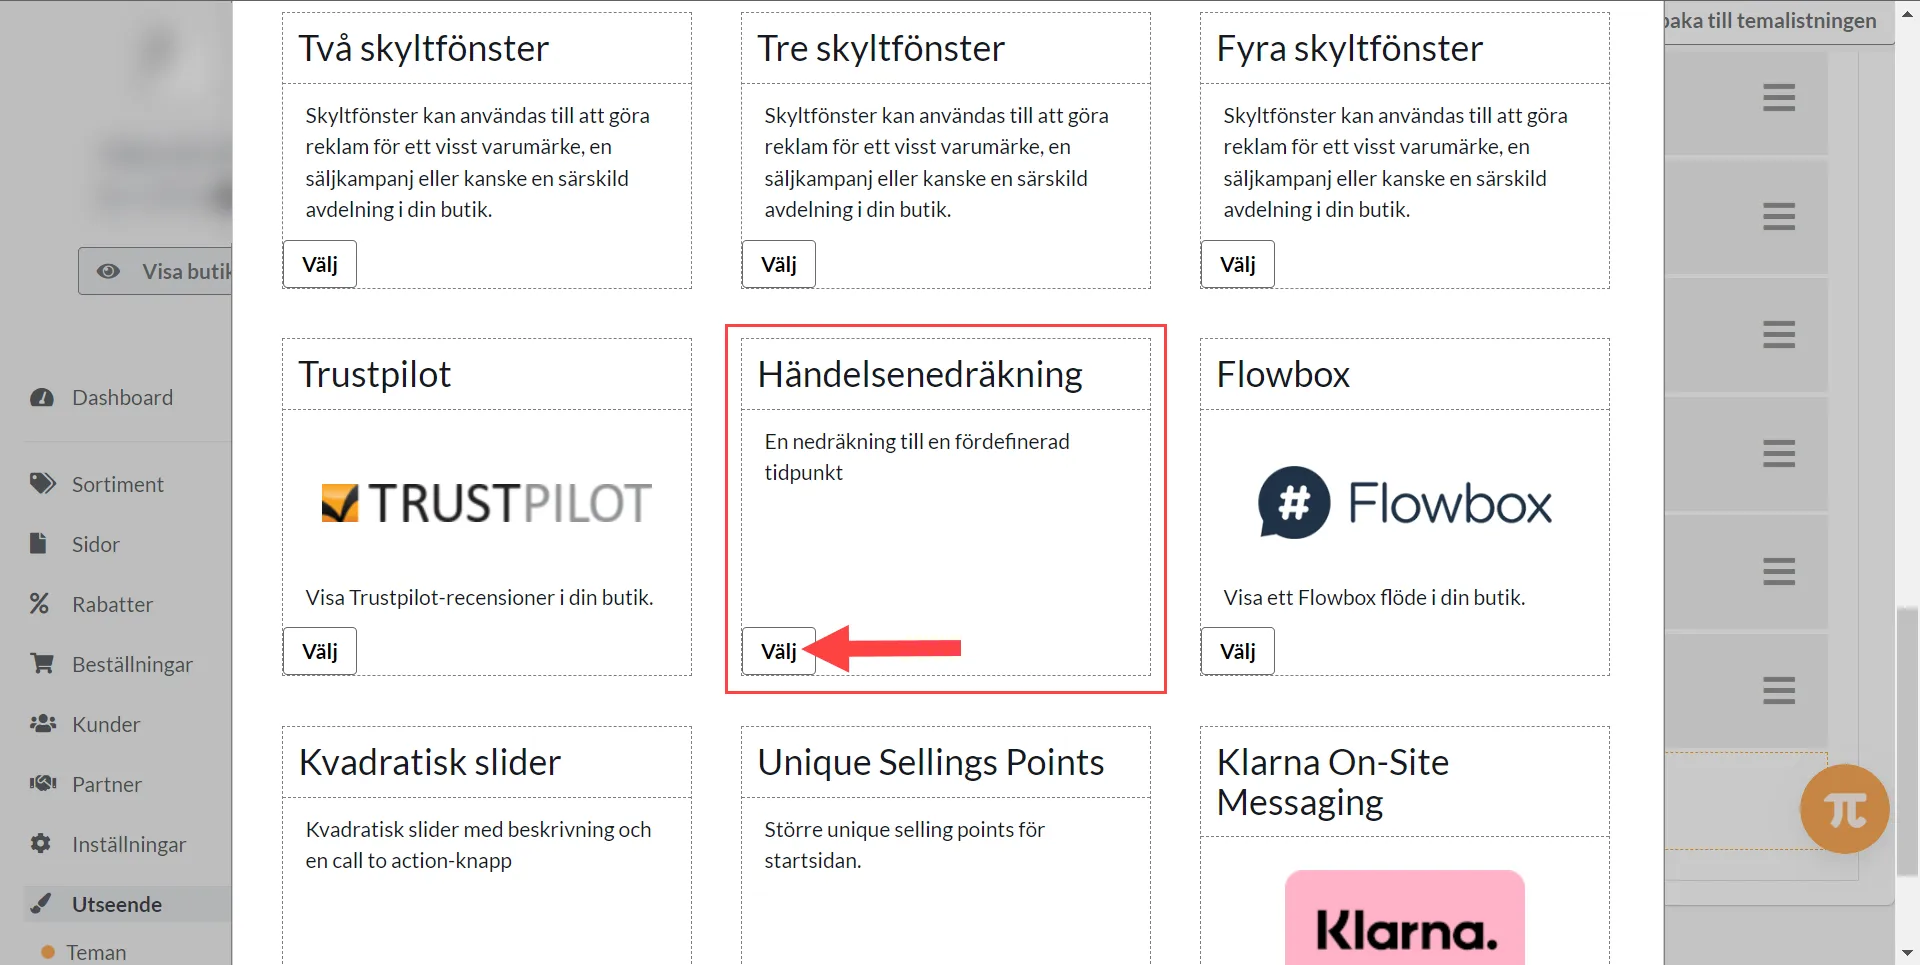
Here's how to do it: 1) Appearance >> Themes >> Edit Theme2) Home page >> Add Block >> Event counting3) Set the block >> Finished >> SaveTry our text banner in combination with the countdown. The text banner is visible on every page while the countdown is only visible on the home page.
-
Text banner
27 Nov 2025
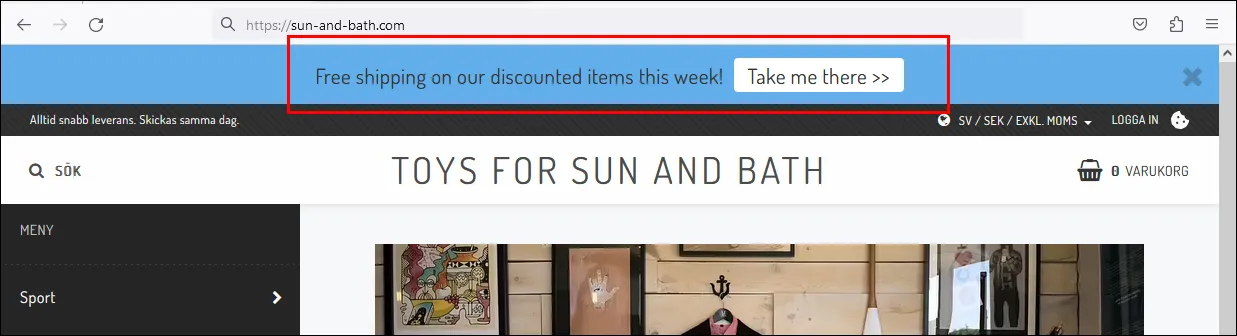
Activate a text banner in the theme that appears at the top of all pages.What is a text banner?A text banner is a field you can activate at the top of the page where you can enter a text to inform about something, such as a temporary offer, free shipping or something else. You can also add a button and link it to a page, product or product group.How does the text banner work?A visitor can choose to remove the text banner by clicking on the checkbox at the far right. This choice is saved in the visitor's browser and the banner will not be shown again. To see the banner again, you need to clear your browser's cookies.Activate the text bannerYou activate the text banner in the theme under Settings -> Themes -> edit the active theme and then go to the tab "Add-ons" -> Text banner. Click "On".Main textA field to enter optional text.In this example we have free shipping on all products that have a special price and enter a text informing about this.Button textYou can choose to have a button that links to a page, product or product group. Enter a text to be displayed on the button.LinkChoose where the button should link to, a page, product or product group. In this example, we want to link to our own page that shows all products with special prices. Check "Pages" and then select the "Discounts" page.Background color for text bannerSelect the background color by clicking on the color box on the right.Color of the button in the text bannerSelect the color of the button by clicking on the color box on the right.Don't forget to save when everything is done. Then just preview and display the banner at the top of the shop.
-
Add logo for payment and delivery methods
27 Nov 2025
Did you know that you can add logos for your payment and delivery methods at checkout?How to do this:1) Click Appearance >> Themes >> Edit active theme2) Content3) Payment and delivery method logos4) Click on the three vertical dots5) Choose between the default logo and uploading your own imageYou can download the payment/delivery method logo on their website search name + logo in your browser. Remember to choose an image of good quality.6) Save at the top of the page with the green buttonRepeat for all payment methods and delivery methods you want to have a logo
-

Using pop-ups on your website
27 Nov 2025
In your theme, you will find the "pop-up dialog" setting (also called pop-up window). It can be used for e.g. newsletter pop-up and king login or freely customized with the "custom" option (HTML block).This is how you do it:1) Enter your theme by clicking Appearance >> Themes >> Edit (active) theme2) Click on Extensions3) Click on Pop-up dialog >> Select options & edit4) SaveDone!Good to know about using PopupsGoogle treats popups on web pages with great care, especially when it comes to user experience and mobile-friendliness. Here is a summary of how Google views popups:Google handles popups on web pages with great care, especially in terms of user experience and mobile-friendliness. Here is a summary of how Google views popups:Negative aspects - can negatively impact SEO:1. Intrusive interstitials on mobile devices:- Since January 2017, Google has a policy where *intrusive* popups on mobile pages can lead to lower rankings in search results.- Examples of bad popups:- Popup that covers the main content immediately when the page loads.- Popup that must be closed before accessing the content.- "Intermediate pages" that appear before accessing the actual content.2Impaired user experience:- If popups are difficult to close, interfere with reading, or load slowly → negative for user experience, which can also affect rankings.Approved uses of popups according to Google:Google makes exceptions for certain types of popups that are considered reasonable:- Legal notices: For example, information about cookies or age verification.- Login boxes: For pages that are not public (e.g. behind a paywall).- Small banners That cover a small part of the screen and are easy to close (e.g. at the top or bottom).Tips for handling popups correctly:1. Avoid showing popups immediately when the page loads.2. Show the popup only after the user has scrolled or after a certain time.3. Make sure the popup is easy to close.4. Use "exit intent" on desktop if you want to catch users who are about to leave.5. Feel free to use banners instead of full-screen popups on mobile.
-
Add a menu item
27 Nov 2025
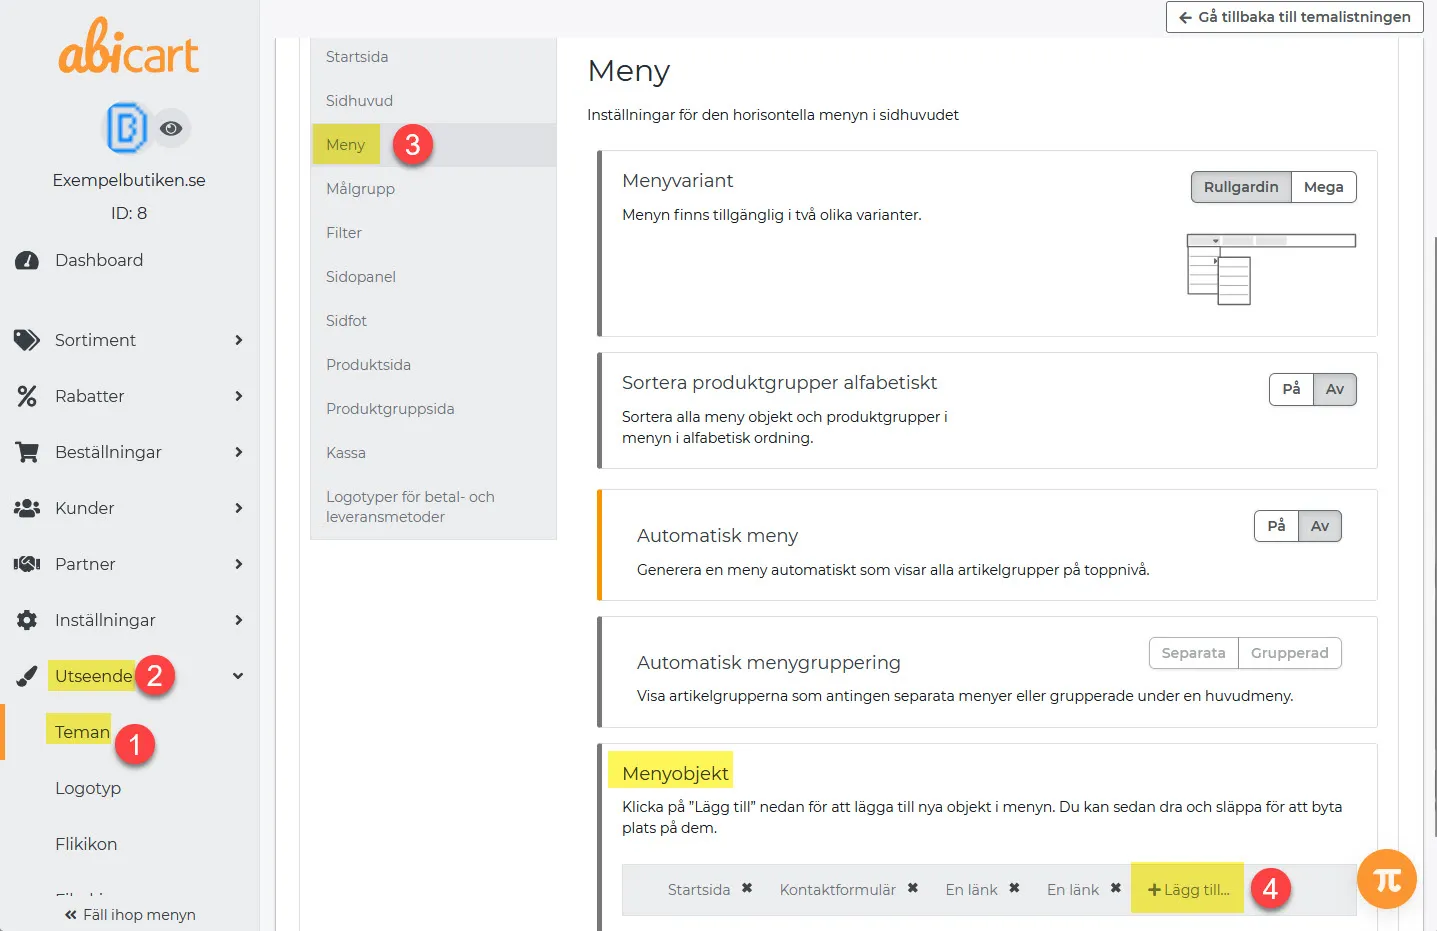
In "Automatic menu OFF", menu items are added manually under Appearance >> Themes.Here's what you do:1) Go to Design >> Themes >> Edit >> Menu2) Menu item >> Add >> Find the menu item >> AddChoose between, product group, pages or own link3) Save with the green button on the top right. 4) Done!
-

Consent to Cookies
27 Nov 2025
Cookies are small data files that are stored in your customer's browser by the website, to keep track of their activities on your pages and save their personal preferences. They can store unique identifiers to recognise your customer's browser and personalise their experience.For information on Google Consent Mode version 2, read more here.Why do we use the cookie consent policy?As a seller, cookies are essential to understand your customers' behavior. This data is important for improving your website and making it more accessible to visitors.Cookies can store different information such as language, currency, etc. They can also track online activity and customize ads accordingly. This helps you create a more personalized experience for each visitor. The data differs for each website and the services used by them.When collecting cookies, it is of course important to respect the visitor's privacy. The cookie consent policy allows your visitors to control the information they share by giving them a choice to accept or reject cookies. No information is sent or tracked until the visitor makes a choice in the cookie policy pop-up window.This means that the visitor must explicitly choose "Accept" for the cookie to collect and track their data. By accepting cookies, their website will resume all normal functions and work as expected without any restrictions. The features restricted by the new behavior are listed below.Once rejected, they can always "accept" it at any time by clicking on the "Cookie icon" in the top right corner of the web page. This will trigger the automatic data collection and the normal cookie function will resume. All pending cookies that are not essential are put back.Those visitors who have already accepted cookies in the old behavior will not be affected by the current change. If they want to reject it, they can do so by clicking on the cookie icon in the top right corner of the page.By default, the website's cookie policy is set to "Reject", i.e. no data is collected or tracked. Because of this, your visitors may notice the following changes on your website when they reject cookies:The favorites list does not work because it is a cookie-based feature. The visitor can mark the product as their favorite, but it will not be stored in the list.The compare button on the product will have limited use. It will show the product comparison, but the product will be removed when it is reloaded."Last visited products" will always be empty unless visitors "accept" the cookie policy. This is because it cannot store this information without a cookie.Facebook Pixel, Google Analytics, Google Tag Manager and Google AdWords will not work. It will not collect any data about the user.Google's consent mode gives you an alternative way to still track the required data even if the visitor has rejected cookies.These are, from the visitor's perspective, the main effects of rejecting cookies.If the customer chooses to "Accept" cookies again, all functions will work again. The site will also resume tracking with Google and Facebook Pixel. The tracking will be restarted, and will not remember what the customer did before accepting cookies.What is Google's consent mode?Websites using Google's tools do not collect any information when cookies are rejected. To overcome these data tracking limitations imposed by Google tools, we now support Google Consent Mode. It helps you track the mandatory data while respecting your visitors' choices. You can learn more about Google Consent Mode here.How does it work?With the new Google Consent Mode, if the visitor accepts cookies, the tools will work as usual and get detailed information about visitors' behavior.When consent is active in the store and the visitor has rejected cookie consent, no detailed data will be saved as before. It will only send a ping to Google to tell it whether the specific goal has been achieved or not. Make sure your marketing goals are met while respecting the visitor's consent to cookies.You can enable consent under Appearance >> Themes >> Edit >> Add-ons >> Cookie >> Require consentMore information about custom applications and their cookie consent?This cookie policy will only affect the built-in features. Any custom or 3rd party scripts added manually in the webshop under themes or in other places like the product page, checkout or order confirmation page will not be affected by the visitor's consent to cookies. However, it will be your responsibility for any cookies set by these scripts.If you want to know more about cookies and their functions, please contact support at support@abicart.se.New update:Benefits:Show your custom text to your visitors about the data you collect and your terms and conditions.Customize the pop-up with HTML and CSS.Require cookie consent from your visitors by making the choice mandatory.Google's consent mode still allows you to collect visitor data by respecting their privacy when the cookie is denied by the visitors.The new Facebook cookie consent feature allows the Facebook pixel to track all visitor data and save it until the visitor makes a cookie choice. Then, based on the choice, it will be updated on your Facebook tracking page.Points to remember:This is only available in the latest version of our themes.Facebook Cookie Consent is built-in and does not have an explicit setting like Google Consent.The statistics will change when cookies are turned off by default, until the visitor makes an active choice and accepts cookies.If the visitor rejects the cookie, the Facebook cookie consent will not send the saved information to your pixel tracking page. In other words, if the visitor never gives cookie consent, the Facebook tracking feature will not send any data at all.The statistics will not be affected for those existing visitors who have already accepted cookies before the update. If a buyer has already accepted cookies, this update will not affect their choice of cookies and will continue to collect their data.The reason is that a website should only collect cookies from users after they have given their explicit consent to the specific purposes of use. Until then, it is thus mandatory to turn them off in accordance with the legal requirements. It is their choice to choose what information they want to share. This also complies with the rules of other services, such as Google Ads.The new cookie policy is only available in the latest version of our themes, so it's time to upgrade your theme to access this new feature.What are the new settings?We have divided the cookie settings into two parts: General and Advanced.General - Here you can control the customization and selection of general cookie settings.Advanced - Here you can turn on or off the cookie policy pop-up in this section. But it is at your own riskRequest consent: This makes the selection of cookies mandatory. When a new visitor arrives on your website, the pop-up will be placed in the center of the website. (Like newsletters and other pop-ups. The visitor must make an active choice to explore the site. They can close it without making a choice, but with each button click it will keep popping back up until they make an active choice.This cookie pop-up will not affect other pop-ups such as newsletters, visitor type (business or individual).Cookie text:You can add your own content, design your layout (HTML + CSS), add images, videos and other customization.The cookie field text will have a fixed mandatory text for the "Terms of Use" page. It is built-in and cannot be deleted. But it can be customized with CSS.You can enter the HTML customization under the (<>) icon and the corresponding CSS under Style >> Custom CSS in the theme.Abicart mandatory cookies:Abicart has a number of cookies that are required for the site to work. These are as follows:SERVERID: Indicates which of our API servers the requests should go to.theme_id: Specifies the theme to use when loading the store. This is mostly used during theme preview.diversity_twssessid_{Webshop UID}: Specifies the session ID of the current visitor. The last part of the cookie name is the web shop ID. If this cookie is deleted and the user has an active shopping cart, the content will be emptied unless the session ID is retrieved again. Logged-in customers are logged out.twssessid_{Webshop UID}: Same as "diversity_twssessid_{Webshop UID}".diversity_webshop_language: Indicates the language used in the shop.twsApi.Locale.currency: Used to keep track of the currency to be displayed on the website. Without this, the default currency will be displayed the next time the page is refreshed/reloaded.twsCore.pendingShipmentCountry: Indicates the shipping country selected by the visitor. Depending on the country of delivery, the VAT rate on prices may be different. So this cookie makes sure that if the page is reloaded in any way, the shop will still show the same price.cookie_accepted: Saves the choice for cookie consent.
-
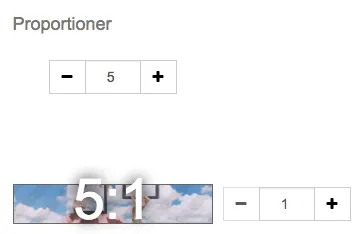
Image sizes and proportions
27 Nov 2025
Plan and choose the right size, aspect ratio, and format for the images in your online store. How do images work in the store? Images are handled in two different ways. Product images are uploaded directly to each product. All other images used on custom pages, in the theme, and elsewhere are uploaded to the file archive under Appearance → File archive. It is a good idea to plan your images before you start uploading them. Use the same dimensions and aspect ratio for all product images. This creates a consistent and professional presentation on the home page, category pages, and product pages. How do you edit images? Images cannot be edited directly in the store. Edit them in an image-editing program before uploading them. Adobe Photoshop is a popular paid option. Free or browser-based alternatives include GIMP, Paint.NET, and Pixlr. Aspect ratios How large should an image be, and what is the best size? There is no single answer because the correct dimensions depend on the aspect ratio selected in your theme. An aspect ratio describes the relationship between an image's width and height. For example, a 5:2 image can be 5000 × 2000 pixels, 2500 × 1000 pixels, or 500 × 200 pixels. All three images have the same shape, but different pixel dimensions. If you want square images, select the 1:1 aspect ratio and upload images such as 1000 × 1000 pixels. Slideshow You can find the settings for the Slideshow block on the home page under: Appearance → Themes → select a theme → Edit → Content → Home page → Slideshow Example 1:Set the slideshow aspect ratio to 5:1: Then upload images that are 1500 × 300 pixels: Example 2:Set the aspect ratio to 3:1: Then upload images that are 1500 × 500 pixels: Is the image being cropped? If you upload a 1500 × 300 pixel image but set the slideshow to a 3:1 aspect ratio, the image will be cropped. The image is not automatically reshaped to match the selected ratio. Upload an image with the same aspect ratio as the theme setting to prevent unwanted cropping. Product images Product images are displayed both in product listings and on the individual product page: Upload the image to the product under: Range → Products → select a product → Edit → Images → Upload image Then set the aspect ratio in the theme under: Appearance → Themes → select a theme → Edit → Style → Images Example 1: Square product imagesSet the aspect ratio to 1:1: Then upload images that are 1000 × 1000 pixels: Example 2: Landscape product imagesSet the aspect ratio to 3:2: Then upload images that are 1500 × 1000 pixels: Product group images A product group image is displayed on the product group itself: Upload product group images under: Range → Product groups → select a product group → Edit → Properties → Image in product group table Set the aspect ratio in the theme under: Appearance → Themes → select a theme → Edit → Style → Images Example 1: Square imagesSet the aspect ratio to 1:1: Then upload images that are 1000 × 1000 pixels: Example 2: Landscape imagesSet the aspect ratio to 3:2: Then upload images that are 1500 × 1000 pixels: Storefronts Storefront images in the theme use a 5:4 aspect ratio, regardless of how many are displayed in each row. The recommended pixel dimensions increase when fewer storefronts are shown because each image occupies more space. 4 storefronts:1000 × 800 pixels 3 storefronts:1500 × 1200 pixels 2 storefronts:2000 × 1600 pixels 1 storefront:2500 × 2000 pixels Choosing the best image size for an online store There is no single image size that works for every online store. The right dimensions depend on where the image appears and on the aspect ratio used by the store design. As a practical starting point, square product images at 1000 × 1000 pixels work well for many stores. The most important thing is to use a consistent aspect ratio, keep the images sharp, and avoid files that are larger than necessary. Recommended image sizes: quick reference Image type Recommended dimensions Aspect ratio Square product image 1000 × 1000 px 1:1 Landscape product image 1500 × 1000 px 3:2 Wide slideshow or banner 1500 × 500 px 3:1 Narrow slideshow or banner 1500 × 300 px 5:1 Storefront image At least 1000 × 800 px 5:4 These dimensions are useful starting points rather than universal requirements. A larger or smaller image can have exactly the same aspect ratio. For example, 1500 × 500 pixels and 3000 × 1000 pixels are both 3:1. Image dimensions and aspect ratio are not the same thing Image dimensions describe the number of pixels in the file, such as 1000 × 1000 pixels. The aspect ratio describes the relationship between its width and height. 1:1 is square. 3:2 is a common landscape format. 3:1 is wide and works well for banners. 5:1 is very wide and shallow. If the uploaded image does not match the aspect ratio selected in the theme, part of the image may be cropped. Use the same aspect ratio for all product images Product listings can look uneven when the images use different shapes. Choose one image template before photographing or editing the products, and use it throughout the catalog. Square images are a reliable choice for many types of products. Leave some space around the product and keep the most important part near the center. This reduces the risk of important details being removed if the image is cropped in another view or sales channel. Which image format should you use? JPEG or JPG: A good choice for photographs. It usually provides a useful balance between image quality and file size. PNG: Useful when transparency is required, but the files are often larger than JPEG files. WebP: Can provide smaller files while maintaining good visual quality. Check that the platform and upload field support it. SVG: Suitable for logos and simple illustrations, but normally not for product photographs. Only upload SVG files from a trusted source. Product images that help customers buy Good product images are not only technically correct. They should also answer the questions a customer may have before making a purchase. Depending on the product, consider showing: the product against a clean, consistent background; the product from several angles; important materials, textures, and details; the product being used in a relevant setting; and an indication of size or scale when it is difficult to judge. Keep lighting, background, framing, and distance consistent across the product range. A consistent visual style makes the catalog easier to scan and helps the store feel more professional. Use descriptive file names and alternative text Give image files meaningful names before uploading them. For example, blue-linen-shirt-men.jpg is more useful than IMG_4821.jpg. Add concise alternative text that describes what the image shows. Alternative text helps visitors who use screen readers and gives search engines useful context. Describe the image naturally and avoid repeating keywords. Decorative images that add no information should normally have empty alternative text. Create an online store where your products stand out Great product images deserve a store that presents them clearly. With Abicart, you can create a professional online store, adapt the design to your brand, and get personal support when you need it. Start your online store with Abicart
-
Link to a file in the file archive
27 Nov 2025
Upload a file to the file archive and then link to the file from a product or custom page. You may want to link to a file, such as a PDF, or perhaps link to an image in the description of a product. Then you can use the file archive to upload the file, and link to it from another page.Link to a file from the home pageFirst you need to upload the file in the file archive. To do this, go to Appearance -> File archive -> click on the upload icon (floppy disk).By default, the maximum space is 20 MB for one file. For customers with a PLUS subscription, we now offer a maximum of 50 MB. PRO customers can get access to upload a maximum of 100MB files. Please contact customer service if you need to change the upload size, and if you have an active PLUS/PRO subscription.Then select the file from your computer. It will then appear in the large white bar on the right. In this case, the file is called "catalog-news.pdf".Then double-click on the file so that it opens. Then select the URL of the file as shown in the address window. Right click and select "copy" or hold down the CTRL key and press "C" to copy the URL we need to link to the file.Place the cursor in the "URL" field and right-click and select "Paste" or hold down the CTRL key and press "V". The file address should then appear in the field. Then click on "OK".If everything is correct, the text should now appear as a link.Click on "Done" and "Save".Add images to the description of a productIn some cases, you may not only want to show images in the image feature of the product. You may want images in the description as well. In this case, you can upload these images to the file archive and then use HTML code to insert the images.First you need to upload the image in the file archive. You do this under Appearance -> File archive -> click on the upload icon (floppy disk). See the image.Then select the image from your computer. It will then appear in the large white bar on the right. In this case the image is called "football.jpg".Then double-click on the image to open it. Then select the file URL that appears in the address window. Right click and select "copy" or hold down the CTRL key and press "C" to copy the URL we need to link to the image.Then go to the article where the image should appear. Assortment -> Products -> select product, edit -> scroll down to the "Description" field.In the field we need to enter an HTML code to insert an image and the basic code looks like this:<img src="xxx" alt="yyy">xxx - To be replaced with the source of the image. The URL we copied from the browser address window above.yyy - Is a text (alternative text, also called ALT text) used by search engines to index the image. It is also useful for visually impaired people as it should describe what the image represents. Simply a short description of the image.The finished code looks like this in this example:Done. Don't forget to save.
-

Customer chat
27 Nov 2025
If you want to give your customers the opportunity to chat with you directly in the store, you can add a customer chat to the store's theme.Activate customer chat in the themeGo to Appearance -> Themes -> select theme, edit -> tab "Add-on" -> Customer chatClick "+Add to block" to see which customer chats we support:Here you can read more about how the different services work and what they cost:ZopimImBoxChatlioTawkOlarkLivechatYou sign up/register with the various providers outside Abicart. Then you put the code you get from the provider (e.g. Zopim) into the theme.Click on the block to access the settings:. ..and insert the code you received from the chat provider:Click "Done" and save.In this case, the chat (Zopim) appears in the lower right corner of all pages in the store.In this example, click on it to unfold it and start chatting:
-
Tab icon / Favicon
27 Nov 2025
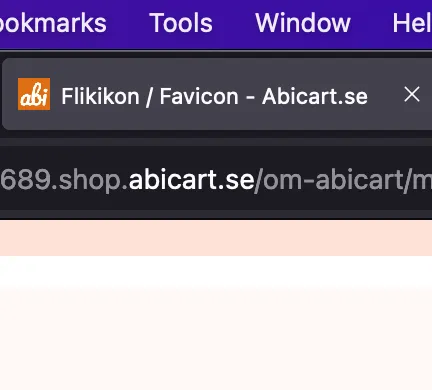
You can add your own image to be displayed in browser tabs or address windows.What is a favicon?A favicon is a small square image that appears on the tab or in the address window of the visitor's browser. Some browsers display the image in the tab and others in the address window.A custom favicon makes your shop look more professional and unique, so we recommend adding one if you can. The most common is to have a small version of your logo as an icon.What format should the image be?It should be a square image (1:1 ratio) and common sizes are 16 x 16 px or 32 x 32 px and it should be in the . PNG.In the past, .ICO was the most common format for this image, but some browsers no longer support this. We therefore recommend that you save the image as .PNG instead, so that it works on as many browsers as possible. Insert a tab icon in the themeGo to Appearance -> Tab icon. Upload the image and press "Save". Now you have your own tab icon in your store!Some browsers display the image in the browser tab (e.g. Google Chrome) and others display it in front of the page address in the browser address window (e.g. Safari), so it may differ depending on which browser you are using.
-
Footer
27 Nov 2025
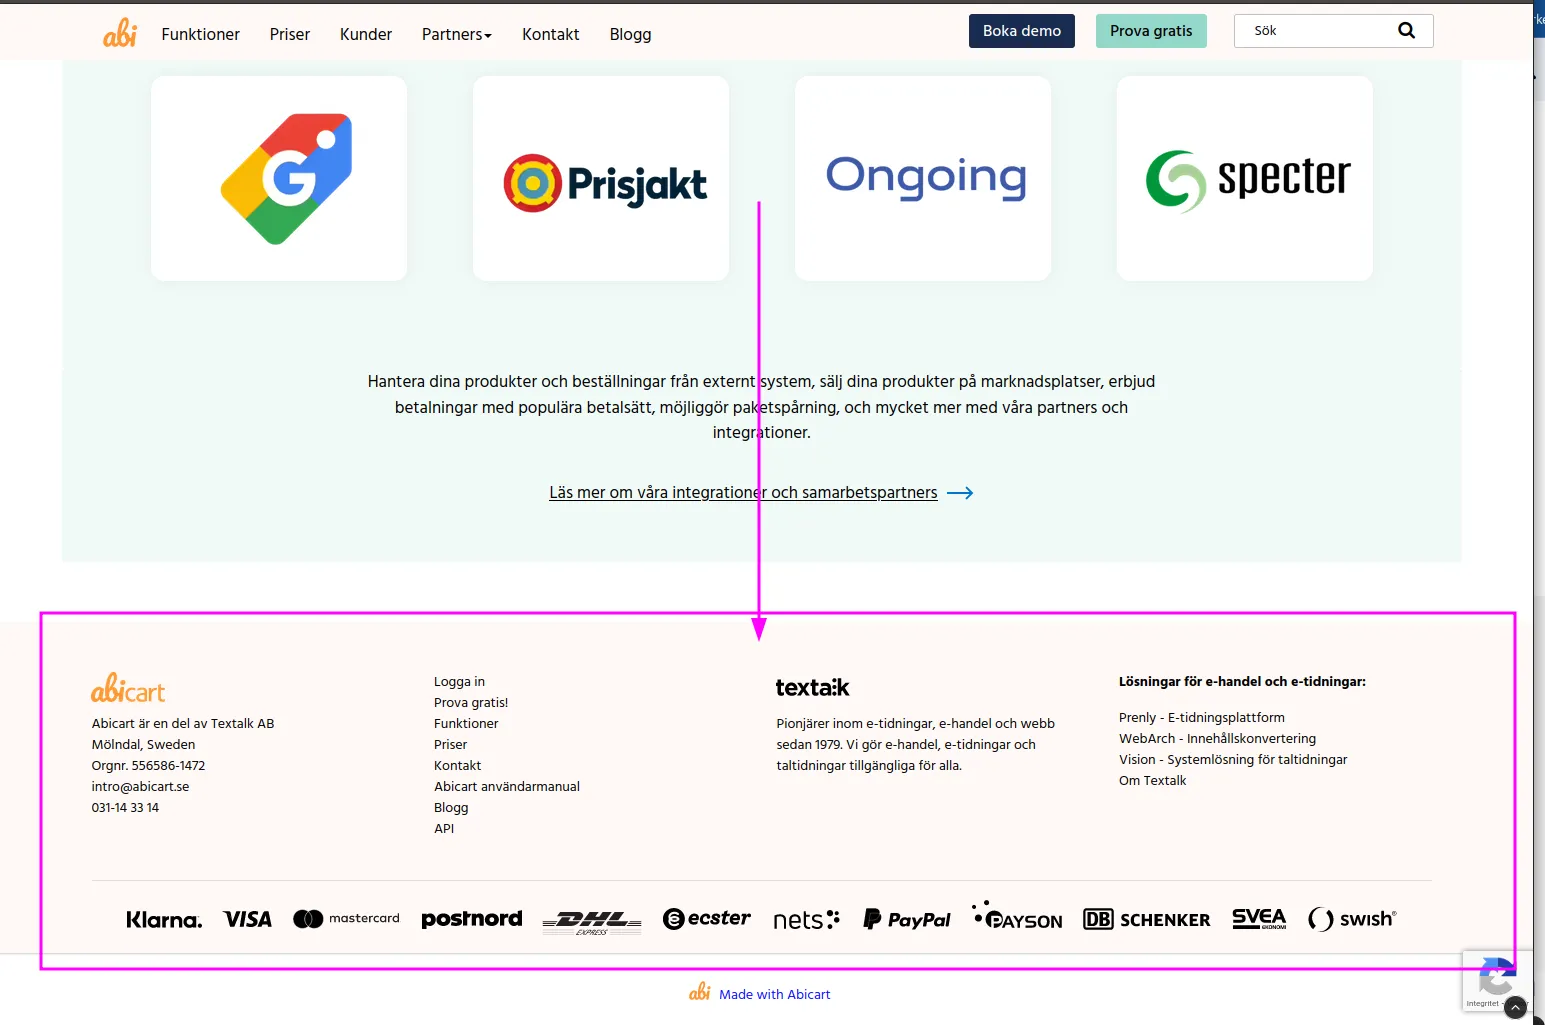
The footer in your shop is the block at the bottom that follows whatever page the visitor is on in the webshop. Here we'll go through what settings can be made there, how to add text and images, or links to social media.The footer consists of four different fields where you can select and add different content to each field.Your own HTML/Custom content:In all the fields in the footer you can add your own content:You can add your own text/image, your own links, or images of your payment methods.Click on the small icon "insert/edit image" to upload an image:Address:In the leftmost field it is possible to activate ready-made fields where you can enter the address and contact details of your company.Social media icons:In the two fields on the right you can add icons and links to Social Media sites. There is a selection of icons to choose from and you can add the link to your Facebook or Instagram, the logo then becomes a link to your page.Payment method information for Klarna Checkout:If you use Klarna Checkout as your payment method, you can activate a logo in the footer for Klarna. This can be done in the rightmost field.
-

Themes: homepage
27 Nov 2025
Here we go through all the blocks you can add to the home page in all themes Under Appearance -> Themes you will find all our themes. Under Content -> Home page you build the home page in its store. You can add and remove different blocks. Click on the button "Add blocks". Here you can see all the blocks you can add.Block: ProductsA block to display products on the home page.TitleEnter a title for the block. The title appears as a heading at the top of the block, such as "News", "Popular" or similar.ListSelect from which list the products should be retrieved. All products, product group, news, latest, special prices or select products manually.SortingIf you have selected a list above (except manual), you can choose the order in which they are displayed. The following sorts are available: price, name, product number, created, popular, unpopular and stock.Type of listChoose how the products are presented: in a grid, list or carousel.Number of productsSelect and limit the number of products to be displayed.ColumnsIf you have chosen to present the products in a grid, you can choose how many columns to display for computer, tablet and mobile phone.Block: Highlighted product groupsTitleEnter a title for the block. The title appears as a heading at the top of the block. For example, popular categories, sale items or similar.Highlighted product groupsSearch for the product groups to be displayed. Enter a keyword. Then select the product group and click on the "Add product group" button. Repeat this step to add more product groups.Block: Custom HTMLA block for adding your own content such as text, images, videos, links, scripts and HTML code.There is a toolbar at the top of the page that contains two rows of icons.The top row contains icons for choosing between header and body text, text size and adjusting the text block.The second row contains icons for bold and italic text, text color, background color, image upload, embedding videos, creating links, and an icon for editing the page in HTML mode.Block: SlideshowAutomatic image switchingIf you have multiple images in your slideshow, you can set them to switch automatically.Image switching modeIf you have activated automatic image switching, you can choose whether the images should slide in from the page or fade in.CroppingIf the images are not aligned with the set proportions, you can choose to crop the images to fit in the slideshow.ProportionsWhat proportions should the slideshow have. Choose width and height.ImagesChoose which images to display in the slideshow. The images must first be uploaded to the file archive found under Appearance -> File archive.Block: Full width productProduct blockSearch for the product to be displayed in the block.Show priceChoose whether to show the price.Show descriptionChoose whether to show the product description.Show buy buttonChoose whether to show the buy button.Show link to attachmentShow a link to the attachment if it is uploaded on the product.Block: Subscribe to newsletterIn this block there are two text forms. The top field appears above the email field where the visitor can enter their email address to subscribe to the shop's newsletter.The bottom text field can display a text after completing registration.Once a visitor has registered for the newsletter, the email address is added to the customer register.This feature is included at no extra cost in Abicart Plus and Pro.Block: Mailchimp formMailchimp is an additional service for sending out newsletters. If you use Mailchimp, you can add their forms to this block. Log in to your Mailchimp account. Go to Create -> Signup form, select "Embedded", and then select one of their forms. Then copy the code of the form and paste it into the field in this block.Block: StorefrontsA shop window can contain an image, three lines of text and a link to a product, product group, own page or an external link.There are four different shop windows: shop windows, two shop windows, three shop windows and four shop windows. For example, if you choose two shop windows, these are displayed next to each other.Block: InstagramThis is a block to display images from your Instagram account on the shop's homepage. First you need to log in to Instagram in the browser you are using. Open a new tab and log in if you are not already logged in.Then add the "Instagram" block and click on the "Get key" button.When you reach the Instagram page, click on the "Grant access" button.You will then be redirected back to the shop and click the "Done" button at the bottom right and then the save button.Block: TrustpilotThis is a block to display reviews about your store from Trustpilot. Log in to your Trustpilot account and get the embed code to show reviews. Then paste the code in the "Trustpilot code" field.Block: Event countdownA feature you can activate that shows a clock counting down to a specific date and time. For example, to the start of a sale or similar.You can read more about this function here.TimerEnter a start date and time when the countdown should start to appear and an end date and time that it should count down to.ContentThere is a field above the counter where you can add text, images, as well as scripts and HTML if you wish.DesignHere are settings for "Crop background image", "Text color" and whether the timer should be displayed or not.Block: FlowboxA block to display a Flowbox. Enter "flowbox key" in this field and save.Block: Square sliderA small square slideshow. Select image and link.Block: Unique Selling PointsA block to add unique selling points to your page to highlight aspects of your store in an effective location.
-
Preview themes in mobile view
27 Nov 2025
Here we go through how to preview themes in mobile view for different browsers. Most browsers have tools that resize the window to mimic the look of a mobile or tablet. Since many end customers make purchases on mobile and tablet, it can be interesting to preview a new theme you've created, for example, so that you also know how the look of the store will look to those customers.Previewing with Firefox, Google Chrome and EdgeWhen previewing an active or inactive theme under Appearance>Themes, do the following to open the inspection tool in the browser:Firefox: Ctrl + shift + MGoogle Chrome: F12 and then Ctrl + shift + MEdge: F12 and then Ctrl + shift + MNow the inspection tool is running, you can then choose to widen the height or width of the view itself , or choose one of the preset sizes to mimic how it would look for a number of different devices.Previewing with SafariWhen previewing an active or inactive theme under Appearance>Themes, do the following to open the inspection tool in your browser:1. Safari menu> Preferences> Advanced2. Tick the box for "Show develop menu in menu bar"3. "Develop" is now an option in the menu bar in Safari. Click on Develop-> "Responsive design mode"Now the inspection tool is running, you can then choose to widen the height or width of the view itself, or choose one of the pre-set sizes to mimic how it would look for a number of different devices.To preview with Safari you need to go through a few more steps, so we recommend using a Firefox, Chrome or Edge in the first instance for mobile view previews.
-

Edit theme (Home page)
27 Nov 2025
Good to know!Settings in themes may differ depending on the theme you have chosen. Add a theme There are currently 8 different themes to choose from, all with different designs.Add the one that suits you best. 1. go to Appearance in the left menu2. click on Themes3. Select the Theme Templates tab4. Add: Select the theme you want to use in your store. Demo: Here you get a glimpse of what the theme might look like.Learn more: Click here to get some extra information about the theme. Under the tab My themes you will find your added themes, this is also where you edit them. Editing a theme You can create copies of a theme. Perfect if you want to experiment, or if you want to have seasonal themes. To edit a theme, click on the pencil on the right. Content of the themes Under the tab Content you choose how each page should look and function in the store. For example, what information your Footer should display or how you want your Menu to function. You create your start page by adding different blocks.You can change the position of the blocks by dragging and moving them. Always finish by clicking on Save Remember to save! Once you have made changes to a tab, you must always save before moving on to the next one. Style Under the tab Style you choose the colors and fonts you want in the store.You also upload your logo and choose how you want the store images to be cropped.If you know CSS, you have the opportunity to add this under Custom CSS.CSS is a code language that we use in Abicart. Tip!When choosing a logo, choose one without a background.Click below for a more detailed description of the logo.Manual - Add and edit your logo Additions Under the tab Add-ons you will find some goodies.This is where you connect analytics tools to the store. You edit functions that are linked to the theme, for example Cookies or Text banner and under Own content in HEAD you can add your own code.
-
Add a logo to your webshop
27 Nov 2025
One of the easiest ways to make your shop more personal is to add your own logo that is visible in the shop. The logo is added to the theme that you use in the shop, go to: Appearance->Themes->Click on "edit" on the active theme->Click on the "Style" tab. Upload your logo here or add your shop name in text if you don't have a logo: You have the possibility to adjust the proportions based on the logo you upload, if you have a square image you choose 1:1 in proportion while for a more rectangular image you need e.g. 5:1. Click here for more information about proportions.You can set the maximum width of your logo to prevent it from being too large or too small: Under Appearance->Logo you can also add a logo. The logo you add there is only visible in documents you can extract from your orders, such as receipts and packing slips.