


-
Production - Attribute
31 Jul 2026
Production The Production attributes let you describe where and when a product was made, and who supplied or manufactured it. All fields are optional and can be shown to customers on the product page. Available attributes: Country of origin: the country where the product was manufactured Expiry date: the date after which the product should no longer be used or sold Production date: the date the product was manufactured Supplier: the name of the supplier Manufacturer: the name of the manufacturer Note: Check the visibility setting for each Production attribute before publishing your products, since this determines whether the information is shown to customers on the product page. Setting up Production attributes 1. Enable the attributes Go to Assortment → Products → Product Settings. In the panel on the right, locate the Product Attributes section. Scroll down until you find the Production heading. For each attribute you wish to use, click the edit icon and select your preferred visibility option, then click Save. 2. Add production details to a product Go to Assortment → Products and open the product you wish to edit. Scroll to the bottom-right of the product page. You will find the Production fields, where you can fill in the relevant details for each attribute. If you have any questions, please contact customer support.
-

Specification - Attribute
31 Jul 2026
Specification The Specification attributes let you record technical or regulatory details about a product, such as strength, type, and volume. These fields are optional and are private by default, meaning they are visible only to store administrators unless you choose to change this. Available attributes: Strength: the strength or potency of the product (e.g. alcohol percentage, dosage) Type: the type or variant classification of the product Volume (ml): the volume of the product in milliliters Note: These attributes default to Private. If you want customers to see this information on the product page, you need to change the visibility setting. Setting up Specification attributes 1. Review the attributes Go to Assortment → Products → Product Settings. In the panel on the right, locate the Product Attributes section. Scroll down until you find the Specification heading. For each attribute, click the edit icon and select your preferred visibility option, then click Save. 2. Add specification details to a product Go to Assortment → Products and open the product you wish to edit. Scroll to the bottom-right of the product page. You will find the Specification fields, where you can fill in the relevant details for each attribute. If you have any questions, please contact customer support.
-

Target Audience
31 Jul 2026
Target audience The Target audience attributes let you describe who a product is intended for. This information is used to guide customers to suitable products and can also be required for compliance in certain product categories. Available attributes: Adult content: indicates whether the product is intended for adults only Suggested age group: the recommended age group for the product Suggested gender: the recommended gender for the product Note: Suggested age group and Suggested gender matter most for categories like clothing, toys, and accessories, where the right value helps customers filter to products meant for them, for example separating kids' shoes from adult shoes, or menswear from womenswear. Fill these in whenever they clearly apply to the product. Setting up Target audience attributes 1. Enable the attributes Go to Assortment → Products → Product Settings. In the panel on the right, locate the Product Attributes section. Scroll down until you find the Target audience heading. For each attribute you wish to use, click the edit icon and select your preferred visibility option, then click Save. 2. Add target audience details to a product Go to Assortment → Products and open the product you wish to edit. Scroll to the bottom-right of the product page. You will find the Target audience fields, where you can fill in the relevant details for each attribute. If you have any questions, please contact customer support.
-

Digital withdrawal function
9 Jun 2026
On June 19, 2026, new amendments to the Distance Contracts Act (DAL) will enter into force. The biggest change is the requirement for a digital withdrawal function - popularly known as the 'undo button'. The aim of the law is to strengthen online consumer protection and counteract so-called 'dark patterns' (designs that make it difficult for the customer to cancel or change something). In short: it should now be as easy for a customer to cancel a purchase online as it was to complete it.New Legal Requirement: The "Cancel Button" in E-commerce On June 19, 2026, new amendments to the Distance Contracts Act (DAL) will take effect. The most significant change is the requirement for a digital cancellation feature —commonly known as the “cancel button.” The purpose of the law is to strengthen consumer protection online and combat so-called “dark patterns” (designs that make it difficult for customers to cancel or change a purchase). In short: it should now be just as easy for a customer to cancel an online purchase as it was to make it. A new legal requirement means that online stores must provide customers with a simple, digital way to exercise their right of withdrawal—without having to call or send a manual email. Important: Deadline June 19,If your online store lacks this feature after June 19, it may be considered a violation of the Marketing Act, which could result in penalties and a significant extension of the customer’s cancellation period. What does this mean for you as an e-retailer? Clear and easily accessible feature: You must provide a clearly placed feature (e.g., on “My Account” or via a direct link in the order confirmation) where the customer can indicate that they wish to exercise their right of withdrawal. The customer should not have to call or send a manual email. Immediate confirmation: When a customer clicks to cancel their purchase, the system must automatically send a confirmation (a receipt) to the customer immediately. Unchanged cancellation period: The right of cancellation itself remains unchanged—the 14-day cancellation period still applies to goods and services covered by the law. It is only the way customers can notify the store of their decision that is being simplified. The Importance of Complying with the Law: If your online store lacks this feature after June 19, it may be considered a violation of the Marketing Act, which could result in penalties and a significant extension of the customer’s cancellation period. Step 1 - Enable the cancellation form in your store The first step is to make the cancellation form visible and accessible to your customers. You can do this via the built-in footer link or by creating your own links in the menu or on other pages. Option A: Enable a link in the footer Supported theme versionsThis setting is only available in Fabrikk 1.6, as well as in Nordic, Hadje, Bountiful, Emporium, Trailblazer, and Brew 1.1, and Azalea 1.2.Recommendation: If your store is using a theme version older than Fabrikk 1.6, Nordic/Hadje/Bountiful/Emporium/Trailblazer/Brew 1.1, or Azalea 1.2, we strongly recommend that you upgrade. The latest theme versions are optimized for modern web technology, which gives your store significantly better performance, faster load times, and stronger SEO (search engine optimization). Go to Appearance → Themes → Edit the active theme → Content → Footer. Scroll down to the “Link to Right of Withdrawal Form” setting. Select the “On” option. If you want to change the default text for the link, you can do so in the field directly below. Click Save. Once the link is enabled, it will appear at the bottom left of the store, below the store’s address information. If you don’t have an address field in your footer, that’s okay—you can still add the link as custom HTML text in your footer. If you’re using custom HTML in all four columns of the footer, you can create a manual link to the cancellation page by following these steps: Go to Appearance → Themes → Edit → Content → Footer. Add the link text for the cancellation link to any HTML block. Then follow Option B. The link will then appear in the footer. You can follow the same steps in your other stores as well. Option B: Create Your Own Link on a Page If you want to link to the form from other places in the store—for example, from the “Terms & Info” page—you can easily create a regular text link. Go to Pages → System Pages → Cancel Purchase. Copy the address listed in the URL field. Note that in a multi-store system, the system page is located in the sub-store. Navigate to the page where you want to place the link, for example, Pages → System Pages → Terms & Info. Type the text that the customer should click on, such as "To the cancellation request form. " Select the text with your mouse and click the link icon in the toolbar to paste your URL. Paste the link to the cancellation form into the “URL” field and save. Then click Save again so that the page saves the changes. Option C: Add a link to the menu Go to Pages → System Pages → Cancellation Request. Copy the address listed in the URL field at the top of the page. Then navigate to the theme menu: Appearance → Themes → Edit Active Theme → Content → Menu. In some themes, such as Fabrikk, the menu is located under Content → Header. Scroll to the bottom of the page to “Menu Items.” Click “Add, ” select “Custom Link,” and paste the link to the cancellation form into the field below. In the “Link Title” field, enter the name you want the link to have in the menu. Click “Add” and then the Save button in the theme. Step 2 - Here’s what it looks like to the customer Once the form is active, this is the process your customers go through when they want to cancel a purchase. 1. The customer navigates to the return form.To return an item, the customer goes to a dedicated page for the right of return. There, they enter the order number and associated email address. 2 . The customer submits their request.Once the system has verified that the order is in the store, a new page appears where the customer can write a message and submit their request. 3 . The customer confirms via email.Once the customer has clicked “Submit Request,” an email is sent asking them to confirm their request. As soon as this is done, the case is forwarded to the store. Step 3 - Manage Incoming Return Requests When cases start coming in, you can manage them all in one place in the admin panel. Under “Orders” and the “Return Requests” tab, all incoming requests from your customers are collected. New, unprocessed requests are automatically assigned the “New” status. To easily sort the list, you can filter your requests by status: “All,” “New,” “Approved,” or “Denied.” Click “Details” to view a detailed overview of each return request. Note that the order cannot be modified directly in this view. The page only displays the customer’s return request—here, you manage the case status and can add your own notes. If the order needs to be adjusted or canceled, this is done on the order page. Click the order number to go there. Once processing is complete, mark the request as 'Accepted' or 'Denied.' The customer is not automatically notified when the status changes. You must therefore always contact the customer and inform them of the decision manually via your email client. Email An email regarding the created case is sent to the customer from the email address specified in the "Order Confirmation Sender" field (Settings >> Email) The email notification to your store is sent to the email address specified in the "Order Confirmation Copies" field (Settings >> Email)
-
Single Sign-On (SSO) - Settings
1 Jun 2026
Abicart Admin · Quick Setup Guide Single Sign-On (SSO) This guide walks you through the setup in four steps. Supported protocols are SAML 2.0 (recommended) and OAuth2. i Before you start SSO is an add-on service, so reach out to Abicart Support first to have it enabled on your account. What you'll need A few things to have ready before you begin: Access to your identity provider's admin panel, such as Azure AD, Google Workspace or Okta The SAML metadata URL or XML from your identity provider SSO enabled on your Abicart account by Abicart Support Admin access to your Abicart back office Setting up SSO in four steps 1 Create your SSO configuration in Abicart Admin Go to Settings > Single Sign-On (SSO) in your Abicart admin panel and add a new configuration. Give it a name, for example your company name, and save it. Saving generates Abicart's metadata URL for this configuration. You'll find it on the same page, labelled Abicart Metadata URL (URL till Abicart-metadata). Copy it directly. You do not need to type anything or enter the IDs manually. ✓ Tip Keep this page open in a tab. You'll come back to paste your identity provider's metadata into it in step 3. 2 Create a SAML application in your identity provider In your identity provider, for example Microsoft Azure AD, create a new SAML application for your webshop and paste in the Abicart metadata URL you copied in step 1. ✓ Tip For Azure AD, your identity provider's own metadata URL, which you'll need in step 3, usually looks like this: https://login.microsoftonline.com/{tenant-id}/federationmetadata/2007-06/federationmetadata.xml?appid={app-id} 3 Paste your identity provider's metadata back into Abicart Back on the SSO configuration page from step 1, fill in the following: Identity Provider MetadataThe metadata URL or XML from your identity provider, from step 2. MappingAttribute mapping in JSON format. See the default below. Default mapping for Microsoft Azure AD: { "sub": "http://schemas.xmlsoap.org/ws/2005/05/identity/claims/emailaddress", "name": "http://schemas.microsoft.com/identity/claims/displayname", "family_name": "http://schemas.xmlsoap.org/ws/2005/05/identity/claims/surname", "given_name": "http://schemas.xmlsoap.org/ws/2005/05/identity/claims/givenname", "email": "http://schemas.xmlsoap.org/ws/2005/05/identity/claims/emailaddress" } The settings that matter most: Active (Aktiv): Must be on. The configuration will not work otherwise. Create missing customer on login (Skapa saknad kund vid inloggning): Turn this on to automatically create a customer account on the first login. Update existing customer on login (Uppdatera befintlig kund vid inloggning): Turn this on if customer details should be updated from the identity provider during login. Disallow other login methods (Inga andra inloggningsmetoder tillåtna): Leave this off unless standard password login should be fully blocked. More information is provided below. 4 Save and test Click + Update (+ Uppdatera) to save, then click Test to try the login flow. If it does not work immediately, double-check that the metadata URLs are correct on both sides and that the attribute mapping matches the claims sent by your identity provider. Using SSO in a multistore setup Each webshop has its own SSO configuration. This means you can use different login experiences for different shops within the same multistore setup. Shop A can require SSO for all users. Shop B can offer both SSO and password login. Shop C can continue using standard password login only. Only the webshop where an SSO configuration or automatic redirect is enabled is affected. Other shops continue using their own login settings. Choose your login experience There are three ways to configure the login experience, from the most flexible option to the most restricted. Choose the setup that best matches how your customers should sign in. 1. SSO as the primary sign-in method Customers sign in through your identity provider. This is suitable when SSO should be the main login method but visitors do not need to be redirected automatically as soon as they enter the shop. Self-service Configure and test the SSO connection directly in Abicart Admin. 2. SSO and password login shown together Customers see both options on the login page and can choose either SSO or their email address and password. The login page must be configured to present both choices. Requires Abicart Support Ask Support to configure a login page that offers both methods. 3. SSO required for everyone, with no password fallback Any customer who is not already logged in is redirected to SSO automatically as soon as they enter the shop, before they reach a standard login page. Password login is therefore not available as a fallback. Requires Abicart Support Ask Support to add an automatic SSO redirect script to your active theme. ! Only choose this setup if every customer should authenticate through your identity provider. The automatic redirect prevents visitors from reaching the standard password login page. i About “Disallow other login methods” This setting is separate from the automatic redirect script. Enable it only when other login methods should be blocked completely, including through a direct link to the standard login page. Customer groups by SSO configuration If multiple SSO configurations are connected to the same webshop, each configuration can automatically assign customers to a different customer group. This makes it easier for several companies to share one webshop while receiving different pricing, assortments or other customer-group-specific settings. For example: Customers signing in through the Company A SSO configuration can be assigned to A Staff. Customers signing in through the Company B SSO configuration can be assigned to B Staff. Customers signing in through the Company C SSO configuration can be assigned to C Staff. Once configured, the customer group is assigned automatically when the customer account is created. No manual reassignment is needed. Available in Admin Each SSO configuration can be linked to its own customer group directly from the SSO settings. Key URLs Abicart SSO metadatahttps://saml.abicart.com/{SHOP_ID}/{SSO_ID}/meta SSO test and login URLhttps://saml.abicart.com/{SHOP_ID}/{SSO_ID} SSO admin panelAbicart Admin > Settings > Single Sign-On Need help? Whether you're setting up your first SSO connection, configuring multiple identity providers or planning a multistore solution, we're happy to help. Contact Abicart Support and we'll guide you through the setup.
-

Product feed: Prisjakt
28 Apr 2026
Product feed for Prisjakt. A product feed contains important data about your products. Among other things, product names, manufacturers, prices and product codes (GTIN/MPN). The product feed can be found under Settings -> External connections -> Product feeds.Note that this is our new feed for Prisjakt. You should use this instead of the previous price files found under Settings -> External links -> Price comparison system. What properties must be filled in on the product? For a product to be included in the feed, the following properties must be entered: article number product name description and/or introductory text product group price Brand name* or GTIN Google Taxanomi * activate brand name under Assortment -> Settings -> Product attributes Google Taxonomy You can choose taxonomy on the product group or on the product. If you choose on the product group, all products in the group will inherit the selected taxonomy. Enter Google Taxonomy on a product Go to Products -> select a product, edit -> in the box "Categorization" on the right there is Google Taxonomy. Enter Google Taxonomy on a product group Go to Products -> Product groups -> select a product group, edit -> under General there is Google Taxonomy.Enter for example "clothes" in the search bar and choose the category that fits best. You can also set a category on an entire product group/subgroup and choose that the products in that group will inherit the category (then you do not have to go into each individual product): You can't create your own categories, everything is retrieved from Google. You must therefore choose one of the existing ones. Generate URL to the product feed Go to Settings -> External links -> Product feeds. In the "Prisjakt Feed" box, select language, currency and country. Then copy the "Generated URL" and add it to Prisjakt's administration. The feed will then contain all products in the store that have the required properties (see above).
-

Setting Up a New Language
13 Apr 2026
This guide explains how to add and configure a new language in your Abicart store covering translations, domain setup, shipping, VAT, and product feeds. Finnish is used as the example throughout, but the same steps apply to any language. Follow the steps in order. Steps 1 and 2 must be completed before the remaining settings become available in your store.1. Activate Language and Currency Begin by enabling the new language and adding its corresponding currency. Once activated, additional localization settings will appear throughout your store administration. Activate the language Navigate to: Settings → Languages Locate the language you want to add and set it to active. If you do not want the language to be visible to store visitors yet, set it to Hidden — the language fields will still be available in your administration panel. Add the currency Navigate to: Settings → Currency Select Add currency and choose the appropriate currency for the target market (for example, EUR for Finland). 2. Translate Your Store The recommended approach for translating store content is to export all texts to a file, complete the translations, and re-import. This covers the majority of your translation in a single operation. Export content for translation Navigate to: Settings → Languages → Export Configure the export options: Translate from - Select your current primary language (the language content is written in). File format - XLXS recommended. It opens directly in Microsoft Excel or LibreOffice Calc. Data to include - Select all content types: Articles, Article groups, Delivery methods, Payment methods, Delivery information, Article template, Own pages, and Theme. Click Export. The file is downloaded to your computer. Complete translations in the file Open the file in a spreadsheet application. It contains three columns: Column A (key) - Internal identifier. Do not edit. Column B (content) - Source language text. Column C (translation) - Enter your translations here. Leave columns A and B unchanged. Important: Do not make changes to your store between export and import. Translation strings are matched by their key values. Modifying store content before importing the translated file may cause mismatches. Import the translated file Navigate to: Settings → Languages → Import Select the target language, choose the translated file from your computer, and click Import. If importing a CSV file, ensure: The file is saved with UTF-8 character encoding. The delimiter is set to comma. For full documentation on this process, see: https://www.abicart.com/support/assortment/import-and-export/translations-exportimport-texts-in-multiple-languages 3. Configure Shipping and VAT Each market requires its own shipping methods and tax rates. These must be configured correctly before the new language is made publicly available. Add a shipping method Navigate to: Settings → Shipping Select Add shipping method and configure an option applicable to the target country. Add the VAT rate Navigate to: Settings → VAT Add the correct VAT rate for the target country. Consult the local tax authority for the applicable rate. 4. Email Content and Other Texts If your store uses customised transactional email templates — such as order confirmations, shipping notifications, or invoices — these must be translated separately. Translate email templates Navigate to: Settings → Documents → Email Content Add a translated version of each template for the new language. Other texts Some content, such as discount names, is managed within its own section and must be translated manually. The export/import workflow described in Step 2 covers all standard storefront and theme content. 5. Add a Language-Specific Domain You can associate a separate domain with each language. For example, Finnish customers could be served from a .fi domain while your primary store uses .se. Register the domain Navigate to: Settings → Domain & SEO → Domain Enter the new domain address and save. Connect the domain to the language Navigate to: Settings → Domain & SEO → URL Settings A section for each activated language is shown. Select the domain you registered from the drop-down for the relevant language. Note: This step can be completed at any point after Step 1. The domain assignment does not affect the translation or shipping configuration. Make sure to have the language set to “active” before this step. 6. Create Language-Based Product Feeds If you advertise on Google Shopping or Meta (Facebook/Instagram), you can generate a separate product feed for each language and currency. Navigate to: Settings → External Connections → Product Feed Select the target country, currency, and file format. The system generates a feed URL for that language and currency combination. Use this URL when configuring your feed in Google Merchant Center or Meta Commerce Manager. Note: Ensure the correct currency is selected. An incorrect currency selection will result in wrong prices being displayed in your advertising campaigns. Checklist Before Launch Use this checklist to confirm all steps have been completed before making the new language available to customers. Language activated under Settings → Languages Currency added under Settings → Currency Translations exported, completed, and imported Shipping method configured for the target country VAT rate configured for the target country Email content translated (if using custom templates) Domain registered and connected to the language (if applicable) Product feed generated for the language/currency (if applicable)
-
Change domain in live webshop
10 Apr 2026
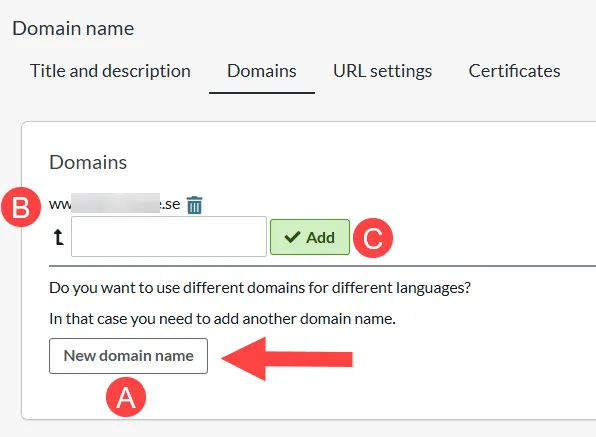
This manual shows you how to change the domain of a webshop that is already active (live). For example, if your online shop changes its name after a few years.Step-by-step: 1. you have purchased your new domain 2. point the new domain to Abicart according to this manual: Domain: Connect a domain to your webshop *Point the domain both with and without www. 3. insert the new domain under the old one and wait 24 hours.Settings >> Domains & SEO >> Domains >> New domain name >> Enter the domain >> Add >> Add www. domain as subdomain >> SaveNOTE!It may take 1-24 hours before the domain is correctly pointed (step 2) and you can continue with step 3. If it is not possible to add the domain immediately, wait 1 hour at a time until it is possible to add the domain as a subdomain. 4. After the new domain has been a subdomain for 24 hours , delete it from the list of subdomains and add it as a new domain name. 5. Go to URL settings and change the domain name for the store language >> save.Now set the new domain as the main domain. We go through how to do this in the linked manual.*Also edit the language prefix and suffix as desired. See the same manual as above. 6. Now put the old domain under the new domain: i) Go back to "domains" and copy your old domain and main domain and paste into a document.ii) Delete the old domains from the list in admin to be able to move them (delete subdomain first, then main domain)iii) Add the old domains as subdomains to the new domain name, one domain at a time (e.g. by copying the domains from the document where you just pasted them). See picture:A: New domain name - Here you enter your new domainB: Domain name - Your new main domainC: Add - Here you enter your subdomain. If the customer has a link with the subdomain, it will automatically redirect to the main domain. Once this is done, the redirection from the old domain to the new domain will happen automatically. So a customer clicking on an old link will be redirected to the same page with the new domain (if the page still exists). 7. what's left to do: - Contact any payment methods and inform them that you have changed domainThe same goes for any external tools, such as Google tools: update the service with your domain change.Then it's done!
-
Shipping and delivery: Pick up in store
2 Mar 2026
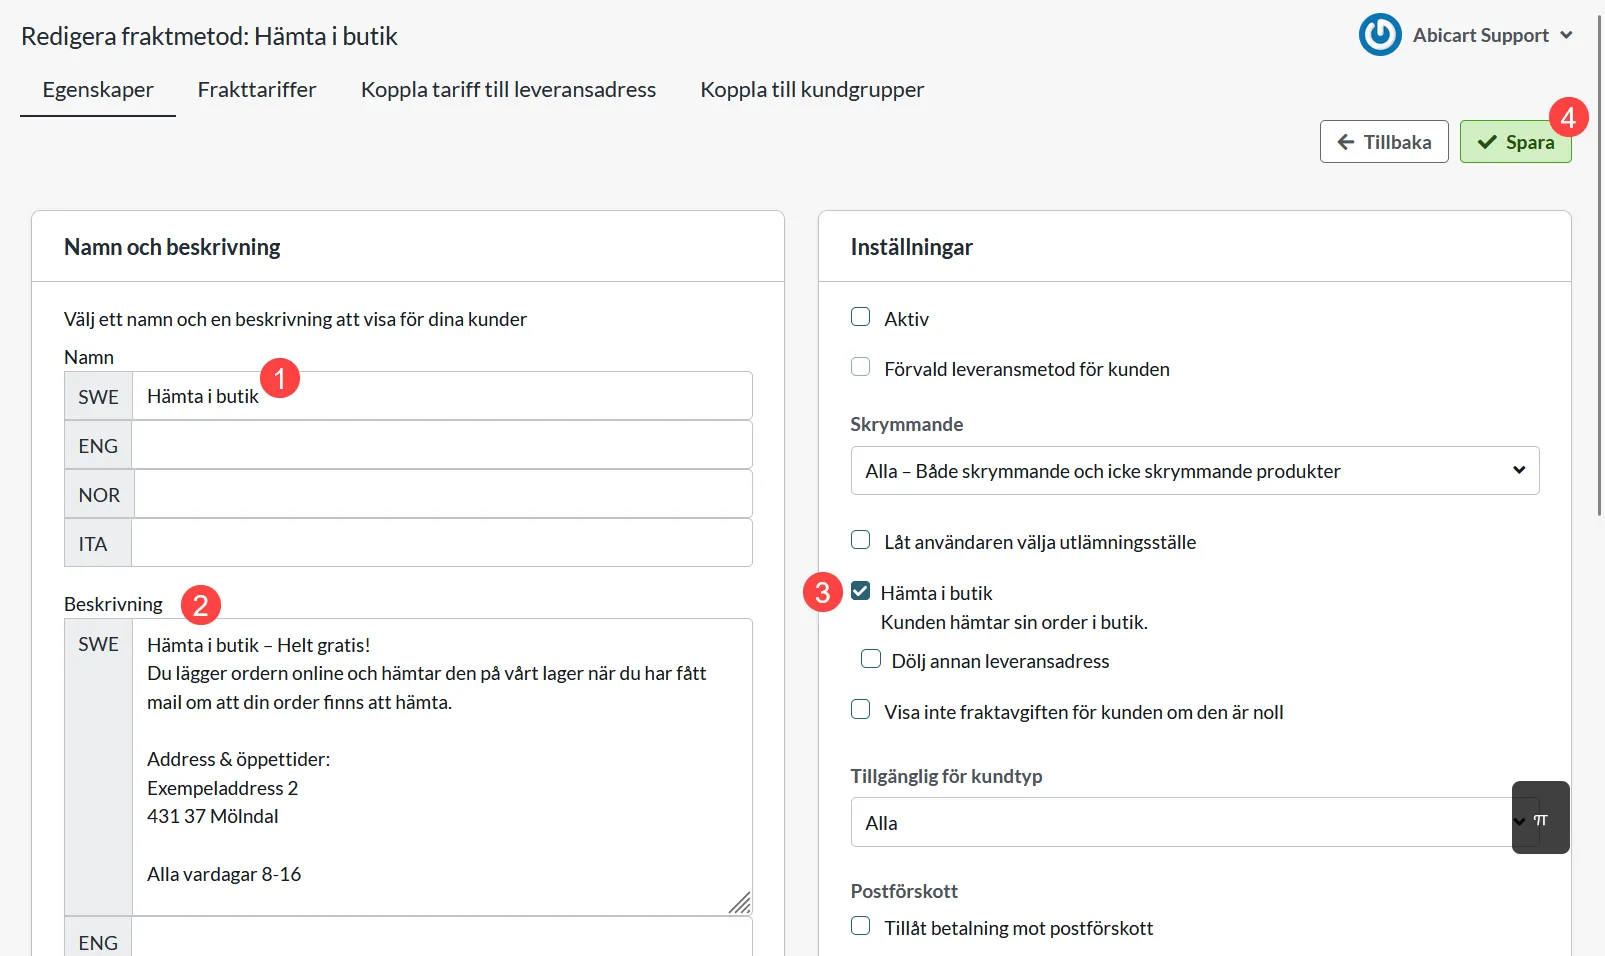
Create a delivery method for pickup in your physical storeBefore creating a shipping method, it's a good idea to watch our video guide and read this manual: Shipping and delivery: How do I create my shipping methods? Video guide Download in store Settings >> Shipping >> +New shipping method 1) Create a new shipping method and name it 2) Enter a description 3) Check the box "Pick up in store"Checking this setting is important as it excludes the delivery method from your product feed. Without this setting, misleading information about the free delivery method will be sent to Google. 4) Click on Add 5) Click on Shipping Tariffs >> Introduce new tariff 6) Name the tariff 7) Click on Add 8) Click on Link tariff to delivery address 9) Click on the arrow for countries within the EU* *If your store or warehouse for collection is located in a country other than the EU, select the section that lists the country. 10) Click on the country 11) Click on the tariff you recently created 12) Save Now you see that a country has an active tariff: 13) Click on Properties >> Check Active to activate the delivery method 14) Save Done!
-

Qliro Checkout
23 Jan 2026
What is Qliro?In today's e-commerce, payment is a crucial part of the customer experience - and a key driver of growth. Qliro is one of the leading companies for modern commerce and helps e-retailers increase sales, loyalty and profitability through a checkout built for results. With modular technology, data-driven insights and a focus on conversion, Qliro creates a smooth and secure payment experience for the end customer.How do I get started with Qliro Checkout? Contact Qliro on their website and get a demo. Add Qliro Checkout to your store Go to Settings -> Payment methods -> Add new payment method. Select "Qliro Checkout" in the list and then click "Add". You will then be taken to the settings page. Status ActiveCheck to activate and make the payment method visible in the store.DefaultA setting to make the payment method default at checkout.Make available only to those customers or customer groups where I specify it.If you do not want all customers to be able to use this payment method, you can deactivate it for non-logged-in customers through this setting. You then go to the respective customer group to activate the payment method there. Available for customer typeYou can set the payment method to be available only for one customer type or all. Require buyer to enter personal/organization numberCheck to make the personal/organization number mandatory at checkout.Send confirmation of payment status to the store ownerA setting to enable a separate payment status email for this payment method to be sent to the store owner.Turn off the purchase of gift card products with this payment methodEnable a setting to disable the gift card product type from being purchased with this payment method. Qliro settings The next block contains fields for Qliro data provided by Qliro Merchant API Key - Data you receive from Qliro Merchant API Secret - Data you receive from Qliro. Activate test mode - Activate for test mode Privacy Policy Page - Select the page that contains your privacy policy. This is a requirement from Qliro. Name and Description Name of payment methodEach payment method has a name that will be displayed in the checkout, but if you want to modify this, you can enter a new name in this field. An optional field that can be left blank. Detailed descriptionA field to enter a text that informs the buyer about how the payment method works. Can be left blank. Currencies If you have several active currencies in the store, you can limit these for each payment method. The default setting is "All the store's activated currencies", but if you check "Specific currencies", all active currencies are displayed and you can choose to disable those that should not apply to this payment method. Countries The default setting of the payment method is that it applies to all countries to which the store offers delivery (Settings -> Shipping). If you want to restrict a payment method to only certain countries, you can check "Specific countries" and then specify the countries that can use this payment method. Order status If you want orders placed via this payment method to have a specific order status, you can set it here. Select the status from the list. Limitation with regard to order total A setting to limit the amount that a payment method can process. If you choose to limit the amount between two intervals, it is always the total order value including shipping and other fees. Fee to be added at checkout when ordering A function to add an extra fee to the purchase, such as a handling fee.
-

Integrating ShipNordic with your Abicart Store
14 Jan 2026
ShipNordic provides automated solutions for shipping and order management, specifically designed to simplify logistics for small to medium-sized e-commerce businesses. By integrating ShipNordic with Abicart, you can automate your shipping workflows, offer flexible delivery options, and manage returns efficiently.Key Features of the Integration Automated Shipping: Streamline your order fulfillment process. Customer Choice: Let your customers choose their preferred delivery points. Easy Returns: Simplify the return process with QR codes and clear overviews in your admin panel. EU-Based: All data is hosted on servers within the EU for maximum data protection (GDPR compliance). Video Tutorial: How to Set Up ShipNordic in Abicart The easiest way to get started is to follow our video guide. This video walks you through the step-by-step process of connecting your Abicart store to the ShipNordic platform. https://www.youtube.com/watch?v=p_oLuD9DHRw Step-by-Step Instructions If you prefer written instructions or need to troubleshoot specific settings during the connection process, please refer to ShipNordic’s official documentation: How to connect your Abicart store to ShipNordic Summary of the Setup Process Log in to your Abicart admin panel. Follow the steps shown in the video above to generate the necessary API credentials/connection. Configure your shipping methods within ShipNordic to match your Abicart settings. Test the integration by processing a sample order to ensure labels and tracking are generated correctly. For further assistance regarding your ShipNordic account or specific shipping rates, please contact ShipNordic support directly.
-

Rule Integration
28 Nov 2025
Synchronize order data from your e-commerce store and deliver accurate marketing. Description Article no.: 1239 The integration to Rule is included in the PRO subscription How does the integration with Rule work? It is an integration that exports customer data from orders and the customer register to Rule. What is needed to use Rule? The PRO subscription + that you get a subscription with Rule. You do this on their website www.rule.se. Create and retrieve API data on Rule.se Log in to rule.se. Click on your username in the upper right (1) and then on "Settings" (2). Click on the "Developer" tab (1) and then on the "New API key" button (2). The API key is a password of about 30 characters and contains mixed numbers and letters. Click on the copy button to the right of the API key. Log in to the store and go to Settings -> External connections -> Rule. (Contact customer service to have Rule added under External connections). Check the Active box, then paste the API key you created in Rule admin in the "API Key" field and save. Order exportCheck this box for the product prices to be displayed incl. VAT in the mailings from Rule to the end customer. Connection - If the key entered is correct, a link will appear that says "Log out of Rule". This means that the store has connected to Rule. Initial Exports - A setting to enable an export of all customers in the customer register. It also requires that "Export Customer List" under "Event Settings" is enabled. Export order - Enable the export of new orders by selecting "Order has changed" under "Activation" and "Update directly" under "Run. Export customer list - Enable the export of new customers by selecting "Customer has changed" at "Activation" and "Update directly" at "Run. Export Abandoned Carts - Enabling the export of abandoned carts gives you the possibility to remind your visitors who have added items to their carts but not completed the purchase. Show more
-

Single sign-on (SSO) capability for customers. SAML or Oath2. (Additional service)
28 Nov 2025
Let your customers log in to your store with single sign-on (SSO) via SAML or Oath2.Additional service in Abicart Pro, 799 SEK/monthEasy and secure logins with Single Sign-On in Abicart Abicart strives to improve the customer experience for both businesses and consumers by offering innovative solutions and services. One of these services is the ability to offer Single Sign-On (SSO) via SAML or Oath2. This is an additional service for Abicart Pro customers, which aims to simplify and secure the login for customers. Read on to understand how SSO can improve your e-commerce platform.What is Single Sign-On (SSO)?Single Sign-On (SSO ) is an authentication process that allows users to log in to multiple related but independent software applications with a single login. This means that customers do not have to remember multiple usernames and passwords for different platforms, providing a smoother and more user-friendly experience.SSO via SAML or Oath2:Abicart offers SSO integration via two popular and secure standards: SAML (Security Assertion Markup Language) and OAuth2 (Open Authorization 2.0). Both standards enable secure and reliable authentication between your e-commerce platform and third-party services. Benefits of SSO for your e-commerce platform: Improved user experience: by offering SSO, your customers can easily and quickly log in to your platform without having to remember additional usernames and passwords. Increased security: SSO reduces the risk of security issues such as password theft and phishing attacks. Reduced administrative burden: With SSO, you don't need to manage and store multiple login credentials for your customers, reducing your administrative burden and improving data security. Cost and how to activate the service:The SSO service is available as an add-on service for Abicart Pro customers for 799 SEK/month. If you are interested in knowing more or activating the SSO service for your e-commerce platform, please contact us.By offering Single Sign-On (SSO) via SAML or Oath2, you can improve the customer experience, increase security and reduce administrative burdens for your e-commerce platform. If you are an Abicart Pro customer and want to take advantage of these benefits, do not hesitate to contact Abicart customer service to activate the service.
-

Northmill Flo: Show both regular and special prices on the Northmill receipt
27 Nov 2025
It is possible to show both regular and extra prices on the Northmill receipt. This can be achieved by setting up to only export regular price Abicart >> Northmill (NMF) and then create extra prices in Northmill.Because Abicart and Northmill handle prices/price lists differently, only one price is exported: the active price of the product.If the product has an additional price, it is the active price of the product. If the extra price is exported, it is this price that will appear on the receipt. So not both regular price and additional priceWhat to do:1) Set to only export regular prices to Northmill by checking the setting "Always use regular price for exporting items" >> Save.2) Create the campaign in Northmill by following Northmill's instructions:https://supportflo.northmill.com/s/article/Erbjudanden-och-kampanjer
-
Setting up DKIM & DMARC
27 Nov 2025
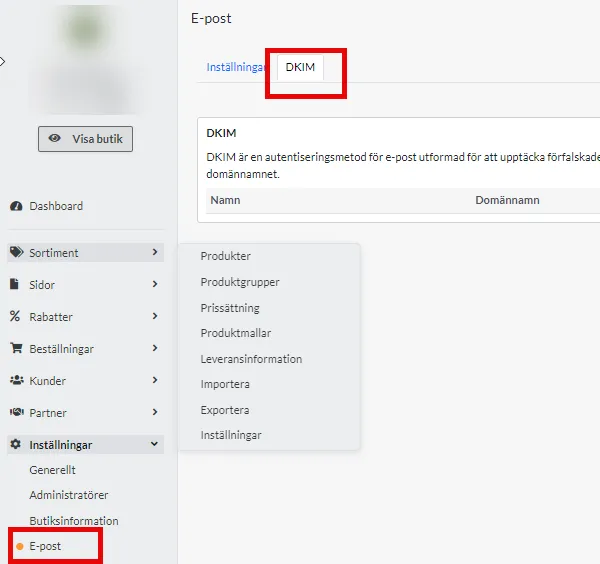
DKIM (DomainKeys Identified Mail) is an email authentication method that protects against email forgery by allowing the sender to add a digital signature to the header of emails. This signature is verified with a public key published in the sender's DNS. Using DKIM improves email deliverability and protects brand reputation by reducing the risk of spam and phishing, making it an essential part of a secure email configuration.To add DKIM, you need to add a setting at your domain name provider. If you do not know how to do this yourself, contact their support.This guide applies if you use Abicart's mail server. If you are using your own email server such as Google, they may already have DKIM and DMARC enabled, check with your provider's support to find out what applies.Add DKIM for the domain you use for emailingStart by creating your DKIM key in Abicart under Settings > Email > DKIM tabClick on Add and select the domain name you use for emailing, and a key is automatically generated in a unique format for your store, e.g. abicart20240131XXXXX._domainkey.Close the pop-up windowClick on the key to open a window with the settings you need to proceed. Copy the name and value.Log in to your domain name provider and add this information to your DNS as a TXT record.More information on how to do this is usually available on your provider's help pages. It is often also possible to contact your DNS provider and let them know the contents of the name and value fields and they will help you with the implementation.5. When DKIM is correctly set up at your DNS provider, it will say Registred = Yes in Abciart in the same place where you retrieved the data.Keep in mind that these types of settings can take up to 24 hours to take full effect.6. When registred has the value YES , click on your domain key and activate the setting so that the value in Active also changes from No to Yes.7. done!Setting up DMARCDMARC stands for "Domain-based Message Authentication, Reporting, and Conformance". It is an email validation method that helps protect your email domain from unauthorized use, such as phishing and spam. It helps reduce the risk of your emails being mislabeled as spam or someone else using your domain to send malicious emails.A DMARC policy determines what happens to an email after it has been checked against SPF and DKIM records.The DMARC policy determines whether a DKIM or SPF error results in the email being marked as spam, blocked, or delivered to the intended recipient.Mail servers can still mark emails as spam if there is no DMARC record, but DMARC provides clearer instructions on when to do so.You create a DMARC policy by adding a TXT record to your DNS with the name _dmarc.Example: _dmarc TXT "v=DMARC1;p=reject" or _dmarc TXT "v=DMARC1;p=quarantine"p = reject means that mail is not received at all, p=quarantine means that mail is received but will probably end up in the spam folder.If you want to receive reports from mail providers about mail that does not meet the DMARC policy, you can add this to your DMARC policy as follows:v=DMARC1; p=none; rua=mailto:email@example.com;There are several DMARC generators you can use if you wish, such as these: https://dmarcian.com/dmarc-record-wizard/ Try our Quick Record Wizard.See also Add SPF record
-

Custom SMTP
27 Nov 2025
By default, Abicart uses its own mail servers to send emails from your store. However, if you want to have more control and visibility over your email delivery and performance, you can use your own SMTP server instead. SMTP stands for Simple Mail Transfer Protocol, which is a standard for sending and receiving email messages over the internet. SMTP servers are applications that handle the delivery of emails from one server to another.You can either use an existing SMTP server with your current email provider or create a new one with a third-party service provider. Some examples of the SMTP service providers are Gmail, Mailgun, Outlook, etc.Once you have an SMTP server that you can use, you need to enable the custom SMTP settings feature in Abicart and enter the details of your SMTP server. Here are the steps to do that:Log in to your Abicart account and go to Settings > Email.On the right column you can find the Custom SMTP settings section. Choose a predefined provider from the drop-down menu or select Other if you want to enter your own details.Enter the host name, port number, username, password, and encryption type of your SMTP server in the corresponding fields. For example, if you are using Gmail as your SMTP server, you can enter smtp.gmail.com as the host name, 465 as the port number, your Gmail username and password in the username and password fields, and SSL/TLS as the encryption type.Most of the provider information is pre-filled by Abicart, so it is just the username and password that should be filled in by you.Click Save changes at the top of the page.Now you have set up your own SMTP server for Abicart. To test your server, you can send a test email from Abicart by clicking on Send test email at the bottom of the custom SMTP settings. Sometimes, you might encounter some errors when using your own SMTP server for Abicart. These errors might prevent you from sending or receiving emails from your store or cause other problems with your email delivery. Here are some common errors that you might encounter and how to fix them:Error: Authentication failedThis error occurs when your email client or our application cannot connect to your SMTP server using the username and password that you provided. This can happen for various reasons, such as:You entered the wrong username or password for your SMTP server.You are using a service that requires an application-specific password or you are using a service that has two-factor authentication enabled, such as Gmail, and you did not create or use one. (More information)Your SMTP server has some security or configuration issues that prevent it from accepting your credentials.To fix this error, you need to check and correct your SMTP settings. Here are some general steps to do that:Make sure that you entered the correct host name, port number, username, password, and encryption type for your SMTP server. If you are using a service that requires an application-specific password or that has two-factor authentication enabled, such as Gmail, such as Gmail, you need to create one and use it instead of your normal password. [This can be resolved by following the steps in the below error information].If you are still getting the error, you may need to contact your email service provider or your SMTP server administrator for further assistance.Error: 534-5.7.9 Application-specific password requiredThis error means that you cannot use your normal username and password to log in to your SMTP server because it requires an application-specific password instead. This is usually the case when you are using Gmail or another service that has two-factor authentication (2FA) enabled for your account. 2FA is a security feature that adds an extra layer of protection to your account by requiring a verification code or a device confirmation in addition to your password when you log in.To fix this error, you need to create an application-specific password for Abicart in your Gmail account or other service provider account. An application-specific password is a 16-digit code that allows an app or device to access your account without using 2FA. Here are the steps to create an application-specific password for Abicart in Gmail:Go to your Google account and sign in with your Gmail username and password.Click on Security in the left sidebar.Under Signing into Google, click on App passwords.If prompted, enter your Gmail password again and click Next.Under Select app, choose Other (custom name) from the drop-down menu.Enter Abicart as the name of the app and click Generate.You will see a 16-digit code that is your application-specific password for Abicart. Copy this code and keep it somewhere safe. You will not be able to see it again after you close the window.Go back to your Abicart account and go to Settings > Email settings.Scroll down to the Custom SMTP settings section and enter the 16-digit code that you copied as the password for your SMTP server.Click Save changes at the bottom of the page.Now you have created an application-specific password for Abicart and fixed the error. You can use this password to log in to your SMTP server and send emails from your store. You can also create more application-specific passwords for other apps or devices that you want to use with your Gmail account.
-

Yotpo & Trustpilot
27 Nov 2025
Integrating Yotpo and Trustpilot with AbicartAbicart gives you the ability to integrate your website with popular review platforms such as Yotpo and Trustpilot. This integration allows you to export your orders to these platforms, where you can enable the option to send out review emails after an order has been placed. Use Automatic Feedback Systems (AFS) Abicart also offers the ability to export your order information to Yotpo and Trustpilot, enabling you to use their Automatic Feedback Systems (AFS) to automatically collect customer reviews. What is AFS? Automatic Feedback Service (AFS) is an invitation method that can be used to automate the collection of service and product reviews. Why is AFS important? This feature automates the process of collecting feedback by sending review requests to customers after a certain period of time, for example after they have received their order. For instance, let’s imagine that you sell electronics online. With Abicart’s ability to connect to Yotpo and Trustpilot (AFS integration), you can set up automated review requests that are sent to customers two weeks after they have received their purchased electronics. This timing allows customers to experience the product before providing feedback, resulting in more insightful and meaningful reviews. How do you enable AFS for Trustpilot and Yotpo in Abicart? Here’s how you can enable AFS for Trustpilot and Yotpo in Abicart: In Trustpilot Business or Yotpo, go to Get Reviews > Invitation Methods > Trustpilot/Yotpo Automatic Invitations (AFS). Copy their unique email/API key and add it to your Abicart account under Settings > External Integrations > Trustpilot/Yotpo. Depending on the settings you have chosen under External Integrations > Yotpo / Trustpilot, you can choose to export the order to them based on the following three scenarios: Option 1: As soon as the order is placed in Abicart Option 2: When the order is marked as paid Option 3: When the order is marked as shipped When the order is sent to Yotpo or Trustpilot, it will trigger an email to the buyers asking them to leave a review. (This is based on your settings in the respective integrations.) Support for multiple stores If you have a multi-store setup within Abicart, you can add separate Yotpo and Trustpilot accounts to each sub-store. This allows you to manage reviews and feedback independently for different parts of your business. For example, suppose you have an e-commerce platform based on Abicart with multiple sub-stores specializing in different product categories, such as fashion, home appliances, and electronics. By integrating separate Yotpo and Trustpilot accounts with each sub-store, you can tailor the review and feedback collection process to the specific needs and characteristics of each sub-store. Note While both Yotpo and Trustpilot allow you to display reviews on your website, it is important to note that the feature under Appearance is limited to the language associated with the selected account. This means that if you have a Yotpo or Trustpilot account in English, the reviews will only be displayed in English on your website. This distinction is an important difference between the two features found under Settings and Appearance.
-

Shipmondo
27 Nov 2025
Shipmondo is an e-commerce logistics service that offers companies the opportunity to manage their shipping and delivery processes efficiently.Integration with Shipmondo TA is included at no extra cost in Abicart Pro.Things to consider before activating the integration:Weight must be entered on all products. We cannot export orders to Shipmondo without weight.in addition to the usual details, the following fields are mandatory if you want to create customs documents for exports:HS NumberCountry of OriginSKU NumberYou must select a package template on the delivery method. Here's more information >>Your Shipmondo account needs to have funds at all time. If the balance of the account is emtpy, orders won't be able to export. Get a subscriptionGet a subscription on the Shipmondo website: shipmondo.comActivate the integrationSettings that need to be made at ShipmondoLog in to your Shipmondo account and go to Settings -> API-Access. If there are no API details already entered, click on the button "Generate API keys". You will then see a username (API User) and a password (API Key). There is more information on how to do this in the Shipmondo manual.Settings that need to be made in AbicartThe data created in the step above needs to be entered in the store under Settings -> External connections -> Shipmondo TA. If "Shipmondo TA" is not available under External connections in your store, contact Abicart's customer service and we will activate it for you. Account settingsAPI users - Enter data from the "API User" field in Shipmondo.API Keys - Enter information from the field "API Keys" in Shipmondo.Labels - Choose whether the label type should be printed as PDF or ZPL. Settings on the delivery methodsYou also need to activate the integration on the delivery methods you want to use Shipmondo. There is a block at the bottom of each delivery method for this. Go to Settings -> Shipping -> select delivery method and click on it to edit.Scroll down to Shipmondo TA - Event settings. Here there are three different headings:- Export order- Export shipment- SettingsHere you can choose to export the entire order (Export order) or divide each order into different shipments (Export shipment). If you do not use partial delivery or do not know which one to use, we recommend choosing "Export order". You should not have both active at the same time. Export orderActivation - Recommended setting "The order is registered".Execution - select "Update directly" when everything is ready.We recommend that you make the following settings the first time and then click the save button. This means that the integration is not activated on the delivery method, but it is possible to select the carrier and set up everything before activating the function.Then you will see new options for selecting the Carrier. Select the carrier you want to use and then click the save button again.Then a new setting for Transport service will appear.Select the transportation service and click the save button again.A new setting for Package type will appear. The box under package type is a setting for using your own agreement with the carrier when booking a delivery. If you do not check the box, the Shipmondo agreement is the default.When all the settings above are done, do not forget to activate the export of the orders by selecting "Update directly" at "Run" and save. Export shipmentActivation - Recommended setting "Shipment is sent".Execution - select "Update immediately" when everything is ready.We recommend that you make the following settings the first time and then click the save button. This means that the integration is not activated on the delivery method, but it is possible to select the carrier and set up everything before activating the function.Then you will see new options for selecting the Carrier. Select the carrier you want to use and then click the save button again.Then a new setting for Transport service will appear.Select the transportation service and click the save button again.A new setting for Package type will appear. The box under package type is a setting for using your own agreement with the carrier when booking a delivery. If you do not check the box, the Shipmondo agreement is the default.When all the settings above are done, do not forget to activate the export of the orders by selecting "Update directly" at "Run" and save.Settings blockIn this block, the settings may look slightly different depending on the transport service you have chosen. Each transport service offers different settings for delivery points and services. We list the ones available in your Shipmondo account and/or the selected transport service.ServicesTo send the tracking number from Shipmondo to the recipient, tick "Personalised e-mail" and "Personalised SMS". Then follow Shipmondo's instructions: Link to manual.Shipping Templates: Abicart & Shipmondo IntegrationShipmondo allows only one shipping country per shipping method. If you need multiple countries or configurations, use Shipping Templates. This two-step process lets you define as many templates as you need in Shipmondo, then import and assign them in Abicart.Step 1: Create Shipping Templates in ShipmondoLog in to your Shipmondo account.Navigate to Shipments → Templates.Click + New template and configure:Sender countryDelivery countryWeight rangesPackage dimensions / typesCarrier settingsSave each template.Read more about shipment templates:https://help.shipmondo.com/en/articles/1834976-shipment-templatesStep 2: Activate & Assign in Abicart2.1 Enable Shipping TemplatesIn Abicart, go to Settings → External Connection → Shipmondo TA.Toggle Activate Shipping Templates.Click Save.All your Shipmondo templates will now be imported.2.2 Assign Templates to Shipping MethodsGo to Settings → Shipping → Edit shipping methods.Choose the method you want to link (e.g. “Standard Shipping”).Under Shipmondo TA → Action Settings, select one or more of the imported templates.Click Save.How It WorksWhen an order is placed, Abicart cross-references:Order weightShipping countryDelivery countryPackage type / dimensions…with your selected Shipping Template. The matched template’s settings are then exported to Shipmondo for label creation and rate calculation.Restrictions & Best PracticesOne carrier per shipping methodTemplates only apply to the carrier chosen in the method’s settings—no mixing between carriers.Best-fit template by weightIf multiple templates exist for the same country, Abicart picks the one whose weight-range best matches the order.Package typesOnly consider the package types you’ve added (up to 2 types per method).SummaryCreate all required templates in Shipmondo (Shipments → Templates).Activate Shipping Templates in Abicart (Settings → External Connection → Shipmondo TA).Assign each template to your Abicart shipping methods (Settings → Shipping → Edit shipping methods → Shipmondo TA).Your store can now support multiple countries, weight-based rates and custom packaging rules—automatically handled via your Shipmondo templates.
-
Multi-store system
27 Nov 2025
Multi-store system is a feature that allows you to create and manage multiple sub-stores within the same system, which is cost-effective for running multiple online stores. It is suitable for companies selling to different countries, individuals and retailers. The feature is available for Abicart Pro subscription. The cost varies depending on the number of sub-stores and requires an Abicart Pro subscription. All sub-stores can have different looks, themes and domain names. The feature is intended for one company with multiple stores and not for multiple companies with different stores. Please note that it is not possible to undo the activation of the multi-store system or merge existing stores into a multi-store system. To activate the multi-store system, please contact support. Read more about the multi-store system here https://www.abicart.com/explore-abicart/manual/multi-store-system/multi-store-systems-overviewAdvantages of the Multi Store System: Cost-effective: Run multiple online stores within the same system, reducing costs compared to having separate systems for each store. Easy administration: Manage all sub-stores from one central location, making it easier to administer and update the stores. Flexibility: Each sub-store can have a unique look, theme and domain name, allowing you to customize each store according to your target audience and market. Customized assortment: Choose to display all or part of the assortment in each sub-store, making it easy to customize products for specific customers or markets. Customized payment and delivery methods: Choose which payment and delivery methods to display in each sub-store, allowing you to offer the right options for different customer groups. International sales: Create sub-stores for different countries to customize the assortment according to local needs and preferences. B2B and B2C: Ability to create separate stores for individuals and retailers, making it easy to offer different products, prices and conditions for different customer groups. Consolidated accounting: Book all orders in the same place, regardless of which online store they come from, simplifying administration and accounting.
-
VAT settings for integration with Visma SPCS
27 Nov 2025
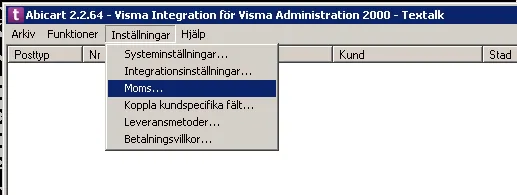
This manual article will guide you through setting up VAT for products with different VAT rates in our Visma SPCS integration program. Follow the steps in this article to ensure that your products with different VAT rates are registered correctly in Visma SPCS.Make the following settings in the integration program:Then make the corresponding settings for VAT in VismaSPCS. This example is from VismaSPCS 2000, but it looks similar in 1000. Do you sell to several EU countries with different VAT rates?Make these settings:Read more about US here https://www.vismaspcs.se/visma-support/visma-eaccounting/se/content/online-help/sales-oss.htm
-

Product feeds
27 Nov 2025
Settings for product feeds can be found under Settings >> Apps >> Product feedsOn this page in admin you will find settings for product feeds for Google Merchant Center and Facebook Catalog:SettingsWhich field should be used for product descriptions?Choose between description, introductory text or both introductory text + descriptionShould product type either be current product group (deep) or top product group (shallow)?Select the depth of the product group you want to include in the flow. See example below:A product belongs to product group 3. If you want product group 3 to be sent in the product flow, select the setting "Deep".If you want product group 1 to be included in the flow, select "Shallow" instead.Google Merchant CenterHere you can read more about Product Feeds: Google shopping.Facebook CatalogHere you can read more about Product Flow: Facebook Catalog
-

Integration with Mamut
27 Nov 2025
How does the integration with Mamut work?You need to download and install a Windows application under Settings -> External connections -> Mamut. Once this is done, you can use that application to send information between the systems.The software for integration between Textalk Webshop and Mamut mainly performs the following functionsfunctions:Retrieve new customers and transfer them to MamutRetrieve new orders and transfer them to MamutUpdate stock status (transfer stock status from Mamut to Textalk Webshop)Update prices (transfer prices from Mamut to Textalk Webshop)Transfer item registers between Mamut and Textalk Webshop (both ways)In addition, an existing customer register in Mamut can be transferred to Textalk Webshop.System requirementsTo be able to use the program for Integration of Textalk Webshop and Mamut BusinessSoftware you need a computer with the following software:Mamut Business Software
-
Integration with Fiken
27 Nov 2025
-

Tip: Recalculate currencies in Google Sheets with the GOOGLEFINANCE function
27 Nov 2025
Abicart supports automatic currency conversion via the European Central Bank (ECB). This means that when a customer makes a purchase on the platform, the price of the product can be automatically converted from the currency used by the seller to the currency in which the customer wishes to pay. Exchange rates are taken directly from the ECB and are updated regularly to ensure that prices are up-to-date. Although this feature is available, it is sometimes necessary to recalculate currencies in your own files before importing. The quickest way is probably to use Google Sheets and the GOOGLEFINANCE function: GOOGLEFINANCE can be used to convert currencies in csv files. To do this you can use the formula GOOGLEFINANCE together with the parameter "price" and specify the currency you want to convert from and to.This is what the formula looks like:=GOOGLEFINANCE("CURRENCY:" + from_currency + to_currency, "price")Where "from_currency" is the currency you want to convert from (e.g. "USD" for US dollars) and "to_currency" is the currency you want to convert to (e.g. "EUR" for Euros).Here is an example of how you can use GOOGLEFINANCE to convert a currency in a csv file:Open a new Google Sheet and import your csv file with the currencies you want to convert.Add a new column in the worksheet where you want to display the converted currency.Type the formula =GOOGLEFINANCE("CURRENCY:" + A2 + B2, "price") in the first cell of the new column, where A2 and B2 are the cells that contain the currency you want to convert from and to.Press Enter to see the result of the conversion.Drag the lower right corner of the cell to fill the formula in the rest of the column.Please note that GOOGLEFINANCE can only retrieve financial information in English and may be limited to certain financial information depending on your location. It is also important to remember that financial information may be subject to delays and may be inaccurate or incomplete, so it is important to verify the information before making decisions based on it.Read more about GOOGLEFINANCE here https://support.google.com/docs/answer/3093281?hl=en
-

Create an SPF record on your domain in Abicart
27 Nov 2025
These instruction applies if you use your own domain and Abicart SMTP server to send emails from Abicart. If you use Custom SMTP settings, you do not need to add Abicart SPF.Add an SPF record to your DNSFollow the instructions below to add an SPF record to your domain. Please note that it can take up to 24 hours for the changes to be activated.To add an SPF record for a domain, you first need to access the DNS configuration for the domain. If you use a web-based DNS service to manage your domain, you can usually add an SPF record by logging in to your account and navigating to the relevant section for adding DNS records.If you have your own DNS server, you can add an SPF record by editing the DNS configuration files for the domain.Do this:Once you have accessed the DNS settings, create a new TXT record.In the "Name" field, enter the hostname to which you want to apply the SPF record. This is the one after the @ sign in your email address. So if your email address is namn@exempel.com, you should add an SPF record for example.com.Enter the following text in the "Value" field:v=spf1 include:spf.abicart.com -allSave the record and wait for the changes to take effect. This can take up to 24 hours, depending on your DNS provider.Keep in mind that SPF records can be quite tricky, and it's important to make sure you have the right syntax and formatting. If you are unsure whether your SPF record is correct, you can use an online SPF record checker to verify it.NOTE! You also need to include your own email provider in this SPF record, depending on the provider you use. Some examples:one.com(read more here)v=spf1 include:_custspf.one.com include:spf.abicart.com -allgmail(read more here)v=spf1 include:_spf.google.com include:spf.abicart.com -allLoopia(read more here)v=spf1 include:spf.loopia.se include:spf.abicart.com -allWhat does this change mean?By adding this SPF record, you are telling email servers that you authorize Abicart to send emails on your behalf. For example, order confirmations sent to end customers.If something goes wrong along the way and the order confirmation does not reach the end customer, the shop owner will receive an email informing them of this and an error message about the reason.The error message displayed in the email can look different but here are two different examples: ==================================================================The MAIL FROM domain [your_domain] has an SPF record with a hardfail policy (-all) but it fails to pass SPF checks with the ip:[192.121.104.215] (Abicart's IP address). To best protect our users from spam and phishing, the message has been blocked. ===========================================================SMTP error from remote mail server after end of data:This mail is unauthenticated, which poses a security risk to thesender and Gmail users, and has been blocked. The sender mustauthenticate with at least one of SPF or DKIM. For this message,DKIM checks did not pass and SPF check for [your_domain] did notpass with ip: [192.121.104.215] (Abicarts IP address).===========================================================If everything is set up correctly, your email addresses will get a green mark under Settings > Email, which means you are ready.Read also about how to set up DKIM and DMARC here.
-

Payment methods
27 Nov 2025
Abicart supports most of the established payment solutions on the market.How to add a payment method:Here are articles on how to add and set up the payment solutions available in Abicart.Read more
-
How to upgrade your subscription
27 Nov 2025
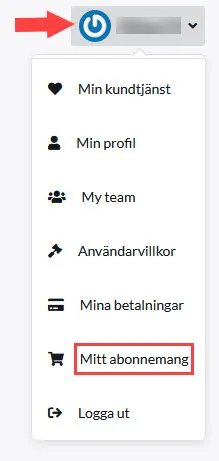
You can upgrade the subscription yourself whenever you want. It's quick and easy and can be done directly in the shop. Upgrade from GO to PLUS, or GO/PLUS to PRO.Here's what you do:1) Log in as usual (must be done by the shop owner)2) Click on your name in the top right corner3) Click on My subscription4) Click Switch to this package for the subscription you want to switch to. When a green box appears around the package, you have selected it:5) Go to the bottom of the page and select Proceed to payment6) Extend as usual by choosing card or invoice**You now pay the difference between e.g. PLUS & PRO, and only for the period, you have left of your current subscription.Done!To downgrade a subscription, i.e. change from e.g. PLUS to GO, please contact customer service.If you have problems renewing a subscription, check that your profile contains both company name and VAT number, then try again.
-

Print settings Abicart ZPL Print App - Postnord integration
27 Nov 2025
How to set up print settings for the Abicart ZPL Print App - Postnord integration. Once you have installed Abicart ZPL PrintApp for Windows, you will need to make some settings on your computer for the print window to open automatically when you select "perform function on selected orders" in Abicart admin. Tip: In some cases, printing may not start correctly if you already have a pop-up window open in your browser. Please close any pop-ups before sending your EDI shipment. We are aware of the problem and will fix it in the next version of the software.Here's what you do:0) Install Abicart ZPL PrintApp for Windows and export an order to Postnord1) Orders >> Orders >> Produce an order exported to Postnord2) Select the order >> Execute function on selected >> EDI labels. The file will be downloaded.3) Open the file explorer4) Select the file (1)5) Select Open with (2)6) Select choose another app (3)7) Select Abicart ZPL Print App + tick the box + OK8) Repeat: Select order >> Perform function on selected >> EDI labelsNow the window below will open (see picture).Click on (7) and select (8)9) Repeat for the third time: select the order >> Perform function on selected >> EDI labels 10) Then select the printer for printing and save.Link to manual: Postnord Send Direct - Postnord TA
-

Delete an administrator
27 Nov 2025
If you are the owner of a shop, you can delete & add administrators.How to delete an admin account in your shop 1) Log in to admin - https://www.abicart.se/ 2) Go to Settings >> Administrators. 3) Click on the trash can icon to delete. (If you change your mind after deleting an admin, you will have to send them a new invitation)
-

Connect your webshop with Northmill Flo (formerly MoreFlo)
27 Nov 2025
Synchronise the flow of in-store and online sales with the Northmill Flo POS system.The connection to Northmill Flo is included at no extra cost in the PRO subscription if Northmill is your only ERP.Contents- Contents- Important info- Which settings should you choose?- Onboarding - Activate the integration- Troubleshooting- Integration settings- Integration event settings Important infoRules for item numbersUse only letters (a-z), numbers (0-9), hyphens (-) and underscores ( _ ).Many external systems (transport systems, financial and cash register systems, etc.) do not allow certain special characters in the item number. E.g. space, & sign, hash tag, dot, comma, etc. Therefore, avoid using special characters.The following can be synchronized between Abicart and Northmill POS systems:Products* (name, article number, GTIN/EAN = barcode, SKU = SupplierArticleNumber)PricesCustomer recordsStock balance*Product groups and images are not exported.Deleting a product in Abicart will delete the product (and its customer choice variants) in both Abicart and Northmill. If you want to delete a product in Abicart, but keep it in Northmill, you first need to break the sync between the systems. Do this by deletin the product number (art.nr) of the product (and of the customer's choice) >> save. Then proceed to delete the product. Which settings should you choose? The integration can be set up in several different ways. The biggest question is:- Where do you want to manage your stock balance?Edit inventory balance in AbicartEdit stock balance in NorthmillThe event settings are then based on the choice of inventory management. Read more about the different settings under "Onboarding" and "Integration settings". Onboarding - How to activate the integration1) Sign an agreement with NorthmillWrite down the username and password, known as API keys, to be entered into Abicart.2) Upgrade your store's subscription to Abicart PRO if you do not already have PRO.3) Contact Abicart support to add the integration under Settings >> External connections if you do not already see "Moreflo" under Settings >> External connections.4) Add the API keys under Settings >> External connections >> Moreflo >> Account settings >> Save.5) Select Inventory management >> Save*Select Abicart or Northmill (Moreflo). Not the "Both" option.6) Set up Sales and Business Income AccountsFill in the VAT rates relevant to your store. Select options from the drop-down list:Item = GoodsService = ServicesFee = ServicesExample: If you only sell products with 25% VAT, select "Goods 25% VAT" for "Item, 25%. If you also sell books, you also select "Goods 6% VAT"."Fees" corresponds to VAT for shipping and must be selected for the integration to work. Here you select "Services 25% VAT.7) SaveSave the settings you have made so far.8) Review the message at the top of the integration pageDoes it say that some products use the same item number?Duplicates are best dealt with immediately. Link to the manual: Fixing your article numbers - Northmill integrationAre there any products with missing item numbers?Products with missing item numbers will not be exported until they get a unique item number. If it is OK that these products are not exported when activating the integration, you can proceed to the next step. If you have time and opportunity, it may be nice to fix all item numbers now, so that all products in Abicart have a unique item number when the integration is activated. 9) Give Abicart and Northmill the same stock balance before you start using the integration. When you activate the integration, it is important that both systems have the same stock balance. If you already have items in both Abicart and Northmill, start with the system whose stock balance best matches your actual stock balance. After the next inventory, update the system you have chosen for inventory management.We recommend correcting the inventory balance in Abicart so that the inventory balance there matches best. To then send the inventory balance Abicart >> Northmill and overwrite any inventory balances in Northmill, do as follows:Export inventory balance Abicart >> Northmill.After the end of the day when the cash register will not be used for 12-24 hours: Activate the integration >> Save >> Select Inventory Management Abicart >> Activate product export >> Go to Initial exports >> Check"Export all products" >> Save >> Wait about 12 hours (12-24 hours if you have many thousands of products).The export needs to be completed before products are sold at the checkout again, otherwise you risk getting a discrepancy in the stock balance after all.When the import is complete, go back into Abicart >> Now you can activate the event setting according to steps 10-11. If you are going to have inventory management Northmill, first change the inventory management, then set the event settings according to steps 10-11 below. Remember to Save. NOTE! If it is the stock balance in Northmill that is most accurate, you can of course export the stock balance from Northmill to a file and import it into Abicart with the usual product import, but if you have products with the customer's choice, it will be a lot of work to customize the export file from Northmill to how the file needs to look for importing the customer's choice in Abicart. There is no setting to "retrieve stock balance NMF>>Abi" via the integration. 10) Read the paragraph about the integration settings/event settings. Make sure you have chosen the right settings and understand the flow of the integration you are about to activate. 11) Enter the correct event settingsThe event settings you choose depend on your choice of inventory management:Inventory Management AbicartSelect Inventory management AbicartEnable Export products when added or changedEnable Import cash receipts (stock changes)Set Scheduled synchronization every hourEnable integration with Northmill inventory managementSelect Northmill inventory managementEnable Export products when adding or modifying themActivate Export order 12) SaveReview all settings >> Save 13) Test the integrationPlace a test order in Abicart & make a test purchase in Northmill:a) Select two products you want to test buy: one in Abicart & one in Northmill.b) Record the item number & stock balance of the product before and after the test purchase so that you can compare and see that the sync works. Copy the example below and fill in the item number and stock balance of the test product:ExampleTest purchase in Abicart Art.no. ABCAbi order number: XStock balance Abicart Before: 10 piecesAfter: 9 pcsStock balance NorthmillBefore: 10 piecesAfter: 9 piecesTest purchase in NorthmillArt. no. CBANMF order number: XStock balance NorthmillBefore: 5 pcsAfter: 4 piecesStock balance AbicartBefore: 5 piecesAfter: 4 piecesc) Buy one product in the webshop - place a test order.d) Buy the second product at the Northmill checkout.e) Wait for 1 hour.f) After 1 hour, check the products' stock balance again - has the product's stock balance been updated correctly in both Abi and NMF?Fill in the test purchase template. TroubleshootingHas the stock balance not been synchronized?- Double-check that the product has exactly the same item number in NMF as in Abi. The item number must not contain any spaces or other special characters.- Does the product have the customer's choice? If so, all variants must have a unique item number.- Has it been 1 hour since the purchase?If everything above looks good, create a case via My Customer Service. Describe the problem and always include the item number / order number as an example. Feel free to include the test purchase notes in the case. Integration settings Here we go through the integration settings:Settings >> External connections >> Moreflo (Northmill was previously called Moreflo).*If you do not see Moreflo as an option under external connections: Scroll up a bit and follow the list "How to get started".Remember to SAVE with the green button when you change a setting. The settingsActiveTo access all integration settings, check this box >> Save. The synchronization between the systems will only start when you activate the event settings.Account settingsHere you enter the API keys provided by Northmill (Username and password) >> SaveSpecial productsThese fields are automatically filled in. Do not edit manually. Warehouse management (warehouse master)Select the system where you want to manage the products' stock balance:- Abicart or Moreflo (Northmill).*We advise against using "Both". It is always most stable to let one system decide. Sales and business income accountsFill in the VAT rates relevant to your shop. Select the appropriate option from the drop-down list.Item = goodsService = ServicesFee = ServicesExample: If you only sell products with 25% VAT, select "Goods 25% VAT" for "Item, 25%."Fees" corresponds to VAT for shipping and must be selected for the integration to work. Here you select "Services 25% VAT. Initial exports--> Export all productsThis setting is made last of all, if assortments are to be exported (see picture below).*The setting requires that you have "Export products" activated.How to activate the setting:Check the box >> SaveActivate only if you want to send all products Abicart >> Northmill (if you have Abicart as warehouse master, the stock status will also be sent).NOTE! Product information in Northmill will be overwritten with product information from Abicart. Only the article numbers in Abicart and Northmill will be updated. If a product only exists in Abicart, it will be exported + created in Northmill. Part numbers that only exist in Northmill remain untouched. --> Export all customersHow to activate the setting:Check the box >> SaveActivate only if you want to transfer all customers Abicart >> Northmill*The setting requires that you have "Export customer records" enabled. Event settingsExport product when adding/changingActivation = Inactive / Product updated (including stock balance)Run = Inactive / Update directlySwitch to 'Product updated' and 'Update directly to activate the setting.*With this active, products are exported Abicart >> Northmill when added/changed. The setting is recommended to ensure that the customer's choice of products is created correctly. Exporting products Abi >> NMF saves you time by not having to edit the product in two places:The product is uploaded in Abicart with all the info it should have in the webshop. The information that can be exported to Northmill does so (name, item number, price, etc.). The product can then be supplemented with other settings in Northmill, but keep in mind that everything that can be exported via the integration needs to be edited in Abicart and exported to Northmill. For example, if you change the product name in NMF, Abicart will overwrite it the next time the product is exported Abi >> NMF. Export customer listActivation = Inactive / Customer.(changed|created|deleted)Execution = Inactive / Update directly*Keep inactive if you do not want to export Abicart customer records >> Northmill. We recommend starting the integration with this setting inactive. You can always activate it later if you want to synchronize customers. Export orderActivation = Inactive / Order changedExecution = Inactive / Update directly*Activate only for Northmill (Moreflo) stock management Product importsActivation = Inactive / Scheduled activationRun = Inactive / Scheduled (enter chronstring) *Then set e.g. 1 time/hour *Products are imported as individual products. If you have products in Northmill to be posted as customer choices, you cannot import them NMF >> Abicart. Products need to be added in Abicart to end up as Main product with customer choice variants. Either by importing the customer's choices, or by creating them manually in admin. Read more about customer choices here. Importing an order*Used to import orders created manually in Northmill. NOT for importing cash sales. To synchronize stock balance, the setting "Import cash receipts (stock changes)" is used.Activation = Inactive / Scheduled activationRun = Inactive / Scheduled (enter chronstring) *Then set e.g. 1 time/hour Option = Enter the payment method* to be registered for the order import*Create a payment method called e.g. Northmill invoice which will remain inactive in Abicart. It only exists to give the order imported from Northmill a payment method so that the order is created correctly. Importing cash receipts (stock changes)*This setting is only visible in Abicart inventory management.*It is this setting that is activated to synchronize stock balance Northmill >> Abicart during inventory management in Abicart.Activation = Scheduled activationExecution = Scheduled (enter chronstring) *Then set e.g. 1 time/hour Options*Used in specific cases IF you want to import previous receipts (since before the integration was activated). Import all receipts created since - specify time range (7-90 days)Import historical receipts - Check the box to enable >> Save the integration pageNOTE! This setting is used in exceptional cases and with caution.
-

Set up Bonusway
27 Nov 2025
Results-based marketing via Bonusway. What is Bonusway? Bonusway is a cashback site that offers results-based marketing and generates new customers and more purchases for online stores. The Bonusway marketing channel is available for those who have a Textalk Webshop. Activate Bonusway in the shop Connect your store by adding your promotion ID (victim ID) directly to your theme. You can find your Offer ID in the Bonusway user interface. Go to Appearance -> Themes -> select your theme, edit. Then go to the Add-ons tab -> Bonusway and enter the Offer ID in the field. Note that if the shop has several active currencies, enter a "Offer ID" for each currency. Each currency has its own tab.
-

Connect your webshop with Sello
27 Nov 2025
With Sello, you can sell on marketplaces such as Amazon, CDON, Tradera, Ebay, Fyndiq and Miinto. In order to create the link between Abicart and Sello, you first need an account with Sello. Once you have your account, it's time to connect your webshop to Sello. Then you will need your Store ID and an API key, both of which can be found in the Abicart admin.Here's what you do:Log in your admin.Copy your Store ID as you see on the left, at the top of the menu.The next step is to create an API key.Log in your adminGo to: "Settings" -> "External Connections".Click on: "Edit" in the box called "API Keys".Click on: "+ Add".Tick the box called: "Active".Give your key a name and a description. For example, "Sello".Click on: "+ Add".Copy your created key.Once you have both your Store ID and an API key, you can establish the connection in Sello.Here's how to do it:Log in to Sello.Go to: "Settings" -> "Web shops" and find "Abicart".Click on: "Connect Now!".Enter your ID and your API key.Now everything is ready!The link is included in the Go, Plus and Pro price plans.
-

Sendify
27 Nov 2025
Cooperation with the transport service SendifyWhat is Sendify?We have no integration with Sendify, but you use the service independently from Abicart.Sendify is a logistics tech company that offers small business owners a simple and cost-effective shipping solution - so less time and money can be spent on logistics and more on driving business. Uniting technology with logistics, Sendify offers, since 2015, a TransportManagement System (TMS) that brings together business-critical logistics functions on a single web-based platform. The aggregated buying power of over 6,000 companies allows Sendify to offer competitive pricing, a free TMS, access to competitive contracting, and small business owners only pay for what they ship. With Sendify, business shipping simply doesn't have to be that difficult.You can then use Sendify to compare the costs of different transport companies.For more information about Sendify and our partnership, click here. Set up an API connection to Sendify To connect your shop to Sendify, create an auth token in the Abicart admin panel. The token is the API key that you use in Sendify. 1. Open Settings >> External integrations >> Abicart API >> 2. Click on ‘Select auth tokens’ >> Add3. Give your auth token a name, for example ‘Sendify’. You can also add a description.4. Click on ‘Create auth token’ to generate the key.5. Copy the value under “Token”. This is your API key. Enter it and your shop ID in Sendify. Your shop ID is displayed at the top left of the Abicart admin panel.
-

Integration with Visma eEconomy
27 Nov 2025
Export items, customers and orders to Visma eEconomy. What is Visma eEconomy? Visma eEkonomi is an online accounting software. Invoice digitally and connect eEkonomi Smart with the bank and much of the bookkeeping is done automatically. Then you approve with just one click. Visma eEkonomi senses how your customers want their invoices and automatically sends them via letter, pdf or e-invoice. You don't need to frank and post invoices - the software does that for you. In other words, invoice less and get paid more. Supplier invoices are interpreted by Visma eEconomy, and all you have to do is approve them. It doesn't get any more efficient than that. Do you use Visma Administration 1000 or 2000? Read about that integration hereGet started with Visma eEconomyIntegration to Visma is included in the Abicart PRO subscription.First purchase a subscription on the Visma website. You then order the additional service "Link to Visma eEkonomi" under "My subscription".Activate the integration option in Visma eEkonomiTo be able to link Visma eEkonomi with Abicart, the integration option must be activated in Visma eEkonomi. Do this:Log in to your account in Visma eEconomi.Under the menu on the left you will find "Options", select this.Then select "More options" and scroll down to "Visma Integrations"Select this and press "Activate".Connect Abicart Webshop to Visma eEkonomiGo to Settings > External Connections > Visma eEconomy (eAccounting)Click on the link Connect to "Visma eAccounting". You will now be redirected to a Visma page where you can log in with your Visma eEconomy login details.After logging in you will be taken to a page titled "Request for Permission", here you need to grant the integration access to Visma eEconomy by pressing the "Allow" button.You will now be directed back to Abicart - there should now be your company name in VismaeEconomi under the heading "Connection".This is what it looks like when your Abicart is connected to your company in Visma eEkonomi:The next step is to make sure that there are 5 items in Visma eEkonomi for shipping. You need to create these yourself in Visma eEkonomi.1. ShippingIn order for the freight to be recorded correctly, you first need to create an article account for freight. You do this here in Visma eEkonomi:Then you create an article for shipping. This article should have the article account "Shipping" that you just created.Then enter the item number for shipping in the Abicart settings.Do similarly for Cash on Delivery, Transaction Fee, Discounts.2. Gift cardsFor other payments, which can only be gift cards, you need to create an item account for gift cards and then create an item with this account.For gift vouchers, choose an account that is not shown on the VAT report, for example, choose account 2420 (advances from customers). You can also choose account 2421 (unredeemed gift vouchers) if this account is activated in the chart of accounts.Next, create the item and select the gift card item account as shown in the image below.In the example below we have specified that when a new customer registers in Abicart and is then transferred to Visma eEkonomi, the payment term of the customer should be set to 10 days net.Under Payment terms in Visma, you link a payment method in Abicart (the one on the far right) to a payment term in Visma. It could look like this:In our example, this means that if a customer has chosen to pay the order by Swish, the payment term in Visma will be set to "10 days net". What is in the menu is what the payment term will be in Visma, what is on the far right is what payment method it corresponds to in Abicart. Under Delivery terms in Visma, you link a delivery method in Abicart to a delivery term in Visma. What is in the menu is what should be entered in Visma and what is on the far right is what the delivery method is called in Textalk Webshop. You could create a delivery term in Visma called "Pick up" and link this to "Pick up your order at Fyndiga Djur". Similarly, you could add delivery terms in Visma that match the other delivery methods in Abicart.Under Documents in Visma, you specify what the integration should add to Visma eEkonomi when an order in Abicart is transferred to Visma eEkonomi. What is in the menu is the type of document in Visma, what is on the far right is the payment method in Abicart. Visma eEkonomi handles 3 types of documents, "Order", "Invoice draft" and "Order paid by credit card".Orders and draft invoices are transferred to Visma eEkonomi and must then be processed manually. An "Invoice paid by credit card" creates a paid invoice in Visma eEkonomi and records this as a single entry on the card collector. When you receive money from the card redeemer, this should be recorded as a receipt from the card redeemer. Event settingsUnder Event settings, you set when things should be transferred to or from Visma. If there is no entry under this heading, you must click the save button once first. Then the settings will appear. It will then look like this:Export orders: here you specify what should happen when an order is registered in Abicart. In our example, we specify that as soon as the order is registered in Textalk Webshop, it should be transferred to Visma eEkonomi (it may take a few minutes even if it says "Update immediately").Export article when adding/changing: Here you specify what should happen if an article is updated in Abicart. You can choose to transfer the article to Visma eEkonomi. However, you should not activate both export and article import at the same time but choose one of them.Article import: Here you can specify that Abicart should periodically retrieve article information from Visma eEkonomi. You should not activate both export and article import at the same time but choose one of them. In our example, we have specified that we want to retrieve article information from Visma at 10:10 every day (see picture above).Export customer list: here you can specify that Abicart should periodically transfer customer information from Abicart to Visma eEkonomi. You should not activate both "Export customer list" and "Import customer" at the same time but choose one of them.Import customer: Here you can specify that Abicart should periodically retrieve information about new and updated customers from Visma eEkonomi and add them to Abicart. You should not activate both "Export customer list" and "Import customer" at the same time but choose one of them.
-

Sale of downloadable files
27 Nov 2025
You can sell downloadable files with Abicart. These can range from software and documents, to music and video files. If the buyer has a login account, they can log in to the store, where they can see all their previous orders and download files they have already purchased. As a shopkeeper, you can decide how long a particular file should be available to the customer.By default, the maximum space is 20 MB per file. For customers with a PLUS subscription, we now offer a maximum of 50MB. PRO customers can get access to upload a maximum of 100MB files. If you need more space than that, you can put the files on a dedicated server. We protect your files from public access using an encryption method. The maximum size per file here is 300 MB. Larger files must be split into several smaller ones.Please contact customer service if you need to change the upload size, and if you have an active PLUS/PRO subscription.The downloadable file is emailed to the customer when the order is marked as paidIf the "Downloadable files" tab is not visible in the admin, please contact customer service and we will activate the feature for you.Create a downloadable itemFirst create a product as usual under Products -> New product. Note that you must create the product before you can add files.Then click on the "Downloadable files" tab, and then on "New file".There are two ways to use this feature:Upload a file - Select a file from your own computer and click "OK". The file will then be uploaded to the product. The maximum file size is 10 MB/file.Enter a URL (external link) - If you want to upload files from your own server, enter the full address (URL) of the file, e.g. http://min-domän.se/filer/nedladdningsbar_fil.pdf. The file must be available on the server for download without password protection. When the customer buys this file, we will encrypt the real URL.Limit the time the file is downloadable - If you want to limit the time the file is available for download after purchase, enter it in this field. You enter an integer from one (1) upwards for the number of days the file will be available for download.
-

What is an SSL certificate?
27 Nov 2025
What do I need to do to get HTTPS and for the page to be marked as secure in the browser?What is SSL encryption?SSL is included in our platform and is activated in the store as soon as you start a subscription.SSL stands for Secure Sockets Layer and is a security service for your shop that ensures that all the information your customers fill in themselves (for example, in various forms at login and checkout) is passed on as encrypted information to databases and payment systems.It is an important addition to have so that your visitors and customers feel safe. Many modern browsers automatically block pages that don't have SSL, which makes it extra important.How can you tell if a page has SSL?You can see whether a page is encrypted or not in front of the address in your browser's address window. If you see a padlock, there is an SSL certificate. The addresses of pages with SSL certificates always start with "https://".This domain does not have an SSL certificate:This domain has an SSL certificate (https):Important information about SSLSSL only works if you have your own domain associated with the store. SSL cannot be activated if you only have a domain through us e.g. "w65116.shop.abicart.se".SSL only works with our responsive themes. Not with the classic theme. Are you getting a warning on your site even though you have purchased SSL? Scroll to the bottom of this page to read about what could be causing it.Don't forget to change to HTTPS in Google Analytics after activationIf you're using Google Analytics, you'll need to make a change in Analytics once SSL has been activated. There you change from HTTP to HTTPS so that the statistics continue to work correctly.Log in to your Analytics account, and click on the gear in the bottom left corner. Then go to the middle column, "Property" and there click on "Property settings". In front of "Default URL" there is a selector for "http" and "https", select "https". Then scroll down and save. Done.Why do I get warnings that the site is not secure even though I have activated a subscription?In some cases, you may get warnings that the page is not secure even though SSL is enabled in the store, and this is usually because you have linked in an external script or image from another website that does not have SSL. In this case, you will need to find the script/image and upload the file to the store's file repository under Appearance -> File repository instead. Then you can link the script/image from there. Then the warning will disappear.
-

Integration with Business Check
27 Nov 2025
Link credit information to your payment methodsWhat is Business Check?With our connection to Business Check, you can run credit checks and prevent unnecessary credit losses in your store. Business Check is suitable for those who have their own payment methods in the shop, such as their own invoice that you create and send out to buyers yourself.Business Check is an additional service that costs SEK 100 per month and is ordered under "My subscription" in the shop. More information is available here on the Business Check site. Go >>If you use invoicing services via, for example, Klarna, Svea, Dibs or any other company, the credit check is already included and you do not need to use this additional service. This is only for your own payment methods that you manage yourself.
-

BL Administration: integration with Björn Lundén's Administration
27 Nov 2025
Björn Lundén is a knowledge and software company that has been simplifying the daily life of small and medium-sized companies for more than 30 years. Primarily by offering modern software solutions, comprehensible information and practical tools for managing the company's tax and declaration, accounting, payroll and personnel issues. Abicart has a function that exports orders and products to the BL Administration accounting software.Things to consider before activating the integrationAll items must have a unique item number and a name. Also each selection must have a name and item number if you are using customer selections (e.g. sizes and colors). Prices need to be added excluding VAT in BL.Remember to enable the store's active currencies in BL. If a currency is not enabled in BL, we cannot export an order placed in that currency. If you have variants (customer's choices), these must be created in the store the first time and then exported to BL for the sync to work. So you cannot export variants from BL to the store the first time.Enable integration with Abicart Webshop in BLStart BL Administration and open your company which must be stored in the cloud and select BL integration under the File menu.Locate the Abicart integration in the list of available integrations and press Activate.Confirm by pressing "Yes, start integration".Connect the shop to your business in BLSelect BL integration under the File menu in BL Administration. At the top and far right you will see a small gear, click on it.Select your public key as shown above and then right-click and select copy. You need to paste this key into the BL settings page in Abicart as shown below.Log in to your store and go to Settings -> External Connections -> BL Administration.At "Connection", paste your company's public key and then press Save.Shipping and other products for feesThe next step is to make sure that there are 5 items in BL for Shipping, Postal Advance, Transaction Fee, Discount and Other Payment. You will need to add these items manually in BL.Enter the item number for each item in BL under the Item Number section as shown below.Exactly how these items look in BL depends, among other things, on how you want to record them in BL. For example, the item for shipping could look like this in BL administration:As a result, the freight is recorded in account 3520 - Freight invoicedEvent settingsThis means:Export order: here you specify what should happen when an order is registered in Abicart. In our example, we specify that as soon as the order is registered in Abicart, it should be transferred to BL (it may take a few minutes even if it says Update immediately).Export article when adding/changing: Here you specify what should happen if an article is updated in Abicart. You can choose to transfer the article to BL, but you should not activate both export and article import at the same time, but choose one of them.Article import: Here you can specify that Abicart should periodically retrieve article information from BL. You should not activate both export and article import at the same time but choose one of them. In our example, we have specified that we want to retrieve article information from BL at 10:10 every day.Export customer list: Here you can specify that Abicart should periodically transfer customer information from Abicart and transfer these to BL. You should not activate both Export customer list and Import customer at the same time but choose one of these.Import customer: Here you can specify that Abicart should periodically retrieve information about new and updated customers from BL and add them to Abicart. You should not activate both Export customer list and Import customer at the same time but choose one of them.
-

Automatic product import via FTP
27 Nov 2025
It is quite common for external suppliers to update products and stock balances continuously via a text file and/or feed, in which case you can set it to be automatically imported into the store. You will then need a login to the server where the file resides, or make sure the supplier uploads the file to their own server.**Please note that an FTP server is not included in the Abicart subscription. This needs to be purchased separately, for example via a hosting provider.** The import only supports FTP, not SFTP Which file formats are supported? For the file to be imported, it must be a text file. The following file types are supported: CSV, TXT, TAB, and SKV. A text file can contain different character encodings and the import supports two, "Windows UTF-8 (universal)" and "Windows ISO-8859-1 (Latin 1, Western European)". If you receive a file with articles from a supplier, you should be able to get them in one of these formats. If you create the products yourself in a spreadsheet program, such as Excel or LibreOffice Calc, you can choose the file format when you save the file. Create a template with column orderFirst, you have to do a manual product import the first time. The reason is that the system needs to know the order of the properties in the import file. You can read more about how to do a product import here in our manual: https://www.abicart.se/om-abicart/manual/import-export/produktimport There is a good video tutorial of a few minutes that we recommend you watch. Follow the instructions on the manual page "Product Import" and then under the heading "Importing a file of products into the store" and especially the section on "Saving column order for future imports".  Note that if the order of columns in the file is changed, you must redo the above step and save a new template with the new order. ### Gör inställningarna för FTP-anslutningen Gå till Inställningar -> Externa kopplingar -> FTP-artikelimport FTP server - Enter the server's domain or IP address FTP username - The username of the FTP server FTP password - The password to the FTP server FTP path - If the file to be imported is located in a directory on the server, enter the path to the file, for example,/webshop/products/ File Name Pattern - The name of the file to be imported. If you want to import multiple files, we recommend that you place all files in one directory. Then enter * as the file name. Then all files in the selected directory will be imported. Keep in mind that all files must have exactly the same column order to be imported. Remember that you have to enter the exact file name with possible lower and upper case letters for existing products to be updated. If the item number is not found, a new product will be created. If you want to import new product images, you can place them on the same FTP server as the import file, or you can download them from another server. In that case, just tick the box "Get images from separate server" and enter the data there. File format - If there are column headings in the file on the top line, such as "item number", "product name", etc., check this box. If there is an item on the first line of the file, leave it unchecked. Column order template - When you did the first manual import above, you should have saved a template with the column order in the file. Enter the name of that template. The name must be exactly the same as the name you gave the template, with lower and upper case letters. Field delimiter - If you know what field delimiter the file contains, select it here, otherwise select automatic and the system will try to detect it. Character encoding - If you know what character encoding the file contains, choose this, otherwise, choose automatic and the system will try to detect it. Updates You need to set how the item will be handled if it is already in the range. Update information - If the item already exists, all data should be imported anyway. This is the most common setting, especially if you are doing daily stock balance updates. Ignore - If the item already exists, the new content of the file should not be imported.This setting is quite unusual, but it may be that you do not manage stock balances and only want to import new items once the supplier has received them into the import file. Force update of images and attachments - If the article already contains images, you can force these to be updated anyway, for example, if you have updated the images on the image server and they have the same file name as before. Then the images will always be uploaded even if they already exist. This setting makes the import take much longer.
-

Integration with Fortnox
27 Nov 2025
Connection to the Fortnox business and financial systemWhat is Fortnox? Fortnox is a cloud-based financial management platform for small businesses, accounting firms, associations and schools. In addition to popular programs for e.g. invoicing, accounting, payroll and expense management, there are hundreds of industry-specific solutions from other providers that are integrated into our platform. Things to consider before activating the integration Integration to Fortnox is included in the Abicart Pro subscription (An integration to ERP is included) All items must have a unique item number and name. If you use the customer's choice, each choice must also have a name and item number. Note that spaces and other special characters are not allowed in the item number. Remember to activate the store's active currencies in Fortnox. If a currency is not activated in Fortnox, we cannot export an order placed in that currency. If you have variants (customer's choice), these must be created in the store for the first time, and then exported to Fortnox for the sync to work. It is therefore not possible to export variants from Fortnox to the store the first time. Activate license for integration in Fortnox In order to connect Fortnox with Abicart, the program license for Integration must be activated in Fortnox. If you do not already have the license for Integration, you need to add it. Do this as follows: Log in to your account in Fortnox. Click on "Administer users" as shown in the image below. Activate the license for Integration. Connect the store to Fortnox Under Settings -> External connections -> Fortnox you will find the settings for Fortnox.The first thing to do is to connect your store to your company in Fortnox. Click on the link shown in the picture below: Then log in to Fortnox with your Fortnox login details. When it is done, it says Connection + company name and a link to log out. Settings in Abciart Create articles in Fortnox The next step is to create three articles in Fortnox. The reason is that these should be linked to any shipping fees, discounts and other payment methods. Enter exactly the same article number on these articles in the three fields below. For example, the item numbers shown in the picture. It is also possible to enter a specific shipping item on each delivery method.Settings -> Shipping -> select shipping method, edit -> Fortnox Article export Export all items on the next eventCheck the box + save if you want to export the entire range on the next event. This setting exports the entire assortment once and overwrites the information found on the products in Fortnox (if the information differs). If you want to export products continuously when they are created/edited in Abicart, activate the event setting"Export item when adding/changing". Include customer selection in the item nameIf you have items that have the customer's choice, each variant will be exported to Fortnox as a separate item. To be able to see the difference between all variants, you should check this box that adds the name of the variant after the main article name. Uncheck webshop products for products hidden in AbicartWhen a hidden item is exported, it is deselected as "webshop item" in Fortnox. Important! Do not set up any product sales accountsA setting to not set any product sales accounts on the products in Fortnox. If this box is checked, we do not set sales accounts on items in Fortnox, but only set sales accounts on the order/invoice in Fortnox. If you use a different sales account for the products in Fortnox than what you specified in Abicart, it is important to check this box before activating the integration. Use item number as identifierBy default, the products' database ID is used as an identifier. This works as long as you have created the products in Abicart and then let the integration export the products to Fortnox. If you already have products in both Fortnox and Abicart before activating the integration, you must activate this setting so that the systems identify the products by article number instead. Article import Only webshop articlesThe import only retrieves the articles that are marked as "webshop articles" in Fortnox. Import only stock balanceThis setting ensures that only the stock balance is imported from Fortnox. Do not import product namesThis setting causes all properties to be imported on the products except the product name. Note that you also need to activate the event setting "Product import". Just checking one of these boxes is not enough to enable product import. Warehouse management In order to prevent unsynchronization between systems, you can choose which system will be the main warehouse. We recommend that you choose either Abicart or Fortnox, not both. Customer export Enter customer number in external systemThe setting means that the customer is transferred from the customer register in Abicart to Fortnox with the same customer number (own customer number) as the customer has in Abicart.If this box is not activated, Fortnox will create its own customer number. Enable custom mapping for customer fieldsSet priority for customer mapping by customer number, email or org number in the lists below. Order export Set order date to date for exportThe date of the order in Fortnox is set to the date when the order is transferred from Abicart to Fortnox. Without a cross, the date will be the same date as the order was registered with in Abicart. You can choose if an order should be transferred to Fortnox when: The order is registered in Abicart When the order is marked as paid in Abicart. When the order is marked as delivered in Abicart. Options 2 and 3 mean that the order can be transferred to Fortnox at a later date than when the order was registered in Abicart. Change delivery status to "delivered"The status of the order in Fortnox is set to delivered even if it is not flagged as delivered in Abicart. Without a cross, the delivery status in Fortnox will be the same as in Abicart. Do not refer to articles in external systemsWith a check in the box, no link is made between the products in the order and the item register in Fortnox. This means, among other things, that Fortnox does not count down the number in stock. Export content in package itemsWith a check in the box, the content of package items is "expanded", ie. the items included in the package are included in the order in Fortnox. Without a check mark, only the package item will be included in Fortnox (not the items included in the package). Type of resource in Fortnox Select the type of resource in Fortnox for each payment method. Select how the order should be created in Fortnox when it is transferred from Abciart, "Invoice", "Cash invoice", "Invoice paid by credit card", "Order" or "Offer".Depending on how the order in Abicart is paid, you can choose whether to create an Invoice or a Cash Invoice (which does not necessarily have to be paid in cash, it can be by credit card, for example).Here is an example from a store with four payment methods, card payment, Swish, Ecster installment and Invoice. Email notifications These settings above are if you want to send emails from Fortnox. Accounting accounts Under Sales and business income accounts, you will find the accounting accounts for sales depending on whether you are selling a good or a service, and the VAT rate that applies. If you use the Standard BAS plan, it could look like this: Event Settings Under the heading "Event settings" you activate what should be exported/imported. At "activation" there are three settings: xxx is registered xxx is paid xxx is sent At "execution" there are two choices: Inactive Update directly The most common is to select "registered" and "Update directly". Then orders/products/customers/price lists will be updated immediately when they are created/changed. Note that you need to select an option for both Activation and Running. If one of them is left as "Inactive", the event setting is not activated. Export order - Here you specify what should happen when an order is registered in Abicart. In our example, we specify that as soon as the order is registered in Abicart, it should be transferred to Fortnox (it may take a few minutes even if it says Update immediately). Customized logic - Advanced function. A field where you can enter code to make calls directly to Fortnox API. Export article when adding/changing - Here you specify what should happen if an article is updated in Abicart. You can choose to transfer the article to Fortnox. You should not activate both export and article import at the same time, but choose one of these. Product import - Here you can specify that Abicart should periodically retrieve trade item information from Fortnox. You should not activate both export and article import at the same time, but choose one of these. Export customer list - Here you can specify that Abicart should periodically transfer customer information from Abicart and transfer these to Fortnox. You should not activate both Export customer list and Import customer at the same time, but choose one of these. Import customer - Here you can specify that Abicart should periodically retrieve information about new and updated customers from Fortnox and add them to Abicart. You should not activate both "Export customer list" and "Import customer" at the same time, but choose one of these. Export price lists - Exports all the store's price lists to Fortnox. Import price lists - Imports all price lists in Fortnox to Abicart. New VAT rules from July 1, 2021 If you sell abroad, you need to make certain settings to be able to export correctly to Fortnox. Start by activating "VAT per country" in the store. 1) Settings -> VAT -> Price management.Previously, excl. VAT was required, but now it is just as good to have prices incl. VAT selected. If you have excl. VAT in admin, you can still show prices incl. VAT in the store. You manage this under "Presentation" just below this setting.2) When the setting above is as you want it, set "VAT per country" at the bottom of the page.Add the countries outside the EU that should pay VAT, for example Germany and Spain, and then enter the percentage for these countries. Save. When this is done, log in to Fortnox and create the VAT rates to be used in Fortnox: Next, create sales accounts for each country in Fortnox. Here are instructions for this in the Fortnox manual: https://support.fortnox.se/ordlista-bokforing/oss-one-stop-shop When this is done, you will be able to select sales accounts per country under Settings -> External connections -> Fortnox in Abicart: The products must be marked as active and "webshop item: yes" in Fortnox to work. Tip! If a business customer from a non-EU country placed an order with a non-approved VAT number, the order will not be exported to Fortnox. Solution: remove the VAT number from the order, from the customer card in Abicart and from the customer card in Fortnox. Click Export on the order page. Then the order will be exported. F.A.Q. - Frequently asked questions and answers I want to export orders as unposted invoices to Fortnox, how do I set this up? Under "Type of resource in Fortnox", select "Invoice" for the payment method(s) you want to export as "Invoice". At "Payment method in Fortnox" you then control whether the order should be posted or not. Ignore - The invoice is registered in Fortnox but not posted.Post - The invoice is registered in Fortnox and posted but not marked as paid.The other options (which ones are available here depend on which payment methods you have created in Fortnox) mean that the invoice is registered in Fortnox, posted and marked as paid with the selected payment method. How are customers managed? If you are a logged in customer in Abicart:First, we check if the customer in Abicart is already connected to the customer in Fortnox. Then that customer is used in Fortnox.Secondly, we check if there is a customer in Fortnox with the same customer number (own customer number) in Abicart. Then that Fortnox customer is used.Thirdly, we check if there is a customer with the same e-mail address. Then that Fortnox customer is used.If none of the above is met, a new customer is created in Fortnox.If you are not logged in as a customer in Abicart:We check if there is a customer with the same e-mail address in Fortnox. Then that Fortnox customer is used.If none of the above is met, a new customer is created in Fortnox. What properties are exported when exporting a product from Abicart to Fortnox? The following product properties are exported to Fortnox from Abicart. Name/Description Active/hidden Item number StockGoods - whether the item is a stock item or not StockWarning - level of stock warning Type - set to "STOCK" or "SERVICE" depending on the item type EAN - THE ARTICLE NUMBER Manufacturer's article number MPN/SKU Unit - set to the unit of the item (often pieces) WebshopArticle - set to true if the item is displayed in the store Quantity in stock is set for stock items Sales accounts are set if you have not ticked that you do not want this. Price is set Purchase price What properties are imported when importing products from Fortnox to Abicart? The following product properties are imported from Fortnox to Abicart. Article number Active/hidden Stock balance Weight of product EAN Manufacturer's article number MPN/SKU VAT rate, percent Unit of measure Name/Description Price of the item Purchase price
-

Integration with Creditsafe
27 Nov 2025
What is Creditsafe?With Creditsafe, you can run credit checks and prevent unnecessary credit losses in your shop. Creditsafe is suitable for those who have payment methods such as self-billing and want to know the creditworthiness of those you do business with.The link between Abicart and Creditsafe costs SEK 100 per month, and you also need to sign an agreement with Creditsafe for the link to work. Start by signing an agreement with Creditsafe. Then activate the additional service under My subscription. More information is available on the Creditsafe website >>If you use invoicing services via, for example, Klarna, Svea, Dibs or any other company, credit checking is already included, and you do not need to use this additional service. This is only for your own payment methods that you manage yourself.
-

Integration med Specter
27 Nov 2025
In this article you can read about our new updated connection to the Specter ERP system.What is Specter? Abicart has an integrated connection to the Specter Business Management system. Using a modern, web-based ERP system gives you the freedom to work wherever and whenever you want, on both PC and Mac. NOTE! The integration to Specter is included in Abicart PRO. For the integration to work, all products must have unique product numbers, including the customer's choice (sizes/colors) if used. The product number must not contain special characters such as å, ä, ö, &, %, ¤, #, €, etc. as well as spaces and commas. Instead of spaces, use hyphens, underscores or write the item number together. The base currency of the shop must be SEK. For support or questions about this integration, please contact customer service. Please note that the integration does not support exporting product packages. Activate Specter in the store Go to Settings -> External Connections -> Specter NOTE! When you check "Active", an initial product export Abicart >> Specter will be initiated. This means that products incl. its price will be sent to Specter. If the product does not exist in Specter, it will be created. If it already exists in Specter, it will be updated with product name and price from Abicart. SETTINGS Account settings smbID and md5key are provided by Specter. This is used to verify the Specter account against Textalk Webshop and vice versa. Customer is created Ignore checking email address when creating a new customer This box allows you to select customers to be compared against email address. If there is a customer with the same email address in Specter, the information on this is updated. Ignore social security number when creating a new customer This box allows you to select customers to be compared against person/org no. If there is a customer with the same person/org no. in Specter, the information is updated on this. If both of these fields are filled in, both will be ignored and a new customer will be created in Specter - regardless of whether the customer already exists or not. Orders are exported Send order confirmation to customer from Specter This box allows you to send out order confirmation from Specter. Order confirmation from Textalk Webshop will then not be sent to the customer. Send a copy of order confirmation to administrator in Specter This box allows you as a webshop admin to receive order confirmation from Specter. Order confirmation from Textalk Webshop will then not be sent out to you. Include zero amount for shipping cost If you check this box, a row with zero amount will be sent to Specter if the shipping cost is also zero. Include zero amount for payment fee If you check this box, a row with zero amount will be sent to Specter even if the payment fee for the payment method used for the purchase is zero. Include zero amount for postal advance If you check this box, a row with zero amount will be sent to Specter even if the cost of cash on delivery is zero, if cash on delivery is added as a payment method in the store. Include customer field If you have created your own customer fields in the checkout and want these to follow Specter when exporting orders, this needs to be checked. Export discounts in percent for each order item If you check this box, the discount percentage is sent on each individual item, usually we send over the percentage of the discount for the entire order. Put company name in address line 1 The company name entered by the customer will be added to the Address Line 1 row in Specter. Product number for gift card Enter a unique product number for the payment method "Gift card".Note that this also needs to be entered in Specter separately. Product number for discounts Enter a unique item number for discounts.Note that this also needs to be entered in Specter separately. Product number for gift cards Enter a unique product number for "Fee to be added at checkout when ordering".In Textalk Webshop, this is set on each payment method and means a fee that is added at checkout when the customer chooses a specific payment method.Note that this also needs to be entered in Specter separately. Product number for deliveries Enter a unique product number for the delivery method.Note that this also needs to be entered in Specter separately. Product number for postal advance Please enter a unique product number for the payment method "Cash on delivery".Note that this also needs to be entered in Specter separately. The following image is only an example: Product export Export the EAN code of the products. Order update Update orders with the status from Specter. The order will be marked as paid and shipped in Abicart. Other information Product import settings Contact Abicart customer service to enable product import. The following information can be imported Specter >> Abicart: Art.nr (product number) Product name Product description Price (Regular price or extra price) VAT included Stock balance Price settings EVENT SETTINGS Export order The first list selects whether orders are exported.Inactive - No export is made.Order is registered - Order is automatically exported to Specter when customer places the order.Manual export - Order is exported when you go to the order page in Textalk Webshop and click "Export". In the second drop-down list, select whether to run directly to Specter (Update directly) or not at all (Inactive). When a product is deleted in Abicart, it will also be deleted in Specter Export product when adding/changing In the first list, select whether products should be transferred to Specter (Product changed) or whether products should not be transferred to Specter (inactive).The second list selects whether to run directly to Specter (Update directly) or not at all (Inactive). HOW DOES THE LINK WORK? Export of orders New in this link is that your order number in Specter is displayed on the order in Textalk Webshop. Discounts are sent as separate order lines with minus balances to Specter. Gift cards are also sent as a separate order line, which means that it is possible to see all payment methods on an order in Specter when a customer has paid with a gift card. Order editing and Specter If you edit an order and a product is added or removed, the stock balance will be adjusted automatically in Abicart but not be synced to Specter. You need to change the stock balance manually in Specter. Article export Initial export When all settings are made and the link is activated, an initial export will be made from Textalk Webshop to Specter. All existing items that have unique item numbers will then be exported. If one or more items already exist in Specter, these will be updated with any new information on the item. If one or more items do not have an item number, these will not be exported to Specter. Note that it is not allowed to use spaces in the item number. Existing and new articles If Item Transfer is activated, items are exported to Specter when they are changed in Textalk Webshop. If an item has the same item number in Textalk Webshop and Specter, the item in Specter is updated directly with the new information (price, name, etc.).If there is no item with the same item number in Specter, a new item will be created in Specter. Stock management must be active on items in Textalk Webshop at the first time of export in order for stock to be synchronized from Specter to Textalk Webshop. Connect the delivery methods between the store and Specter To connect the store's delivery methods with Specter, you need to find out the delivery methods' ID numbers. To do this, log in to Textalk and then go to Settings -> Shipping and delivery. Click on the delivery method you want to add to Specter.The delivery method ID number will then appear in the browser's address window on the far right. You then enter this ID number in the "External key" field of the delivery method in Specter. See image below.
-

Integration with e-conomic
27 Nov 2025
E-conomic is an online accounting software that makes it possible to simplify web shop administrative tasks such as invoice management, payments, and stock status.How do I activate e-conomic in the shop?The integration with e-conomic costs SEK 400/month, and you order the connection under My subscription. You can then set up the integration under Settings -> External links -> e-conomic.Ongoing transfer between e-conomic and TextalkNew customers and orders in your webshop are transferred to e-conomic on an ongoing basis. At the same time, the online shop always has the correct price and stock status, as the information is continuously retrieved from e-conomic. You have access to your accounts and customers as long as you are connected. So you don't need to have e-conomic installed on a physical computer.
-

Integration with nShift Delivery (formerly Unifaun Online)
27 Nov 2025
Automatic export of orders to manage and book transports in nShift Delivery.What is nShift Delivery? nShift Delivery is a complete, secure, web-based transportation management system that manages all your shipments and carriers in one place. You'll get your labels, shipping documents, customs documents, shipment lists, reports, etc. printed out. EDI is automatically sent to your carriers. For more information about nShift Delivery, visit their website here >> Please note that all items must have a weight in order for the orders to be exported to nShift Delivery. You can either enter weight manually on each item or via import. If you need help, please contact our support. Which shipping services are supported? DB Schenker DHL Express DHL Freight PostNord Sverige AB PostNord Letters We will build in more shipping services as we go along. How do I connect to nShift Delivery? Click here to order the service. If you have any questions or need help with the registration, the easiest way is to call nShift directly: +46 10 55 17 676. Activation of the service Once you have been connected to the service, you will receive login details for nShift Delivery from nShift. Enter the sender Log in to Unifaun Online here: https://www.unifaunonline.com/ Go to Maintenance -> Sender In the "Quick search value" field, enter your store ID number in Abicart. You will find this in the top left corner when you are logged into the store admin. Fill in the rest of the fields.Further down the page, you should choose which carrier(s) you will use.In the"Customer number" field, enter your customer number with the selected carrier. If you are unsure what to enter in any of the fields, please contact nShift customer service for more information Create API keys Go to Maintenance -> API Keys in the left menu. Click on the "New API Key" button. Fields for API keys Status - Select "Active" to activate the API key.Type - Check only "Web Service calls (REST)"Note - You can enter anything in this field, but to know which integration the API key applies to, you should write "Abicart Integration" or similar.Valid IP addresses - This field must be empty.Email - Enter the email address you registered your Unifaun Online account with.Developer ID - This is your "User ID" at Unifaun Online. The one you log in with. Then click on the "Finish" button. Now the following page appears and it is the "Combined ID" field to be used in the store settings. Settings in the store Log in to your store and go to Settings -> External connections -> Unifaun Online. Under the heading "Account Settings", enter the "Combined ID" (as we created above) and also your store ID (in the "Sender Quick Search Value" field). Don't forget to check the "Active" box at the top. Print target - Make the print settings you want. Booking - Choose whether the booking should be stored or booked directly in Unifaun Online. Sent - You can also choose whether the order should be marked as sent or not in the store. Hide content - You can choose to hide the content of the package label. Activate nShift Delivery on the delivery methods Go to Settings -> Shipping and delivery -> select delivery method, edit. Then scroll down the page to "Event settings Unifaun Online". Export order - Choose when to export the order to Unifaun Online. When the order is placed, when it is marked as paid or manually (export button on the order). If "inactive" is selected, the Unifaun integration is not active for this delivery method.The "Execution" field should always have the setting "Update directly". Note that if you want to use"Partial delivery", you must select "Inactive" on "Export order". You will then use the "Export shipment" setting instead. Option - In this field you choose which carrier and transport template you want to use for the selected delivery method. In our example in the picture above, we have chosen "PostNord Parcel SE". Export shipment - If you intend to use the"Partial delivery" function, select "The shipment is sent" under "Activation". The "Run" field should have the setting "Update directly". If you do not want to use partial delivery, select "Inactive" on both activation and execution as shown above. Option - In this field, select which carrier and transport template you want to use for the selected delivery method. In our example in the picture above, we have chosen "PostNord Parcel SE". Print favorites Unifaun Online has something called Print Favorites, these can be used to make settings for shipping that are not made in Abicart Webshop. The settings can control how end customers are notified (SMS. e-mail, letter notification), as well as other additional services that can be used by each carrier. It also provides the ability to control which additional services to use (e.g. Climate compensation, Extended ID control. etc.). What you need to do is log in to Unifaun's admin and go to Maintenance -> Print favorites. Create a new print favorite and name it for example "favorite1".Then scroll down to the "Service and Additional Services/Options" section. There are several different options for SMS, such as "SMS notification", "SMS notification (return option)", "SMS reminder", etc. Choose what you want and also check with Unifaun's support what it costs and how to activate this with them. When everything is ready, go to the delivery method in your store and scroll down to "Event settings in Unifaun Online" and there you enter the name you named the print favorite in Unifaun. In our example "favorite1". You must enter the exact name with lower case, upper case etc. Then that favorite will be used on the next order placed. F.A.Q. - Frequently asked questions and answers How do I set up so that the buyer automatically receives the tracking number on the delivery confirmation? A: Then you need to make the following settings: 1 - Activate the "delivery confirmation". Under Settings -> Document and e-mail content -> Delivery confirmation -> check "Send delivery confirmation by e-mail when order is marked as sent". 2 - Set the export settings to Unifaun/Pacsoft. Under Settings -> External connections: "Booking" must be"Direct" 3 - Set the delivery method On the delivery method, you can select any choice at "Export order". You need to choose a "Shipping Service" that supports tracking numbers. Check this with Unifaun/Pacsoft if you are unsure which ones do this. 4 - Set up notification for the delivery method On the delivery method, you can select any choice at "Export order". On the delivery method >> Scroll down to Unifaun Online Event Settings >> Options >> Select the Notification option specific to the delivery method you are editing. Example: How does it work in practice? When an order is placed, it is exported to Unifaun directly or manually depending on the setting you have chosen in "Export order" on the delivery method. If you have manual export, you must make sure to only export the order to Unifaun. You must not mark the order as "sent" at this stage. When the order comes over to Unifaun, the transport is booked and a tracking number is generated. This tracking number is then exported back to the store and added to the order. Once the order has received a tracking number, you can mark the order as "sent". The tracking number will then be sent in the delivery information email. Customs declarations To make logistics even smoother for you as a customer between Abicart and Unifaun, we now support the export of shipments with customs declarations. This will be extra smooth and efficient for you who send packages outside the EU.The setting is activated per delivery method by checking the "customs declaration" checkbox. To make the customs declaration fully compliant, your webshop needs to add HS numbers for each product. HS stands for Harmonized System and is an international standard for classifying products. They are used, among other things, to calculate the duties and taxes paid to customs authorities when a shipment crosses a customs border. 1) Activate HS numbers Assortment -> Product settings -> In the box on the right, "Product attributes" there is "HS number". Click on the icon with the pencil and then select "Private" (this number will only be displayed in admin) or "Public" (if you want to display it on the product page). 2) Enter the HS number of the products.Assortment -> Products -> select product, edit -> scroll down to the "Properties" block in the left column. There you will now see a field for the HS number. 3) Activate the customs declaration on the shipping method.Settings -> Shipping -> select delivery method, edit -> scroll down to "Event settings Unifaun Online" and under "Export order" check "Customs declaration".
-

Integration with Pacsoft Online (Outgoing service)
27 Nov 2025
Note: Outgoing service Use Postnord Send Direct instead What is Pacsoft Online?The Pacsoft online service will be phased out in 2021 and replaced by either nShift(formerly Unifaun) or Postnord.If you already have Pacsoft Online and want to switch to nShift Online, click here (Migrating from Pacsoft Online to nShift Delivery).IMPORTANT! Don't forget to enter "Abicart" in the partner field when filling out the form.
-

Visma/SPCS: Integration to Visma Administration
27 Nov 2025
Export orders, customers, and assortments to Visma Administration 1000 or 2000. Connect the financial and business system Visma SPCS with the shop. By linking the shop to a financial system, parts of order management and accounting can be handled automatically. There are a number of financial systems on the market that offer technical possibilities for integration with your online shop. Do you use Visma eEconomy? Read about that integration here Integration with Visma/SPCS is available in Abicart Pro. Note that the program requires the Visma Integration add-on (sold by Visma). With this connection you can transfer... orders and customers from Abicart to Visma/SPCS (you can choose between transferring orders from a certain date or only downloading new ones), customer records from Visma/SPCS to Abicart all or part of the product register from Abicart to Visma/SPCS and vice versa stock status from Visma/SPCS to Abicart (both manually and using a function that regularly sends the current stock status to Abicart). To get started:1. Select the Visma SPCS add-on under "My subscription" 2. go to the Integration page (Settings >> External connections >> Visma)3. Download the latest version + Download installation instructions4. Follow the instructions Contact information for Visma Website: http://www.vismaspcs.se Phone: 0771 / 44 22 00 Settings in the shop's administration area When the add-on service is activated, go to Settings -> External connections -> "Visma integration" tab. In the fact box to the right you will download the application and an installation manual. Read through and then follow the instructions to activate the connection. Fill in the username and password. You decide the password yourself, which must be entered in the integration program for each transfer. Things to keep in mind There are three components that you as a store owner need for the integration between Textalk Webshop and Visma Administration to work: Visma Administration (purchased by Visma), Visma Integration (an add-on to Visma Administration purchased by Visma), our Widows application for integration between Abicart and Visma. Frequently asked questions and answers Q: I get "Error code 137" when I start the integration program A: The path to Visma Administration is incorrect. In the integration program, you need to enter the path to your local "Visma Administration" installation, e.g. C:\Documents and Settings\Application Data\Visma Administration. Q: Can I transfer the customer register from Visma to Abicart and vice versa? A: There is a function in our integration program to transfer the Visma customer register to Abicart. You cannot export the entire customer register from Abicart to Visma, but as soon as an order is exported, the customer is also exported. This means that all customers who place an order will be transferred to Visma when the order is exported. Q: I get "Error code 583" when I start the integration program A: Your Visma Administration license is not valid for Visma Integration. Please contact Visma SPCS for information and to change your license. Q - I have just updated Visma Administration and now get error code 676 when I log in. What is the error? A - The error occurs because a new function has been activated in Visma called "Authorization Control". This means that when the integration program starts, the program needs to "log in to Visma" with the user information you have created in Visma.You manage this under File -> Users in Visma Administration Q: Our firewall stops communication from Abicart. How do we solve this? A: In order for the integration program to be able to retrieve orders from Abicart, you need to make sure that https traffic (TCP port 443) to 192.121.104.141 is let through by your firewall.You can try to open a browser on the same computer as the integration program is running on and open https://admin.abicart.se/se/editor. If it works, everything is set up correctly.
-

Integration with Unifaun Web-TA
27 Nov 2025
Automatic export of orders to manage and book transports in Unifaun Web-TA.OBS! Unifaun has been replaced by nShift. Integration with Unifaun Web-TA Unifaun Web-TA is a simple and efficient Transport Administration (TA) system. The system is designed to suit most businesses, from the smallest who ship an occasional parcel to those who ship more than a thousand parcels a day. ⚠️ Note: All items must have a weight in order for orders to be exported to Unifaun. You can either enter the weight manually on each item or via import. If you need help, please contact our support. What are the benefits of Unifaun Web-TA? The integration with Unifaun Web-TA simplifies and streamlines the entire booking process. Instead of making bookings in Unifaun Web-TA, you can create the basis directly in Textalk Webshop and the relevant information is then automatically transferred to Unifaun Web-TA. In addition to a simpler booking procedure, this also minimises the risk of manual errors (the "human factor"). Features Postal advance Notification of last pick-up time Support for multiple parcels/packages per shipment Language: English/Swedish Automatic tracking information of parcels to customer Notifications via SMS, e-mail, post or fax (depending on carrier) How do I join the service? Click here to order the service. If you have any questions or need help with registration, the easiest way is to call Unifaun directly: 08 729 88 50. Activation of the service As soon as you are connected to the service, you will be sent login details and integration settings. You will need to enter these details in the Textalk Webshop-admin administration interface: Go to "Settings → External connections → Unifaun Web-TA".Tick the Active box and fill in the data provided by Unifaun Web-TA. Templates This field only needs to be filled in if a custom template has been created in Unifaun Web-TA. If you have created a template, enter the same name as the template in Unifaun Web-TA. It will then be available under "Delivery methods". Please note that the name must be the same as in Unifaun Web-TA. Each delivery method can be linked to its own template. Activate the settings of the delivery method Once activated, the integration should work fully automatically. You therefore need to link it to your delivery methods. You will probably have different settings depending on which delivery method the customer chooses. For example, if you offer an option where the customer can pick up the order in person, Unifaun Web-TA should not be used. Go to "Settings → Shipping and delivery" and click on the delivery method, then scroll down to "Event settings Unifaun Web-TA". Export order Select when the order should be exported to Unifaun: When the order is placed When it is marked as paid Manually (export button on the order) If "inactive" is selected, Unifaun integration is not active for this delivery method. The "Run" field should always be set to "Update directly".
-

Mailchimp: Add Mailchimp to your store
27 Nov 2025
Mailchimp is a program for sending out newsletters. You tailor your newsletters and reach out to your customers while building opportunities for a long-term relationships.The integration with Mailchimp is included at no extra cost in the Abicart Plus and Pro subscriptions.What does Mailchimp cost?Mailchimp is free of charge for up to 500 subscribers and if you send less than 1000 emails per month. If you have more subscribers, you can read more about the costs here. How do I get Mailchimp?First, create an account with Mailchimp.Then you need to create a "list" in Mailchimp. The list is needed for the link to be activated, but it does not need to contain any subscribers at this stage.Activate MailchimpEnter your company detailsSettings -> Store information -> Store information / Company information.To ensure that the mailings come from a secure source and are not classified as spam, certain store details are mandatory, in accordance with Mailchimp's rules.The following information is mandatory:E-mail addressAddress line 1LocationPostal codeCountryConnect your store to MailchimpGo to Settings -> External Connections -> Mailchimp.Click on "Connect to Mailchimp" and fill in your Mailchimp login. If the login is correct, you will now see "Connected to Mailchimp account, [Store name].Underneath, a box with "Store settings" will appear. Select language and currency.Event settingsYou then need to make some settings for what to export to Mailchimp. The settings you can choose are "Activation" and "Run". Activation - If you do not want to export this property, select "Inactive". Otherwise, select "xxx modified". Execution - This is controlled by the setting above and should always be set to "Update immediately". Export customer listNew customers and customer card updates in the store's customer register are exported to Mailchimp. Export product listNew products and item updates are exported to Mailchimp. Export orderNew orders and changes to orders are exported to Mailchimp. Start the initial export by editing an active product and waiting for a hit. The products and/or customers are exported according to the event settings from Abicart >> Mailchimp.How does the export work?If something changes on a product, order, or on a customer card in the store, the export will be activated and sent directly to Mailchimp. Note that orders are transferred as soon as you have a new (completed) order or when an order changes by being marked as shipped, paid, or if it is canceled. Previously placed orders will therefore not be transferred unless one of the above changes is made. Once the export is complete, you can get started with Mailchimp and start sending newsletters!See the "Create a Campaign" section of Mailchimp's Getting Started Guide for more details on how to do this.Start the initial export by editing an active product and waiting for a beat. The products and/or customers will be exported according to the event settings from Abicart >> MailchimpIf the integration is active when adding new lists in Mailchimp, you will need to contact customer service to restart the integration. After restarting, the new lists will be available in admin.
-

Reco - Collect and display customer reviews
27 Nov 2025
Add a script for Reco widgets in your webshop Reco.se is an independent service that collects and publishes customer reviews of online shops. A flow of credible reviews on the web shop makes potential customers feel confident about shopping and can thus increase both conversion and average orders. It also provides valuable insight into the customer experience and how it can be optimised.Abicart sends a hidden copy of the order confirmation to Reco. This activates an invitation to the customer to leave a review on their purchase experience. Based on your delivery time, Reco sets a delay so that the customer has time to pick up his products.Example of what this might look like: The widget can be published on e.g. the homepage, product pages and in the checkout.Get started with Reco.seStart by setting up an account with Reco. This is done on their website: www.recotrust.com. If you want to know more about the product, you can also ask for a demo there. The next step is to activate an extra email field in your store. Send an email to hello@abicart.se, attach your store ID and ask us to "enable the ability to send order confirmations via the BCC field".Insert Reco's email address (företagsnamn@biz.reco.se)Under Settings -> Email there is now a field for BCC. Enter the email address you have received from Reco and save. Add the Recotrust widgets and security certification scriptIt's valuable to display your reviews in different places in the webshop. Some common placements are the front page, category pages and in the checkout. Footer and/or header are great for smaller widgets or the "2019 Recommended E-Commerce Merchant" assurance certification. Iframe codes for all widgets and trust badges can be found in your admin tool at Reco.Home pageGo to Design -> Themes -> select theme, edit -> Content -> Home page -> Click on "+New block". Select the "Custom HTML" block. Click on the "source code" icon in the toolbar. Paste the iframe code you download in the admin tool on Reco into the field and click "OK". Then click "Done" and "Save". Now everything is ready. FooterGo to Appearance -> Themes -> choose theme, edit -> Content -> Footer. There are two different fields you can use to insert the script: "Own content - Footer, second place from left" or "Own content - Footer, third place from left".Click on the "source code" icon in the toolbar. Paste the script you have received from Reco into the field and click "OK". Then click "Done" and "Save". Now everything is ready. Article pageGo to Appearance -> Themes -> select theme, edit -> Content -> Article page -> scroll down to the heading "Block" -> click on "+New block". Select the "Custom HTML" block. Click on the "source code" icon in the toolbar. Paste the script you have received from Reco into the field and click "OK". Then click "Done" and "Save". Now everything is ready.
-

Fix your article numbers - Northmill integration
27 Nov 2025
This manual is aimed at those who have duplicate article/item numbers or products without article/item numbers in their range. Deepening of point no. 8 in the manual: Connect your webshop with Northmill Flo (formerly MoreFlo).Fixing the art.nr before activating the Northmill integrationBefore activating the Northmill integration, we recommend that you fix any warning message on the integration page (Settings >> External links >> Moreflo) so that there are no duplicates in your assortment. It is also good if products without an art.nr get a unique art.nr .Products with no art.nr/product numberProducts without an article number will not be exported Abi >> NMF until they get an article number.*Abi = Abicart*NMF = Northmill FloDuplicate / X products or variants use the same product number.In Abicart there is no limit to the number of times an art.nr can be repeated, unlike in ERP systems where an art.nr can only exist once. If you activate the integration with duplicate article numbers, the products with the same art.nr will remain in Abicart as usual, but overwrite the art.nr in Northmill every time the art.nr is exported.Example:Item no. ABC - Bathing ballItem no. ABC - Striped swimsuitItem no. ABC - Swimming gogglesThe integration is active with Inventory Management Abicart, Product Export and Import Cash Receipt. Art.nr ABC exists three times in Abicart. If you edit the product Badboll , it is exported to Northmill. Badboll now exists in Northmill. If you then edit Striped swimsuit in Abiart and save, the product is exported to Northmill. Art.nr ABC is now changed from the product information for Swim Ball, to Striped Swimsuit. If you then update Swimwear , the same thing happens again: the information for Striped Sw imsuit changes to Swimwear.Before you get started- Read the Northmill Flo manual and follow the points up to point no. 8"Review the message at the top of the integration page".- Go to Settings >> External connections >> MorefloThe warning message on the integration can warn about missing product numbers/article numbers, duplicates & customer numbers (See image).In this manual we show export of products, not customers. This fixes missing article numbers and duplicate article numbers, not customer numbers. If the warning message remains even though you have just corrected all article numbers, it may be in the form of junk data. Then you can ignore the warning and proceed to step 9 of the Northmill Flo manual. How to do this1) Go to Assortment >> Export2) Take out two exports by checking the options below >> ExportExport 1: - Product number- Product nameExport 2:- Product number- Product name- Include customer choices with their own properties as separate rowsHere you can read more about product export: Link to the product export manual.Image example Export 1:Fixing products without article number1) Open export file no. 1 on your computer.In column A you will find the art.nr and in column B the product name.2) Fixing products without art.nrIf there is a product name in column B but the row field in column A is empty:Copy the product name >> Go to admin >> Assortment >> Products >> Search for the product name >> Click on the product to edit >> Enter a unique art.nr >> Save.Repeat for all products in the file that have a product name but no art.nr.3) Repeat with export file no. 2.In this file, it is the customer's choice variants' article numbers that are interesting. The art.nr for the customer's choice is in column C.--> Fix variants that do not have an art.nr by Copying the product name >> Assortment >> Products >> Search for the product name in admin >> Edit the product >> Enter the customer's choice >> Enter the art.nr for all variants >> Save. Remember the rules for article numbersOnly use only letters (a-z), numbers (0-9), hyphens (-) and underscores ( _ ) in your part numbers. Many external systems (transport systems, financial and cash register systems, etc.) do not allow certain special characters in the art.nr. E.g. space, & sign, hash tag, dot, comma, etc. Therefore, avoid using these special characters. Fixing duplicates / products using the same art.nr1) Open export file no. 1 >> Select the entire column A where the art.nr is located >> Search for duplicates.You can search for duplicates e.g. in Excel or via various pages on the internet. See example "Find duplicates" below.2) Fix the duplicatesExample: Item no. 123 exists twice. One is a sweater in size Small and the other in Medium. The art.nr gets a unique ending:Art. no. 123-SArt.no. 123-MNow the products each have a unique article number and will be exported to Northmill Flo correctly.3) Repeat with export file no. 2. In this file, it is the article numbers for the customer's choice of variants that are of interest. They are in column C. Therefore, copy column C and repeat the steps to find duplicates.Example: Finding duplicatesOpen your browser and search for "duplicate count tool". For example this tool >> Select column A >> Copy >> Go to the page you are using >> Paste what you copied in the Paste Text Below box >> Click on the Display/Update counts button >> Review the count:On the left (count) you have the number of duplicates and on the right (line) you have your art.nr.3) Repeat the same thing for export file no. 2. In this file it is column C you copy. There is the art.nr forContact customer service if you have any questions
-

Klarna On-site messaging
27 Nov 2025
With Klarna On-site messaging, you can add customised messages to your webshop. Inform your customers about the different payment options even before checkout, and get an opportunity to influence the customer at an early stage.Klarna on-site messaging is a feature that allows you to set up personal messages to your customers on multiple pages in your webshop. The information can be about possible instalment plans or any offers you plan to give your customers via Klarna. Note that you must have Klarna v.3 and have activated Klarna Checkout to add on-site messaging. No other payment solutions are allowed. How do I set up Klarna On-site Messaging? Go to Design -> Themes -> Edit -> Extensions -> Klarna Save and reload the theme. Now there should be an option to add the script. Copy and paste the script from the Klarna Merchant portal under On-site Messaging -> Installation and save. Now the widget will be able to be added to different pages. Users can choose the page, position and content they want to display via Klarna On-site Messaging. The page and position are selected under Abicart admin and the content is edited under Klarna Merchant Portal -> On-site Messaging -> Placeholder. This is only available in the latest versions of our themes. This can be added to the home page, header, footer, sidebar and product page. Settings Abicart admin Design>> Themes >> Startpage, top bar, footer & product page Possible reasons why Klarna On-site messaging is not displayed on the website: Klarna checkout is not activated in the store. The selected country of delivery does not have Klarna as a payment method. There are a few cases where the Klarna Checkout payment method will not be available for the current order because the user may have set a limit on the order total. If the order amount exceeds the limit, the widget will be hidden on the website together with the payment method. Klarna merchant ID is not filled in or is invalid under Additions -> Klarna. **[Read more about On-site Messaging at Klarna.](https://www\.klarna\.com/se/foretag/on\-site\-messaging/)**
-

Product feed: Facebook catalogue
27 Nov 2025
Feed for Facebook Directory. This can be found under Settings>External Connections>Product Feeds.In order to add your products to Facebook business manager, these attributes are required: Price name Description Item number GTIN number, MPN number or Brand (brand name) Image Enabled inventory management If you upload a product feed in Facebook manager, you get access to Facebook's various sales channels, including Facebook Shopping and Instagram shopping. Go to Settings -> External connections -> Product feeds -> Facebook catalog. Select the language, currency and country that the advertising should target. Then copy the link that appears at "Generated URL". In Facebook Business Manager, navigate to → Resources → Catalogs. Select "Ecommerce" and "Upload product info" (data feed). Then add products using the Data Feed option. Select "Set a schedule" and configure it to upload products daily. Make sure you choose the default currency correctly.
-

Integration with Redeal
27 Nov 2025
Redeal helps your customers recommend your store to their friends. Immediately after completing a purchase, a deal appears that your customers can send to their selected friends. On average, 16% of Redeal shoppers choose to recommend the store to their friends after completing their purchase.What is Redeal?Redeal, which is implemented directly on the confirmation page of the store, invites customers to recommend the store to friends and acquaintances on social networks, via SMS and email. To increase the number of recommendations, the recommendation is linked to a reward, such as a discount on the next purchase.By using Redeal, you capture your customer, and turn them into an ambassador for your store. The recommendation from your customers becomes more personal than regular advertising, which increases conversion.Integration with Redeal is included in Abicart Plus and Pro. Redeal's services must be paid for separately.How do I get started with Redeal?Create an accountGo to: https://www.redeal.io and create an account. Step 2 - turn on Redeal in the ThemeAll you need to do in the store is turn on the service in your theme. Appearance -> Themes -> choose theme, edit > Add-ons -> Redeal > On/OffCostsYou can find Redeal's costs at https://www.redeal.io/
-

Change of ownership
27 Nov 2025
If your shop is changing hands, follow the list below.To-do list:1) Current owner invites incoming owner to create admin account under Settings >> Administrators. Link to manual: Add a new administrator 2) The new owner fills in their contact details on their new account. 3) The current owner sends a message to Abicart customer service from their owner account, stating which admin account should become the new owner: - Administrator's email- Store ID The transfer will be completed immediately as soon as the request is processed. Send the request only when you want the change to be made. *A transfer agreement is drawn up between the old and new owner on their own. The agreement does not need to be sent to Abicart. 4) Abicart customer service updates the store so that the new administrator account (incoming) becomes the store's owner account. The old owner remains as the administrator. The new owner can now invite new administrators and remove already added administrators. Read more here:Link to manual: Add a new administratorLink to manual: How to delete an administrator 5) New owner reviews company information and makes sure store and admin are updated with correct informationSettings >> Store informationMy profileFooter in the themePages such as "Terms & info"Done!*Please note that your admin account is personal and can be linked to multiple stores. Do not hand over your admin account. A new administrator will instead be invited to their own account via "Add a new administrator".
-

Postnord Skicka Direkt - Postnord TA
27 Nov 2025
Postnord Send Direct is available as an integration under Settings >> External connections >> Postnord TA.Integration to Postnord TA is included in Abicart Pro at no extra cost.Checklist before starting the integration:You need to enter the weight of all products in Abicart. We cannot export products without weight.Store information:Enter the address and company information under Settings >> Store information.Reason: We cannot download Postnord's templates, instead we have to create our own templates using the information on this page. The reason is that it is not possible to download Postnord's templates via their API as they belong to the Send Direct portal and cannot be accessed externally.Information required to set up the integration:Account number:Create an account at https://www.postnord.se/ and copy your account number (customer number).API keys:With the customer number, create an account at https://developer.postnord.com/. Once you are logged into the Postnord developer account, go to My Profile >> Apps and copy the API keys.API keyEORI numberThis is mandatory if you plan to use customs declaration declarations.Add this information to the Postnord Integration settings page.Combination to use for different conditions:Once you have entered all the information, you can control the shipping settings under Settings >> Shipping >> select delivery method >> Edit >> Export complete order: (Placed / Paid / Manual)Export shipments individually: (manual, this does not include marking the order as "shipped")Export shipments/orders after the order is marked as "shipped".Mark the exported order as shipped:Manual activation during the order page: (Note: this only works before the shipment is marked as "shipped")Print Zebra labels from your browserProgram to print (zebra) .zpl labels from your browser on a Windows computer. Can be used with Abicart integration to Postnord TA included in Abicart PRO at no extra cost.Abicart ZPL PrintApp for WindowsBenefits:Postnord supports export of multiple shipments. You can set up the integration to export multiple shipments from the same order to Postnord automatically or manually.If the "Customs declaration" section of our Postnord settings is set to CN22 or CN23, we will export customs data to Postnord. We will export the information Postnord needs to process the customs declaration. Regardless of location.In multi-store systems, the specific information from each sub-store is used as labels on the orders in Postnord.Things to remember:You cannot use the integration against nShift or Postnord at the same time. If you want to use both, you can enable manual activation under Settings >> Shipping >> Edit shipping methods >> Postnord settings.We do not interact with shipping fees at all. Postnord's estimate is not something we can influence.If you have marked the order as "shipped", the only way to export the order is to use combination 3.Once an order has been exported, it cannot be removed from Postnord, nor can it be edited.Do not use both "Export shipment" and "Export order" unless you use "Manual activation". .
-

Add a new administrator
27 Nov 2025
If there are several of you working with the shop, you will need several admin accounts. The owner of a shop can add an account for a new user.Adding an account for a new userClick on Settings -> AdministratorsEnter the new administrator's email address, then click Submit.
-

Pre-payment
27 Nov 2025
Add a pre-payment method to the checkoutWhat is prepayment?It's a payment method you can add to your checkout. Customers place an order and then send the payment via bank transfer or bank account. Once you have received the money, you send the order to the buyer. You handle this payment method entirely on your own. You must check that the payment has been received before sending the order to the buyer.Add prepayment in the shopUnder Settings -> Payment methods -> Add new payment method -> select "Prepayment" and click on "Add". Tick "Akiv" on the payment method. In the "Detailed description" field, specify how customers will pay. For example, enter bankgiro, bank account or similar. Then click on "Add".
-

Your own invoice
27 Nov 2025
A payment method for own invoicesWhat is the invoice payment method?The invoice payment method is intended for use by shops that create their own invoices in a financial or business system and then send them out to the buyer. Create your invoices manually or in your financial systemPlease note that it is not possible to create invoices in the shop, they must be created manually or in a financial/business system.Enter the payment method in the shopGo to Settings -> Payment methods -> Add a new payment method -> Invoice -> click on "Add". The most important settings to consider are the following:ActiveTo activate the payment method in the checkout, you need to tick this box. NameEnter a name for the payment method, for example, "Invoice 30 days". Detailed descriptionHere you need to explain to the buyer how they will pay. Enter the bankgiro, post office or bank number and inform what rules apply. You send the invoiceRemember that this is a manual invoice that you handle entirely yourself. You create the invoice and send it to the buyer yourself. There will be no invoice created or sent out automatically by Abicart with this payment method.Use an invoicing service instead.One tip is to use one of the various invoicing services we support, such as Klarna Checkout. If you use their services, you as a shop owner will receive your money for the order within a few days and you will avoid problems with any invoices that are not paid. Apply for Klarna or DIBS today. You do this on the right-hand side of the home page in the shop's administration.
-

PayEx card payment
27 Nov 2025
Card payment service via PayEx.How do I get PayEx card payment?Contact PayEx and get an agreement with them on their site, http://www.payex.seActivate PayEx card payment in storeOnce you have an agreement with PayEx, you can add the payment method and activate it in the store. Go to Settings -> Payment methods -> in the "Add new payment method" list, select "PayEx card payment" -> click on the "Add" button. StatusHere you can see the basic settings of the payment method. Active - Check the box to activate the payment method at checkout.Default payment method for customer - Check if the payment method should be defaulted for all customers in the checkout. Only one payment method can be preset.Make available only for those customers or customer groups where I specify it - If you want to restrict the payment method for one or more customer groups, tick the box. You then select the payment methods that can be used for each customer group.Available for customer type - If you want to restrict the payment method to a specific type of customer (private or business), you can select it here. If "All" is selected, both customer types can use the payment method.Require buyer to enter personal/organisation number - A setting that forces the buyer to enter a personal number when making a purchase. This setting should only be activated on payment methods such as own invoice (not third party invoice services) and prepayment. We do not recommend forcing purchasers to enter a personal identity number for card payments.Do not allow alternative delivery address for this payment method - Turn off the possibility for the buyer to choose an alternative delivery address. The order can then only be sent to the address where the customer is registered.AccountMerchant account number - Enter your PayEx account number. This information is provided by PayEx.Encryption key - Enter your encryption key. This information is provided by PayEx.Debit method - This is a setting when the money will be deducted from the buyer's card. If you choose "Direct debit", the money will be deducted immediately when the buyer clicks on "Complete purchase". If you choose "Debit when order has been shipped", the money will first be reserved on the buyer's card. Then, when the order is marked as "shipped", the money will be deducted from the card. PayEx transaction callback - In order for the service to work correctly, you must log into PayEx admin and go to "Transaction callback". There you enter the following address: https://shop.textalk.se/backend/payex_ipn.phpNote that you will also need to enter the store's IP address in PayEx admin.The IP address is: 192.121.104.141
-

Swish Commerce
27 Nov 2025
Pay via Swish in the shop. What is Swish? Swish is a mobile money transfer application, launched by Getswish AB, owned by Sweden's six largest banks: Danske Bank in Sweden, Handelsbanken, Länsförsäkringar Bank, Nordea, SEB and Swedbank and Sparbankernas Riksförbund. The application enables fast payments between individuals' bank accounts by entering the recipient's mobile phone number instead of the account number.What is required to activate Swish?This integration supports "Swish Commerce"If you want to pay with Swish, you need to get "Swish Handel" via your bank. Get an agreement hereOnce the agreement is complete, you will receive a login to"Swish Certificate Management" where you create and manage your certificates.Note that Swish only works in Sweden with the currency SEK.Every 5 years you need to renew your TLS certificate. You do this by generating a new certificate and adding it to Abicart. See guide below.Activate Swish in the storeStep 1: Add Swish as a payment methodGo to Settings -> Payment methods -> Add new payment method -> Select "Swish" in the list and then click "+Add". Then click directly on "+ Add" again so that the payment method is saved.Step 2: Generate the CSRClick on the "How to" link after you have clicked on Swish under Settings>Payment methods.Step 3: Generate the CSRThen click on "Generate CSR"Now a code (a piece of text and numbers) is generated in a box below the button, it should look like the image below.Step 4: Copy the CSRCopy the CSR certificate that you just created. Click in the box with the certificate, all text will then be highlighted. Right-click and select "copy" (or CTRL + C).Step 5: Log in to the Swish portalOnce you have copied the CSR certificate, go to the Swish Certificate Manager:Click on the link marked in the image below or via this link: Swish Certificate Manager.Log in using BankID (Fill in your organization number, social security number and your Swish number to Swish Handel)Step 6: Create certificate in Swish certificate management6 a) Revoke old active certificates before new certificates can be created:6 b) Click "New certificate" 6 c) Click "Skip" in the view below:Note! Do not follow the steps "Create a CSR file". Just click "Skip" and continue to step 6 d)Now you are under the "Generate" step6 d) Paste the CSR certificate you created + copied in Abicart admin in the box below:6 e) Then click "Generate certificate"(If you are going to choose which format of the certificate you want to use, choose the .PEM format. Then click "Generate", you have then generated a TLS certificate that will appear directly on the screen).(Paste the CSR certificate you copied from Abicart. Do not upload a CSR file).6 f) Then click on"Done"Step 7: Download the TLS certificate you just created7 a ) Now you have a valid certificate (see the list of Certificates). Click on the eye (View) to bring up the TLS certificate:7 b) Now a box with text appears. This text is your TLS certificate. Carefully select all the text in the box and copy (CTRL + C). (It is important that everything is included. The certificate is your key for Swish to work)(You can also download the certificate and copy it from the file)Step 8: Add the certificate and Swish number to the payment method.8 a) Go back to Abicart's admin - Settings >> Payment methods >> Swish >> TLS certificate8 b) Paste what you copied in the TLS certificate field (see image below)8 c) Enter Swish number >> SaveStep 9: Testthe payment method in your checkout9 a) Mark the payment method as "Active" and go to checkout9 b) Click View Store and go to your store to make a test purchase:9 c) Test purchase: add a product to the cart >> go to checkout >> select Swish as payment method >> fill in your details >> accept the store's terms of purchase >> fill in your mobile number linked to Swish9 d) When Swish loads as shown below, you have ensured that you have entered everything correctly. You now have a working Swish! (If you want to test the entire order flow, you can of course complete the test order and cancel it when the test is complete)Settings and settingsActive - Check the box to activate the payment method at checkout.When you add the payment method for the first time, check NOT in "Active" directly, but save the payment method first. Then make all the other settings below. When everything is ready, check "Active" and save again.Default payment method for customer - Check if the payment method should be default for all customers in the checkout. Only one payment method can be preselected.Make available only for the customers or customer groups where I specify it- [Webshop Plus only] If you want to limit the payment method for one or more customer groups, check the box. You then select which payment methods can be used for each customer group.Require the buyer to enter the personal/organization number - Check the box if the personal/organization number should be mandatory at checkout.Available for customer type - If you want to limit the payment method to a specific customer type (private individual or company), you can select it here. If "All" is selected, both customer types can use the payment method.Do not allow other delivery address for this payment method - Turn off the possibility for the buyer to choose another delivery address. You can then only have the order sent to the registered address.Send payment status confirmation to the store owner - A setting that allows the store owner to receive an email when orders via this payment method are marked as paid.Turnoff the purchase of gift card items with this payment method - If you do not want to be able to purchase gift card items with this payment method, you can turn off the possibility via this setting.Your accountIn the Account box, enter the details you create in"Swish Certificate Management". You will receive the login from your bank.If the text "You must save the payment method before you can do anything here." appears, you must go back to the previous page and click on the green "+ Add" button at the top right first.Swish number - Enter the mobile phone number to which you have connected "Swish Handel".TLS certificate - Enter the TLS certificate you have generated.TLS certificate password - If your certificate is protected with a password, enter it here, otherwise leave the field blank.Name and descriptionName - There is already a default name for the payment method displayed at checkout, but if you want to enter a different name, you can do so here.Detailed description - Optional to enter a text that provides more information about the payment method.CurrenciesSet the currencies that will apply to the payment method. For Swish only SEK works as currency.Limitation with regard to order total[Abicart Plus only]This feature allows you to choose to display different payment methods at checkout depending on the total value in the cart.There are four different settings to control how the payment methods are displayed:No restriction. This shows the payment method regardless of how much the customer is shopping for.Hide if the order total is zero. Here the payment method disappears if the total amount in the cart is 0.Hide if the order total is greater than zero. The payment method is visible here if the total in the shopping cart is greater than 0.Hide if the order total is outside the specified range:With the last option, you can choose to hide the payment method if, for example, the order total is lower than 500 kr:ShreddingWhen you cancel an order paid with Swish, the full amount will be refunded to the buyer. Unfortunately, it is not possible to partially credit, only the full amount can be credited.
-

Lock payment method to currency and country of delivery
27 Nov 2025
In this manual, we'll walk you through how to lock a payment method to currency and country of delivery. This allows you to control which payment method is available to customers from other countries.In the following example, we will add that customers from abroad cannot shop in SEK when they choose Klarna V3 at checkout.Here's what you do:1) Click on Settings2) Click on Payment methods3) Klicka Välj betalningsmetod välj betalningsmetoden i listan - här väljer vi Klarna Checkout V3.4) Click Save5) Go through the payment method settings and fill in the API keys you received from the payment method. Link to manual: 9 easy steps to get your store up and running! >> Add payment methods6) Save7) Select the currency for which the payment method should be available, in this case SEK8) Select the country for which the payment method should be available, in this case Sweden9) Save again10) Repeat steps 3) to 9) and create a delivery method for each currency/country restriction you want in the store.You use the same API keys for each payment method you recreate. The example shows 5 pcs of Klarna Checkout V3 with exactly the same keys. Only the currency/country separates them. If you have different payment methods against different countries, add currency + country to each payment method. For example, you might want Klarna for Sweden & Europe, Nets Easy for Denmark and Paypal for the US.Payment methods that can be set up multiple times with the same API keys are e.g. Klarna Checkout V3, Nets Easy & Svea Checkout. If you want to use e.g. Swedbank Checkout or you need to sign an agreement for each country.Example:Here you can see that we have locked different Klarna Checkout V3 to the target groups Sweden, Denmark, Norway, USA & Europe:When a customer selects the USA as the delivery country, only Klarna checkout - USA will appear at checkout. The customer can therefore only shop in USD.
-

Kustom Checkout
27 Nov 2025
Get paid with Kustom Checkout in your webshop. Here you will find information on how to apply and get started with the payment method.What is Kustom Checkout? Kustom Checkout is a so-called Checkout solution that includes several payment methods: invoice, partial payment, card payment and direct payment. Your customer can easily choose between different payment methods at checkout. You don't have to send out invoices and keep track of payments. In addition, Klarna takes the entire credit and fraud risk. That means you always get paid - no matter what. How to apply for Kustom Checkout? Own domain firstIn order to apply for Kustom Checkout, it is a requirement from our side that the store has its own domain, so you should not apply with the auto-generated domain you get when creating a demo store with us. Apply via the dashboard in Abicart Admin Step 1: Apply Step 2: Apply After you have completed step 1, a KYC form (Know Your Customer) will appear in the same box in admin where you started the application, where you need to provide additional information to complete the agreement. If there is any information missing from the initial form, these will also need to be filled in. You will also need to provide bank details needed for payments, this is also done in our admin under Dashboard in connection with the AML form. Step 3 When Kustom has reviewed the application and this is approved (should take about 24 hours), the payment method will be automatically added to the store, you will find settings for Kustom Checkout under Settings>Payment method. What you need to do to proceed is to place an order with Kustom Checkout as the payment method and set this order as paid in the order list in the webshop. After placing the test order, you should deactivate Kustom Checkout and reactivate the payment method after step 4 is completed. The payment method needs to be activated in order for it to be visible in the store. This is done under Settings -> Payment methods -> Kustom Checkout. #### Step 4 About 24 hours after the test order has been set as paid, Kustom will have accepted the application, this will also appear a note about this in admin. Your store can now take payment with Kustom Checkout as payment method! What does it cost to use Kustom Checkout? There are no fixed monthly costs or start-up fees with Kustom Checkout, but there is only a transaction fee per order completed with the payment method. This transaction fee is determined by the subscription you have with us. Managing orders with Kustom Checkout Every time you receive an order via Kustom Checkout, you need to activate the order when you send it to the customer. Go into the order, in the "Perform actions" box, make sure the "Charge (Kustom Checkout)" checkbox is selected and then click the "Perform selected actions" button. When this is done, the order is activated at Kustom and the customer is charged, or the invoice is sent to the customer. You can also activate the order in the order list. Then click on the icon with a lightning bolt at the far right. Cancel a Kustom Checkout order If a customer has changed their mind and you want to cancel the entire purchase, you can cancel the order. Go to "Orders", click on the order in question and then click on the cancel button in the top right corner. Then the order will be shredded in the store and a signal will also be sent to Kustom, which will shred the order there as well. It is not possible to partially cancel an order from the webshop, but this must be done in Kustom's portal. If you have a Plus or Pro subscription, it is possible to edit the order total in the webshop's order list. Kustom Checkout and multi-store system If you want to use Kustom Checkout in one or more stores in a multi-store system, the application needs to be made at the sub-store, not at the top level of the store system. To be able to do this, the setting "Own payment methods are set for each store" needs to be activated. The setting can be found under Store system -> Settings. When you apply for Kustom Checkout, it works for customer type "Private person". Contact Kustom's support to activate it also for customer type "Company". You can apply for Kustom Checkout with a individual company or limited company.
-

Domain: Add a domain name to your webshop
27 Nov 2025
How do I reassign my domain to the store? Buying a new domain Buy a domain from a hosting/domain provider, for example: Webb.se Loopia.se One.com (Abicart or Textalk do not currently sell domains.) If you buy a new domain just for your shop and your email, you won't need any web space. Your webshop is located on Abicart/Textalk's servers and it is included in the shop's subscription. So you only need to buy a domain name. In order to activate your own domain, your Abicart subscription needs to be active and your store needs to be visible. Read more about it here Replace and add a domain to the store Settings with the domain provider/web hosting company where you purchased your domain If you have any questions regarding any of these settings, please contact the support where you purchased your domain. Unfortunately, we are unable to provide support in other systems. Log in to your domain provider/web host.Go to the DNS management page. The location and name of this page varies depending on your provider, but is usually found under "Domain Management" or "Advanced Settings". You can point the domain in two ways: CNAME- or A-record (A-pager). CNAMEFor "CNAME-host or alias" enter your domain. At "CNAME destination" enter the following address: shop.abicart.se A-recordFor A-record (or A-pekers) enter the IP address: 192.121.104.141Save the changes. It may take a few hours for the changes to take effect. 192.121.104.141 Please remember to remark the domain both with and without www. For example www.abicart.se and abicart.se (without www). If an AAAA (IPv6) pointer exists for the domain names, these should be removed as services like Let's Encrypt will not work with this active.There must only be one pointer to our server. All other pointers must be removed. Settings in Abicart admin Go to Settings -> Domains and SEO -> tab "Domains". Enter the domain and then click "Add".If you have redesignated the domain both with and without www, you will also enter the second domain below the first. For example, www.abicart.se and abicart.se. URL settings Domain nameSelect the domain from the list.Language prefix (only if you have multiple languages in the store)Example /en/ for English, /dk/ for Danish, etc. SuffixIf you want a file extension on the addresses in the store, you can enter it here, for example html, php etc. This is only aesthetic and has no technical meaning. The most common is to leave this field blank. Folder structure You can control how the addresses (URLs) of the pages look like. If you check "Include the article groups in the URLs of the articles", the categories will appear in the links of the pages. For example: /clothes/women/pants/. This is good from an SEO point of view so you should have this box ticked. Article folderOptional field if you want an extra word in the address of article pages. If you want to have as short links as possible, you should leave this field empty. Folder for own pagesOptional field if you want an extra word in the address of your own pages. If you want the shortest possible links, leave this field empty. Home pageOptional field if you want an extra word in the address of the home page. If you want the shortest possible links, leave this field blank. Click the save button It will now take a few minutes for the domain to start working. It will then take a few hours before all filenames are generated correctly. All pages will work immediately but incorrect filenames may appear for the first 24 hours. Just wait and everything will eventually be correct. Indexing (may take a while)It will now take a few minutes for the domain to start working. It will then take a few hours before all filenames are generated correctly. All pages will work immediately but incorrect filenames may appear for the first 24 hours. Just sit tight and everything will eventually be right. If you get the following error message when trying to add the domain:The domain name [domain] is not correctly re-designated. It should be a CNAME pointer to shop.abicart.se (or an A pointer to 192.121.104.141 for the domain without www). Contact your domain provider for help.In this case, the repointing has not been done yet or the domain is not correctly repointed. In that case, you should wait an hour or two and try later or contact your domain provider's support and ask them to help you point the domain correctly. How do I create email addresses for my domain?Email accounts are managed by your domain provider. Contact the company where you purchased the domain and they will help you create email addresses.
-

Currency
27 Nov 2025
Activate multiple currencies, link currencies to each other, automatically updated exchange rates. How do currencies work in Abicart? All shops must have at least one currency for everything to work. If you have multiple currencies, you choose one currency as your base currency. How many currencies can I have in my shop? We support around 30 different currencies (SEK, EUR, USD, GBP and NOK are the most popular) and there is no limit to the number of currencies you can use. See a list of currencies hereMake sure that the payment methods you use in the shop support the shop's active currencies. Contact the respective payment company to find out which currencies are supported.How do I set the currencies?Go to Settings -> CurrenciesBy default, SEK is already enabled in the store and is displayed as a separate block. The name of the currency is on the left. In the middle there are three icons:A house - shows that this is the shop's current base currencyAn eye - Shows that the currency is visible in the shop.An open padlock - This shows that the currency is manual and not locked to another currency.To the right of the block is an icon with an arrow, click on it and the whole SEK block will fold out. Here you can see the settings for the points we went through above. Settings for a base currency, visible/hidden, and manual/locked. If you only have one currency activated, you don't need to make any settings here, everything is already set correctly. Enable multiple currenciesUnder Settings -> Currencies there is a block at the top titled "Currency settings". There is a list of all supported currencies. In this example, we already have SEK as the base currency and we add EUR as a second currency. Select "EUR: Euro" from the list and then click on "Add". The currency is now displayed in a separate block below the base currency that is prepended. The following settings are available: EuroThe name of the currency is displayed as well as a link, "Set as default". If you want to use this currency as the base currency (instead of SEK which is already the base currency), click on the link. ActivationBy default, all new currencies you add are hidden. This is so that you can add prices for all products, shipping costs, etc. In order for the currency to be visible in the shop and to be used, you must tick the "Visible" box." Remove this currencyAll currencies that are not base currencies have a link called "Delete this currency". It simply deletes the currency from the store. Pricing If you have multiple currencies there are two ways to set prices, manual or convert. The base currency is always "manual" which means that you have to enter specific prices for all products, shipping costs, etc. By converting prices, you link the currency to the base currency or another manual currency and do not have to enter prices manually for all products in the new currency. In this example, we want to link EUR to SEK. We select "Convert prices" and two new settings appear on the right. Currency exchangeHere a list of all manual currencies is shown and you can choose a currency to which you want to link this currency. In our example, we have only SEK as manual currency and it is already selected. RoundingHere is a function where you can choose to round the prices after they have been converted from the selected currency. Whole numbers, tens, hundreds, or no rounding.This will not work with manual currency Manual or automatic exchange rate?On the right-hand side of the top block of the page are the settings for "Manage exchange rates". The exchange rate is automatically updated dailyThis option allows the European Central Bank to automatically update the currencies every day according to the current exchange rate. Set the exchange rate manually for each currencyThis setting allows you to set your own exchange rate for each pegged currency. Keep in mind that currencies can rise and fall quickly, so if you have manually set exchange rates, you must keep track of the current rates and adjust them manually at regular intervals. Otherwise, there is a risk of having rates that are too low or too high. We recommend using the "Exchange rate automatically updated daily" setting to prevent this.
-

Languages
27 Nov 2025
Enable and manage multiple languages in the store. How do languages work in Abicart? When you start the demo shop, there is one language active and it is Swedish. If you want to have more languages in the shop, you can easily activate this under Settings -> Languages. What should I keep in mind when activating multiple languages? Standard words and phrases in for example the checkout are already translated but keep in mind that all products, product groups, custom content and themes need to be translated. You can do this manually or via import. More on this later in this article.Short film: enable multiple languages in your webshopEnable multiple languagesGo to Settings -> Languages.In the "Language settings" block there is a list of all languages. Select the language you want to add and click "Add", for example English.There is now a new block under English called "ENG: English". The language is hidden by default and the reason is to be able to translate the language before it is activated. There are also some other settings you can make:» Ange som standardActivationChoose to activate and hide the language. If hidden is selected, only the language is shown in admin.Do not activate a new language until all products, product groups, custom pages and the theme have been translated.Default currencySelect a default currency for the selected language." Delete this languageA link to delete the language. All translations for this language will be deleted if you delete the language.If you activate a new language and do not translate all products, the product will still be displayed but the name and description will be empty. You cannot therefore exclude certain products in a particular language but all products will be displayed in all languages.Use export and import to translate a new languageIf you have a lot of texts to be translated, it may be easier to do this in Excel than to go through the pages manually one-by-one in the administration. Then you can export a text file with the product ID and the base language and then enter the translations in a third column.Go to Settings -> Languages -> "Export" tab.Here are some selections you need to make before the file can be exported.Which language do you want to translate from?If you have the shop in Swedish and want to add English as a new language, select "Swedish (base language)" here. Then the Swedish texts will be displayed in a column in the file so that you can easily see which text will be translated into English.Which file format do you prefer?Here you have to choose which format the file should be exported to. There are three different ones to choose from:CSV - This is the most common format for a text file and can be opened in any spreadsheet program and works on Windows, Mac and most other operating systems.ODS - If you use the free Libre Office (or Open Office) software, you can choose this format.XLSX - If you use Excel, choose this format.If you are sending your texts for translation to a translation company, you should choose CSV as the format. If you are translating the texts yourself and use Excel as your spreadsheet, choose XLSX as the format.What data do you want to include?Select the different properties of the store that you want to translate. If you have several different themes, you can choose between all of them at the bottom. By default, the active theme is exported.Then click on the export button and save the file on your computer.What does the file look like and how do I translate?Once you have exported a file and opened it in Excel (or whatever spreadsheet program you use), the file should look something like this.It contains three columns:KeyThis is the ID number that identifies the text. The text in this column must not be changed.ContentColumn B contains the basic language texts. These are the texts to be translated.TranslationIn column C you enter the translation of the texts in column B (content).Once the translation column has been translated, save the file.Importing translationsOnce you have translated a file, you can import it under Settings -> Language -> Import. There is a choice to be made here first.Choose language to importIf you have translated English and want to import it as a new language, you must first add the language under Settings -> Language (it may still be hidden). Then select the language from the list here.Select the file you want to importSelect the file with the translation from your computer and then click on the import button in the top right corner.Then just wait for the import to finish.
-

Domains & SEO
27 Nov 2025
Connect the domain to the store and set the store URLs Under Settings -> Domains & SEO, set META titles, META descriptions and link domain and set store URLs.Title and keywordsHome page titleThe page title (TITLE tag) is important information for search engines.For example, enter the name of the shop in this field.Titles for product groupsand productsEnter here the basic design of the title for product groupsand products. The title can be customized in detail for each group or product.KeywordsMETA keywords for search engine indexing. Create a comma separated list of keywords, e.g. car, boat, airplane. Google doesn't care about keywords anymore - you may want to keep this in mind. So focus on a good description instead.DescriptionMETA description for search engine indexing. Enter a descriptive text for the store. This text is displayed in the browser when a search result is displayed for your store.DomainsTo connect one or more domains to your shop, you must first activate your shop and make it visible. You also need to make certain settings with your domain provider/web host.You can point the domain in two different ways:CNAME towards shop.abicart.seA-pointer (A-record) to IP address: 192.121.104.141.It is not possible to re-point the domain via name servers (name servers) but only via CNAME or A-pointer (A-record).Once this is done, you can add the domain to the store. Then go to Settings -> Domains & SEO and click on the "Domains" tab. Add the domains you have pointed to (with and without www).URL settingsHere you influence how the addresses of the different pages in the shop should look like. Each page's full address is created from the name of each product, product group, own page, etc. After saving the settings on this page, new addresses will be created for all pages in the shop.The old addresses will remain and redirect the visitor to the new ones for three months. If you have added your own links directly in e.g. your own page or product group, you will need to re-link according to the new settings. After you have saved the settings, the new addresses will be generated and you cannot change the settings while the generation is in progress.Domain nameSelect the domain from the list.Language prefixIf you have only one language, you should not use any language prefix at all. You leave this field empty. If you have the same domain linked to several languages, you must use language prefixes. You usually do not enter a language prefix in the base language, but in all other languages you enter a prefix. For example, /en/ for English, /dk/ for Danish, etc. SuffixIf you want a file extension for the addresses in the shop, you can enter it here, such as html, php, etc. This is purely aesthetic and has no technical significance. The most common practice is to leave this field empty. Folder structure You can control how the page addresses (URLs) look like. If you check "Include the product groupsin the URLs of the articles", the categories will appear in the links of the pages. For example: /clothes/ladies/pants/. This is good from an SEO point of view so you should have this box checked. Folder for articlesOptional field if you want an extra word in the address of product pages. If you want as short links as possible, you should leave this field empty. Folder for own pagesOptional field if you want an extra word in the address of your own pages. If you want to keep the links as short as possible, you should leave this field empty. Home pageOptional field if you want an extra word in the address of the home page. If you want the shortest possible links, you should leave this field empty.
-

Email settings
27 Nov 2025
The store's miscellaneous email settings. What are e-mail settings? Here you can find settings to specify the different shop email addresses to be used for communication to and from your customers. Enter your email addresses in all fields.You cannot create email addresses for your domain here in the shop, but you can do this with your domain provider/web host where you bought your domain. Contact their support for help setting up email accounts and managing your email addresses. E-mail ordersThe address where your copy of the order confirmation will be sent. Max one email address in each field. Click the "Add another email address" button if you want to add more. Customers will receive the email address you enter in this field as the return address on their order confirmations. Note that the store owner will receive a different return address, shop-orders@abicart.se instead. The reason is to minimize the risk of the order confirmation getting stuck in spam.E-mail order senderSending address for order confirmations. You can only have one email address as sender. NOTE!!! If you enter multiple email addresses in this field, no order confirmations can be sent out, neither to customers nor to the store.E-mail contactEnter an e-mail address to be used when customers contact the store via the contact form (Own pages -> Contact form).E-mail newsletterSending address for newsletters. You can only have one e-mail address as sender. E-mail address for alertsE-mail address used as sender address when sending out article alerts.Custom SMTP settingsIf you want to have full control of all the mailings that are sent out and also monitor statistics, you can use your own SMTP server. Enable the feature and choose a predefined provider or set your own details for your mail server. This is an advanced feature and if you choose to use it, we at Abicart cannot provide support in case it does not work. Instead, you should contact your web host or the company responsible for the SMTP server for troubleshooting.If you have not entered your own SMTP details, all sends are made from Abicart's mail servers and masked so that to the recipient it looks like it has been sent from your email address. A disadvantage of not using your own SMTP server is that the emails sent out can sometimes be interpreted as attempts to netfishing where the real sender is hiding behind another email address.
-

Bulky products
27 Nov 2025
Tag products as bulky to direct them towards a specific delivery method. What is a bulky product? In Abicart, we have two ways of determining the shipping fee and it is either a flat fee on the whole order or a weight-based fee. However, if you are sending orders that may not weigh much but have a large volume, it can be difficult to set the correct charge via weight ranges. You can then tag a product as bulky to lock it to a specific delivery method. How does it work?Many shops that sell online and have a physical store usually create a delivery method called "Pick up in store" and set it to handle bulky products. Then customers will only be able to choose to pick up the order on site.Enable bulky on the productsGo to Products -> select a product and edit.Scroll down to the "Shipping" box in the right-hand column on the desktop. Check the box "Bulky" and don't forget to save.Enable bulky products on delivery methodsGo to Settings -> Shipping -> select delivery method, edit.In the "Settings" box on the right, there is a drop-down list at "Bulky".There are three settings:All - Both bulky and non bulky productsDisable for bulky productsEnable if cart has bulky productThe default setting is "All" and should be used if you have only one delivery method for all products.For example, if you have two delivery methods, "Standard delivery" and "Pickup at store" and want bulky products to be handled only by "Pickup at store", you should set the following:Standarddelivery: "Disable for bulky products."Pickup at store: "All - Both bulky and non-bulky products"In practice, it will work so that if you have a bulky product in the shopping cart, only "Pickup at store" will be visible in checkout. If you do not have a bulky product in the cart, both delivery methods will be visible.
-
Pricing files
27 Nov 2025
Price file (product feed) to various price comparison services such as Prisjakt, Pricerunner, Ciao, Kelkoo and Prisvis.What is a price file?To list your products on external sites, such as price comparison sites, you need a product file (or product feed) that you upload to the external site. These price files can vary a bit but are usually text files (CSV) or XML files. If it is a product feed, you usually enter a URL to the products.The file/feed contains product information: product name, description, link to product images, price, etc.To access a price file/feed for Google Shopping, Facebook Catalog, and Instagram, an additional service, "Product feed for Google Shopping and Facebook Catalog" is required and can be purchased in the store under "My subscription".Which price files do you support?At the moment we have ready-made solutions for Prisjakt, Pricerunner, Ciao, Kelkoo, and Prisvis. We also have a feed for Google Shopping and Facebook Shopping.Activate price files in the storeGo to Settings -> External links -> Price comparison system.In the "Price comparison sites" box, activate the product feed(s) you want to use by clicking the "ON" button.This will display a URL to the product feed. This URL is then entered into the price comparison system.In the "Settings" box on the right, there are some choices to make.Allow external parties to download price-listsTo make the feeds available, "Yes" must be selected. In the case of "No" the feeds are hidden.General delivery time (if a product is not in stock) *Enter a text with a general delivery time for products that are not in stock. For example "2-5 days"The delivery method to be includedIn order for shipping to be included in the flow, a selection must be made. The list shows all the delivery methods of the shop as well as "Cheapest". Depending on the possible weight ranges of the delivery methods, the shipping fee can be dynamic. Please note that delivery methods with a weight limit may cause products outside their range not to appear in the price file.Other language or currency in the price fileThe URL displayed in the price file is based on the store's base language and the currency associated with that language. You can change the URL to show a different language, currency, etc. by adding different parameters to the URL.Parameterslang=xx - Swedish (1), English (2), Norsk (3), Deutsch (4), Dansk (5), Suomi (6)currency=xx - SEK (14), EUR (1), GBP (3), DKK (41), NOK (118)p (type of price file) - Ciao (6), Gula Priserna (4), Kelkoo (2), Pricerunner (3), Prisjakt (1), Prisvis (5), Spara30 (7)id=xxxx (store ID number)country (for delivery)shipmentMethod (delivery method)http://shop.textalk.se/pricefile/pricefile.php?id=xxxx&p=x&lang=xx&currency=xxExample of price file for Prisjakt, language: Danish, currency: DKKhttp://shop.textalk.se/pricefile/pricefile.php?id=xxxx&p=5&lang=5&currency=41Cache on price filesThe price file has a cache period of 5 hours. When the time has expired, the price file is regenerated on the first call.
-

How does the audience selector work?
27 Nov 2025
You can create target groups for different languages, currencies and delivery countries for visitors to choose from. Previously there were different language and currency options in the stores, but now we've built a new updated version. This means that as a store owner you can create different target groups and pre-define language, currency, price display with or without VAT and delivery country, and for example customers can see how much they have left for free shipping regardless of which delivery country they are shipping to.Why should I use the audience selector?There are many ways to use this function.If your store delivers to different parts of the world, you can create different audiences for different countries, for example. For example, you can create a target group for the USA where you set English as the language, USD as the currency, display the price excluding VAT and the country of delivery USA.If you only sell within Sweden, you can create two target groups, for example, one for private customers showing prices incl. VAT and one for business customers showing prices excl. VAT.Example of how the target group selector can look like in minimized mode. Only language and currency are shown here.Example of how the target selector can look in unfolded mode. When the customer clicks on the targeting selector, it unfolds and they can modify the settings for language, country of delivery, currency and VAT as they wish.Settings in the themeUnder Appearance -> Themes -> select theme, edit -> Content -> Audiences.There are two buttons, Add External Link and Add Audience, and two blocks, Button Options and Show Selection.Button optionsChoose what information to display in the audience selector. Current target group name, Language, Use the full name of the language instead of the 2-character code, Show currency name and Show VAT. You simply choose which options to display. In the picture above, only Language and Show Currency Name are selected.Show optionsYou can choose whether customers should only see your predefined target groups or whether they can change individual settings themselves.Create a target groupGo to Design -> Themes -> select theme, edit -> Content -> Audiences and click on the Add new audience button. There are several different fields here:NameEnter a name for the target group, for example "Sweden", "Private person - Sweden" or similar.IconSelect an image/icon of a flag or motif. If you want to use your own icon, you can upload the image to the file archive (Appearance -> File archive) and then link to the image by entering the image's URL.LanguageSelect the language to be used by the target audience. All active languages of the shop are displayed in the list. If you want to activate more than one language, go to Settings -> Languages.Country of deliverySelect a delivery country to be managed for the target group. The store's delivery countries are shown in the list. If you want to deliver to more countries, activate this under Settings -> Delivery methods.CurrencySelect the currency to be pre-selected for the target group. All active currencies of the store are shown in the list. If you want to activate multiple currencies, do so under Settings -> Currencies.VAT selectionSelect whether the prices should be displayed including or excluding VAT.Then repeat this step to create different target groups, for example for different countries and or individuals/businesses.
-

Pricing files
27 Nov 2025
Price file (product feed) to various price comparison services such as Prisjakt, Pricerunner, Ciao, Kelkoo and Prisvis."What is a price file?In order to list your products on external sites, such as price comparison sites, you need a product file (or product feed) that you upload to the external site. The format of these price files can vary a bit, but it is usually a text file (CSV) or an XML file. If it is a product feed, you usually enter a URL to the products.The file/feed contains product information: product name, description, link to product images, price, etc.In order to access a price file/feed for Google Shopping, Facebook Catalog and Instagram, an additional service, "Product feed for Google Shopping and Facebook Catalog" is required and can be purchased in the store under "My subscription".What price files do you support?At the moment we have ready-made solutions for Prisjakt, Pricerunner, Ciao, Kelkoo and Prisvis. We also have feeds for Google Shopping and Facebook Shopping.Activate price files in storeGo to Settings -> External links -> Price comparison system.In the "Price comparison sites" box, activate the product feed(s) you want to use by clicking the "ON" button.A URL is then displayed that goes to the product feed. This URL is then entered into the price comparison system.In the "Settings" box on the right there are some choices you have to make.Allow external parties to download price listsTo make the feeds available, "Yes" must be selected. In case of "No" the feeds are hidden.General delivery time (if a product is not in stock) *Specify a text with a general delivery time for products that are not in stock. For example, "2-5 days"Delivery method to be includedIn order for shipping to be included in the flow, a choice must be made. The list shows all the store's delivery methods as well as "Cheapest". Depending on any weight ranges on the delivery methods, the shipping charge may be dynamic. Please note that delivery method with weight restriction may cause products outside its range not to appear in the price file.Other language or currency in price fileThe URL displayed in the price file is based on the store's base language and the currency associated with that language. You can change the URL to show a different language, currency, etc. by adding different parameters to the URL.Parameterslang=xx - Swedish (1), English (2), Norwegian (3), Deutsch (4), Dansk (5), Suomi (6)currency=xx - SEK (14), EUR (1), GBP (3), DKK (41), NOK (118)p (type of price file) - Ciao (6), Gula Priserna (4), Kelkoo (2), Pricerunner (3), Prisjakt (1), Prisvis (5), Spara30 (7)id=xxxx (store ID number)country (for delivery)shipmentMethod (delivery method)http://shop.textalk.se/pricefile/pricefile.php?id=xxxx&p=x&lang=xx&currency=xxExample price file for Prisjakt, language: Danish, currency: DKKhttp://shop.textalk.se/pricefile/pricefile.php?id=xxxx&p=5&lang=5&currency=41Cache on price filesThe price file has a cache period of 5 hours. When the time has expired, the price file is regenerated on the first call. "
-

Postcode controlled tariffs
27 Nov 2025
Restrict your delivery to certain postcodesWhat are postcode-controlled tariffs?If you don't want to deliver within an entire country, you can restrict the delivery method so that it only works for one or more different postcodes. For example, if you have a bakery and only want to deliver within Mölndal. Then you can specify to deliver only to postcodes starting with 431.How to do this?Go to Settings -> Shipping and choose a delivery method. Click on the delivery method and then on the tab "Link tariff to the delivery country". In this example, we want to add specific postcodes within Sweden, so we click on the block "Countries within the EU". In front of Sweden, a link, "Add", appears.A new window will open.In the box, you can enter text strings to control which postal codes the delivery method can deliver to.1234? - will match all that start with 1234 and have exactly one optional character after it.123* - will match all that start with 123 and have one or more optional characters after it1234[456] - will match all that start with 1234 and end with 4, 5 or 6In our example, we only want to deliver to Mölndal and enter 431*Then click "Done".The add link has then changed to "Edit".Then click the save button in the top right corner. Done.
-

Shipping and delivery: how do I create my delivery methods?
27 Nov 2025
Here we explain how to create, set up and edit your shipping and delivery methods. We explain the shipping cost, VAT rate, charge per weight and how to differentiate between shipping countries etc.Video guide (in swedish)Create a delivery methodGo to Settings -> Shipping -> the "New delivery method" button in the top right corner.First choose under "Properties" to name the method, e.g. "Standard delivery" or "Postnord" and then add a descriptive text around the method (optional to do). There are also some settings to go through, such as "Disable for bulky items", "Available for customer type" and "Free shipping over certain purchase amount". Then you save the delivery method.Note that the delivery method becomes active, even if you don't tick the box, and then you need to untick the box and save again if you don't want customers to see it (assuming you've already activated their shop, otherwise it won't matter).First after saving, you can also choose to set that particular method as the default for the customer - so it appears immediately when the customer is about to check out. Freight ratesA freight rate is required if you want to charge a fee for the freight. Under the "Freight tariff" tab, select "Insert new tariff" in the right-hand corner, then enter a name for the tariff (not shown to the customer), e.g. "Sweden". Then you can enter a minimum weight in grams and a fee. A minimum weight is what makes the delivery method kick in at checkout - so if you set 1000 grams, the order must exceed this to appear in your checkout - then you save. Next, the "Set weight range" button appears where you can select different shipping charges for different weight ranges. For example:1-1000 grams = 49 kr1001-2000 grams = 69 kr2001-5000 grams = 99 kr5001... and so on. You can create as many tariffs as you want.Connect tariffs to shipping addressAfter your tariffs are created, it's time to connect them to different countries. There you will first see "Default tariff" where it says "No delivery" as default. You use this only if you want to use the same tariff worldwide, alternatively the same to the few countries/parts of the world and a single country with a different tariff. Under the standard tariff block there are different blocks for different continents, as well as "EU countries" and "European non-EU countries". If you only want to ship to single countries, click on the arrow on the right and set the tariff of the countries to which delivery can be made. You can also see how many individual tariffs are available under each block. It says 0 if you have chosen a Standard tariff. For each country there is also an "Add" link where you can choose to filter by postcode. Connect to customer groupsUnder the tab "Connect to customer groups" you can choose that the created delivery method will only be shown for customer groups that you choose yourself. There you are greeted by "Allow delivery method for" and in the dropdown menu "All customers" is the default. You can instead select "Specific customer groups" and then tick the customer groups to which the delivery method applies. If a customer comes to the checkout and is not in the selected customer group, the delivery method will not be displayed at checkout either. Bulky itemsUnder "Properties" you can click "Disable for bulky items", which means that the delivery method cannot be used by customers who want to order a bulky item. Each item has a checkbox that determines that it is bulky. If you choose to disable a delivery method for bulky items and at the same time sell items that are not bulky, you must also create another delivery method that is displayed to customers who come to checkout without bulky items. Advance by mailAdvance by mail is a shipping method within the Post Office. The "Allow payment by postal advance" option is checked if the customer must pay a fee before the shipment is delivered to the customer. The amount can be the value of the contents and often often the Post Office charges. If you tick Cash on Delivery, you will then be presented with some settings that need to be filled in, as well as the country in which Cash on Delivery will apply. Parcel TemplateThere is a tab under "Delivery Methods" called "Parcel Template". Here you can create different package templates where you enter a packaging weight and can then link a template to a delivery method.Click here to read more about parcel templates.Please note that the shipping fee does not apply......for those items where you have specifically chosen that the item should have free shipping. You do this on the article page under "Assortment". If the customer only comes to the checkout with items where you have clicked on "Free shipping", then no shipping fee will be charged via the delivery method. If the customer comes to the checkout with several items, one of which is set to free shipping but the others are not, the shipping fee will still be charged via the delivery method.
-

VAT: How does VAT work in the shop?
27 Nov 2025
Set the right VAT settings in the shopBrief summary of how VAT works for sales in Sweden:Individuals within the EU must pay Swedish VAT.Individuals and business customers outside the EU must not pay Swedish VAT.Business customers within Sweden must pay Swedish VAT..Corporate customers within the EU who provide a VAT number shall not pay Swedish VAT.Corporate customers within the EU who do NOT provide a VAT number shallpay Swedish VAT.General VAT informationUnder Settings -> VAT you need to make some basic settings for VAT to be handled correctly. The most important is to select the store's VAT country. If you have a shop in Sweden, you simply select Sweden as the VAT country. You then set a default VAT rate for the shop's items which is usually 25% (but can also be 0%, 6% and 12% depending on the type of items you sell). You also have to enter VAT for shipping, postage, invoice and advance payment. Note that you can enter a specific VAT rate for each product as well as for the shipping rates.Price management (in administration)You can choose whether to enter the prices in the administration including VAT or excluding VAT. If you have any integration with an external system, such as a business system or cash register system, you should choose to enter prices excluding VAT, as some systems require this.Presentation of prices (in the shop)Regardless of how you have chosen to enter the prices of the articles, you can choose to present the prices in the shop in a different way. You might get the prices excl. VAT from your supplier but want to show the prices to your visitors incl. VAT and then there is no problem but you can choose how to present the prices here, incl. VAT or excl. VAT.Note that the presentation setting does not control whether a customer should pay incl. or excl. VAT at the checkout. It is the country of delivery as well as the customer type that controls whether the order is paid with or without VAT. See the first paragraph at the top of this page for more information. Activate VAT for other countries - here's what to doFrom 1 July 2021, new VAT rules will apply to you if you sell goods or services to EU countries other than Sweden. Our platform has always supported VAT by country, but to double-check that everything is in order, do this:Go to Settings > VAT > General. Here you set your prices to be entered excluding/inclusive VAT.In the section on VAT by country of delivery, activate the countries where you want to sell your goods or services, and enter the VAT rate for each country. These settings become global settings and are then automatically applied to all your products in your webshop.If you need to make specific changes, you can do so at product level afterwards.Read more about the new VAT rules at the Swedish Tax Agency. VAT by country works with both "handling of prices" incl. and excl. VAT.
-

Facebook CAPI
27 Nov 2025
The Facebook Conversion API (CAPI) integration allows events to be sent to Facebook via our server instead of through the browserIt sounds similar to the Facebook pixel feature that exists today, but it works a little differently:You add the pixel/token in Abicart admin that enables this pixel/token on your site.Facebook uses this pixel/token to track events and conversion information for Facebook Ads ManagerHow is CAPI different from a Facebook pixel?Facebook CAPI is a complement to Facebook pixel and is primarily targeted at visitors who own an iOS device with a version 14 or higher.With Facebook pixel, all data collection is done through the visitor's browser, while in combination with CAPI it is sent through our servers.Facebook pixel: Facebook checks for events and retrieves data directly from the site based on the visitor's activity. It is a fairly reliable way, but with recent Apple privacy changes, the pixel could not always accurately track usage of your site.Some browsers may also choose to disable tracking via the pixel.Facebook CAPI can track this data even if the browser blocks pixel tracking so with CAPI you get more accurate data. Note that Facebook CAPI does not replace the Facebook Pixel but is a complement to it. Our integration ensures that no event or information is tracked twice if you have both the pixel and Facebook CAPI. If the information comes in via Facebook Pixel, we ensure that it is not duplicated when we send the information via CAPI, this is to ensure that the measurements are accurate.Step-by-step:Click Appearance -> Themes -> Edit Theme.Click Additions -> Facebook.Add a correct Pixel IDAdd a correct Access tokenSaveTo make sure it works, do this: Preview the themeNow you land in your store and that means we sent a "PageView" event both through the pixel and our serverClick on any product and a "ViewContent" event is trackedAdd a product to the cart and the "AddToCart" event is trackedHere is how you see the information: Go to Facebook Business AccountIn Business Account, select "Events Manager"Select "Your Pixel Integration"Events registered via both browser and server are listed hereRequirements from FacebookBusiness Manager - You will need a Business Manager account to use this API.Pixel ID: You need a pixel ID to use their Conversion API. If you already have a Facebook pixel for the site, we recommend using the same pixel ID for both browser and server events.Access token - To use this conversion API, you will need to generate an access token that is used as a parameter in each API request.There are two ways to obtain an access token:Through Events Manager (recommended), follow these steps:Select the pixel you want to implement in Events ManagerClick on the settings tabUnder the "Conversion API" section, click on Generate access token link under "Set up manually" and follow the instructions.Once you have your Access Token, click on "Manage integrations" in the "Overview" tab.Click on "Manage" next to Conversions APIThis will create a Conversion API app and users for you.No auditing or permission requests need to be made.By your own app:If you already have your own app in Facebook, you can generate access tokens in Business Manager.Go to Business settingsAssign a pixel to your system user. It is also possible to create a new system user in this mode.Select the assigned system user and click generate.No auditing or permissions requests need to be made.
-

Kustom Shipping Assistant (KSA)
27 Nov 2025
Get started with Kustom Shipping Assistant (KSA) in your storeKustom Shipping Assistant (KSA) is available with the latest version of Kustom Checkout - Link to the manual: Kustom Checkout V3 KSA can be set up in two ways: With your own shipping methods in Abicart (Your shipping methods are displayed in Kustom's checkout window). With external delivery methods from the TMS via Kustom (The delivery options available at the embedded TMS are shown in the Kustom checkout window). With external TMS , the customer can select the delivery point at checkout. *TMS= Transport Management System 1. KSA with your own delivery methods in Abicart Click here to access the manual: Kustom Shipping Assistant (KSA) - Shipping methods in Abicart. 2. KSA with shipping methods from external TMS via Kustom Click here to access the manual: Kustom Shipping Assistant (KSA) - Shipping methods via external TMS
-

General settings
27 Nov 2025
General store settings. Hide the shop, minimum order amount etc.The general settings for the store are available under Settings - General.Make your store visible or hiddenTo make your store visible you need to click Hide store. If you want to temporarily hide your store, check this box. (Only logged-in administrators have access to a hidden store.)Remember to press the green Save button.Minimum order amountIf you set an amount here, your visitors cannot place any orders below that amount. The limit refers to the total checkout amount including shipping and other charges, regardless of whether this total amount includes or excludes VAT.Text on address labelsUsed to insert e.g. the name and address of the store in address labels. The latter are created in the "Orders" tab.Export settingsDepending on which operating system and spreadsheet program you have on your computer, you need to make some export settings so that you can open the file correctly.Set how the file should be saved, for example comma separated with the character encoding UTF-8. Then all exports in the system (see below) will create the files in this format.Article export (Assortment → Export) [Webshop Basic and Plus]Orders (Orders → Export) [Webshop Basic and Plus]Customers (Customers → Export) [Webshop Plus]The checkbox for "Include delimiter on first line in file" is there to make it easier to open the file in newer versions of Microsoft Excel.Recommended settings for users with Microsoft ExcelDelimiter: comma Character encoding: ISO-8859-1 Also check the "Include delimiter" box.
-

Document and email content
27 Nov 2025
Below we go step by step through how to make various settings related to documents and email.Under Settings -> Document and Email Content there are two tabs, Email Content and Document Content.Email contentHere are settings to customize the content of order confirmations, receipts and delivery confirmations.Order confirmationsChoose which properties to display on the customer's order confirmation. It is also possible to add a custom text to be displayed on the order confirmation.ReceiptsSelect the properties to be displayed on the customer's receipt. It is also possible to add your own text to be displayed on the receipt.Delivery confirmationsActivate delivery confirmation when the order is marked as sent. Document contentHere are settings to customize the content of pick lists, delivery notes and print settings for the order documents.Pick listSelect the properties to be displayed in the printout of the picking list. Delivery noteSelect the properties to be displayed in the printout of the delivery note. Order documentHere are the language settings for the printouts, "Same as administrator" (the language selected in admin under "My profile") or "Customer's language". That is, the language chosen by the customer when the order was placed.